Every task, from opening the screen to checking that your change landed. Follow the
numbered steps exactly; the screenshot after each set matches the numbers.
ZZs4_1ZZ4.1Opening the Stock Management screen
Sign in to WHIMS. See section 3.1.
Find Inventory in the left-hand menu. If the group is folded up,
click the word Inventory to open it.
Click Stock Levels. The Stock Levels screen opens
(Figure 3 on page {{PAGE:s3_3}}).
Tip
Bookmark this page in your browser. It is the screen you will use most, and it is one click from
everything else in this guide.
ZZs4_2ZZ4.2Adding stock — Stock Take
Use this when units have arrived, or you have found units that the system does not know about, and
you want to increase the figure on one shelf.
Step 1 — Open the form
Go to Inventory → Stock Levels.
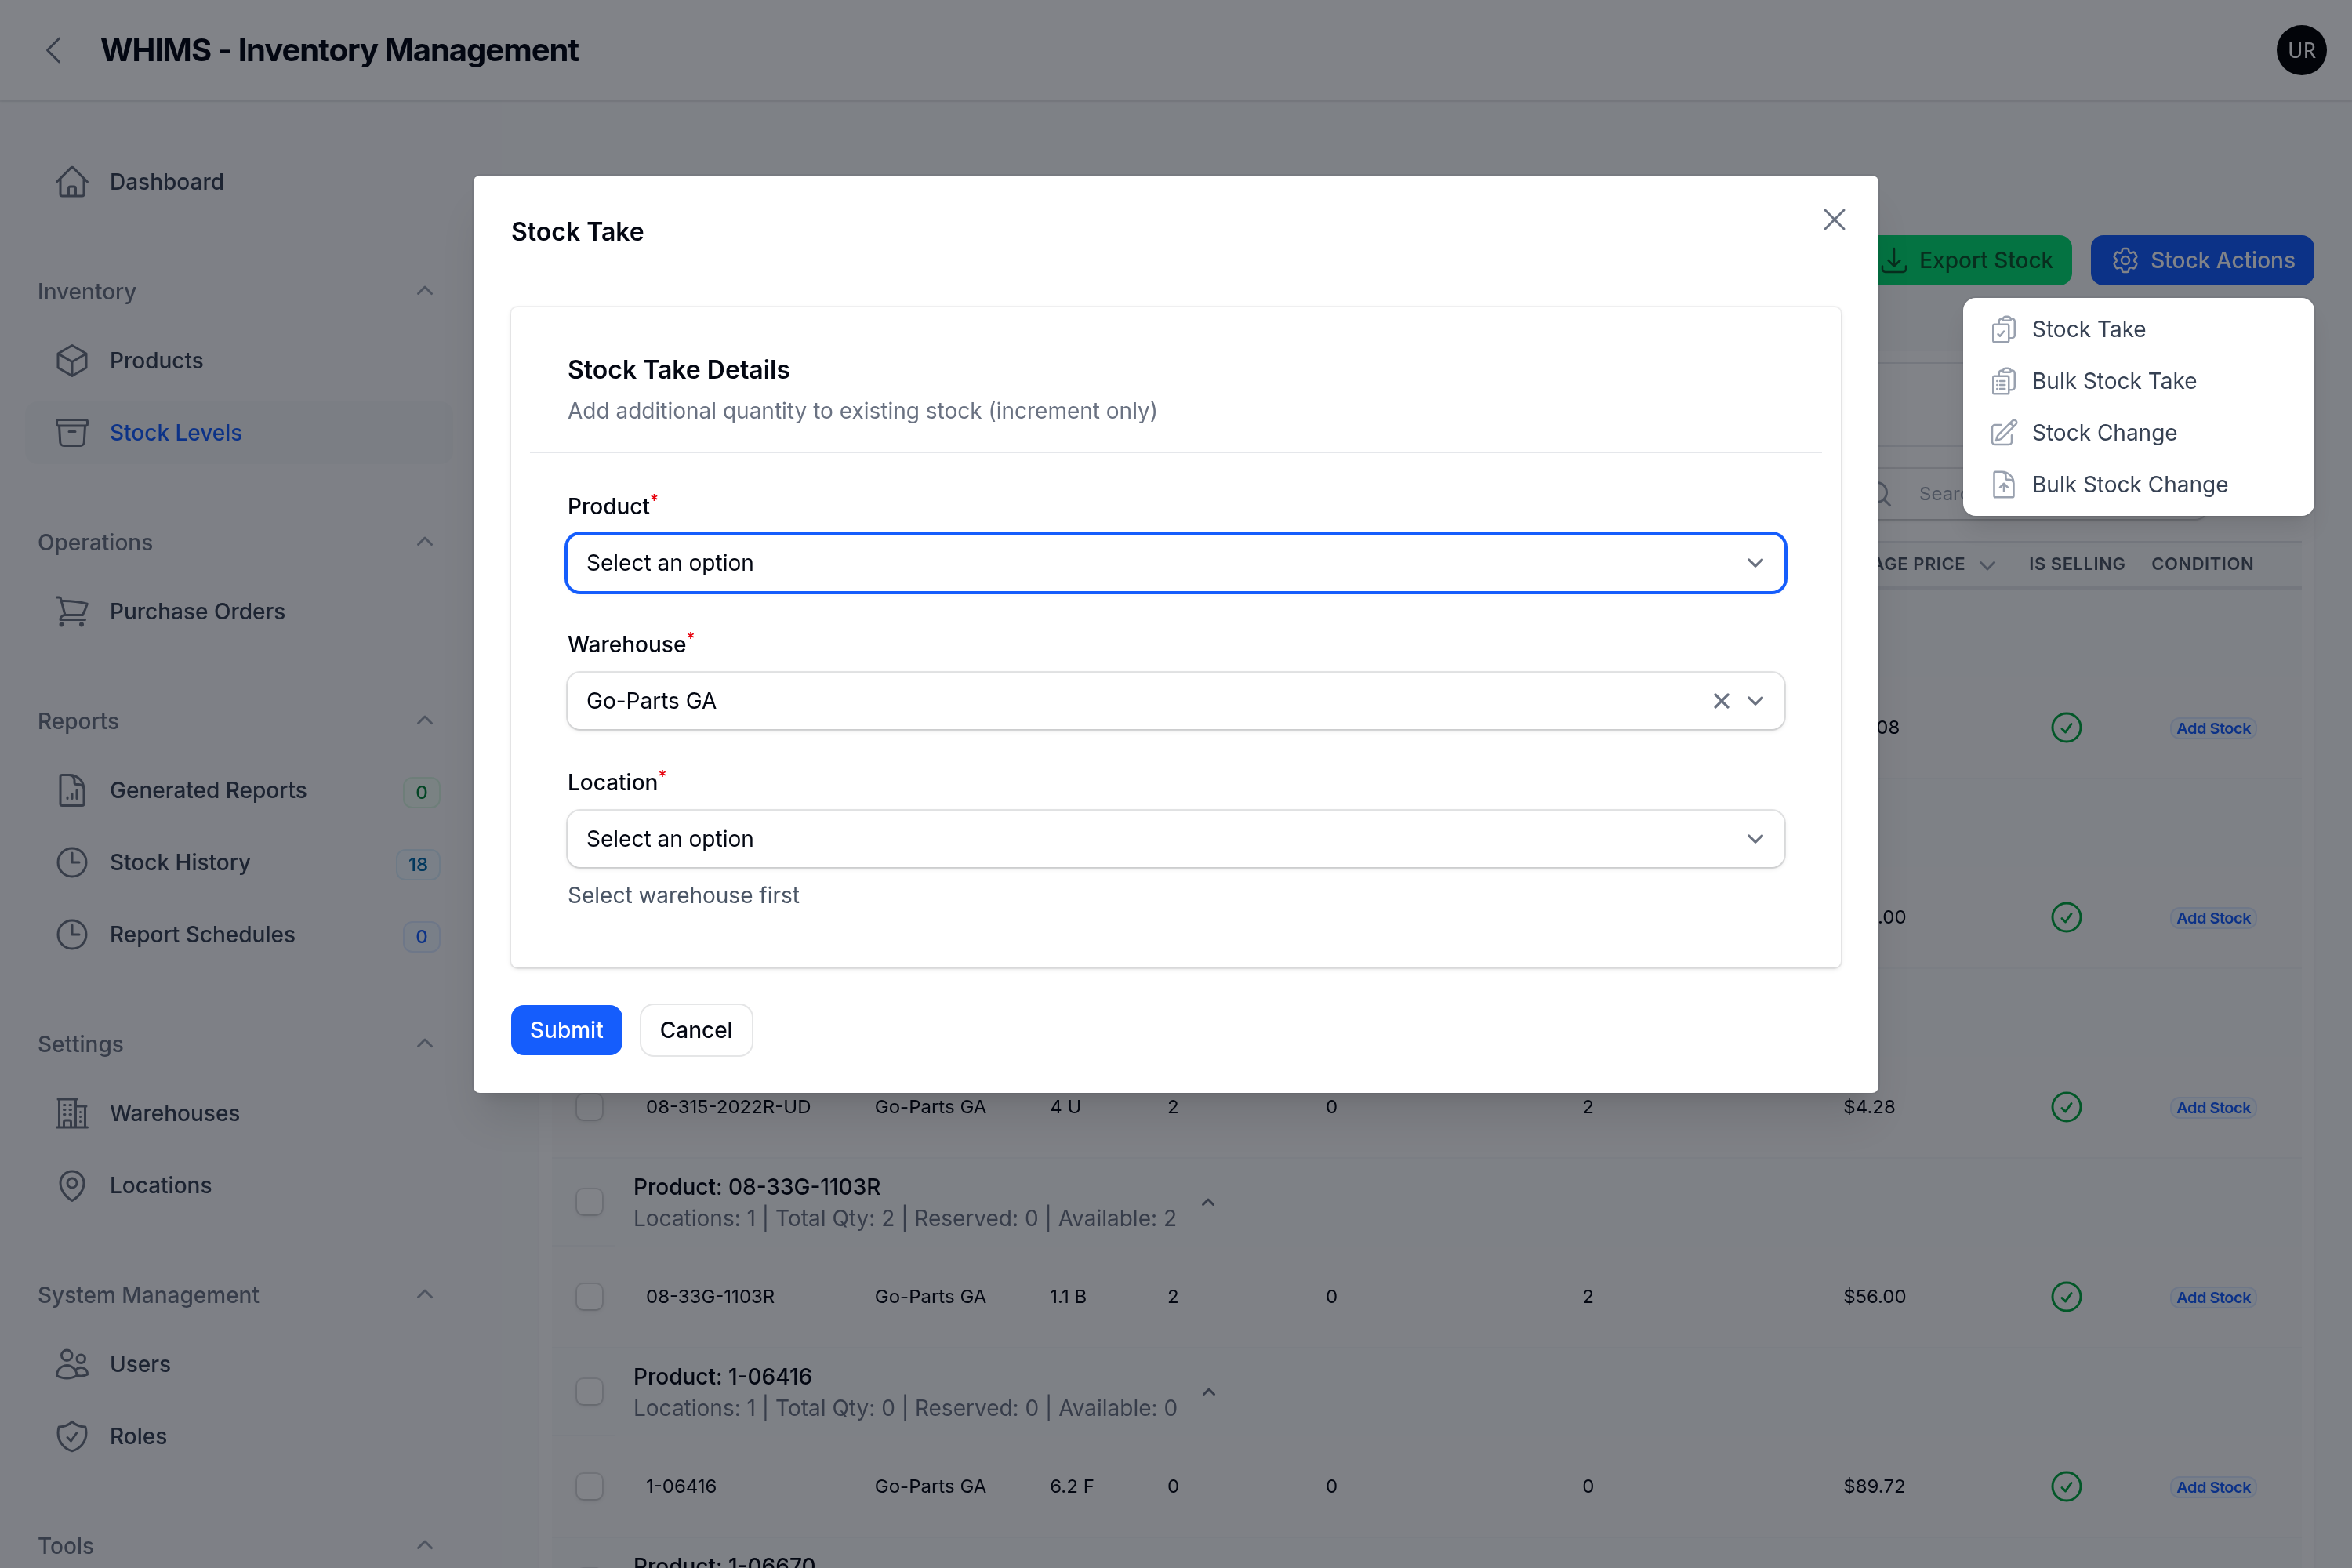
Click the blue Stock Actions button at the top right.
Click Stock Take. A window opens over the page.
Figure 6 — The Stock Take form when it first opens. Only three fields are visible.
The rest appear as you fill these in — this is normal, not a fault.
Step 2 — Choose the product
Click the Product box. A list appears with a search
box at the top.
Start typing the Product ID — for example 06-335-1903L. The list
narrows as you type.
Click the correct product in the list. Its name now appears in the box.
Tip
You can also search by supplier part number, Partslink number or part description. If nothing at
all is found, the product is not in WHIMS yet — see section 9.
Step 3 — Choose the warehouse and location
Check the Warehouse box. WHIMS pre-fills the first
warehouse. If you work at another site, click the box and pick the right one.
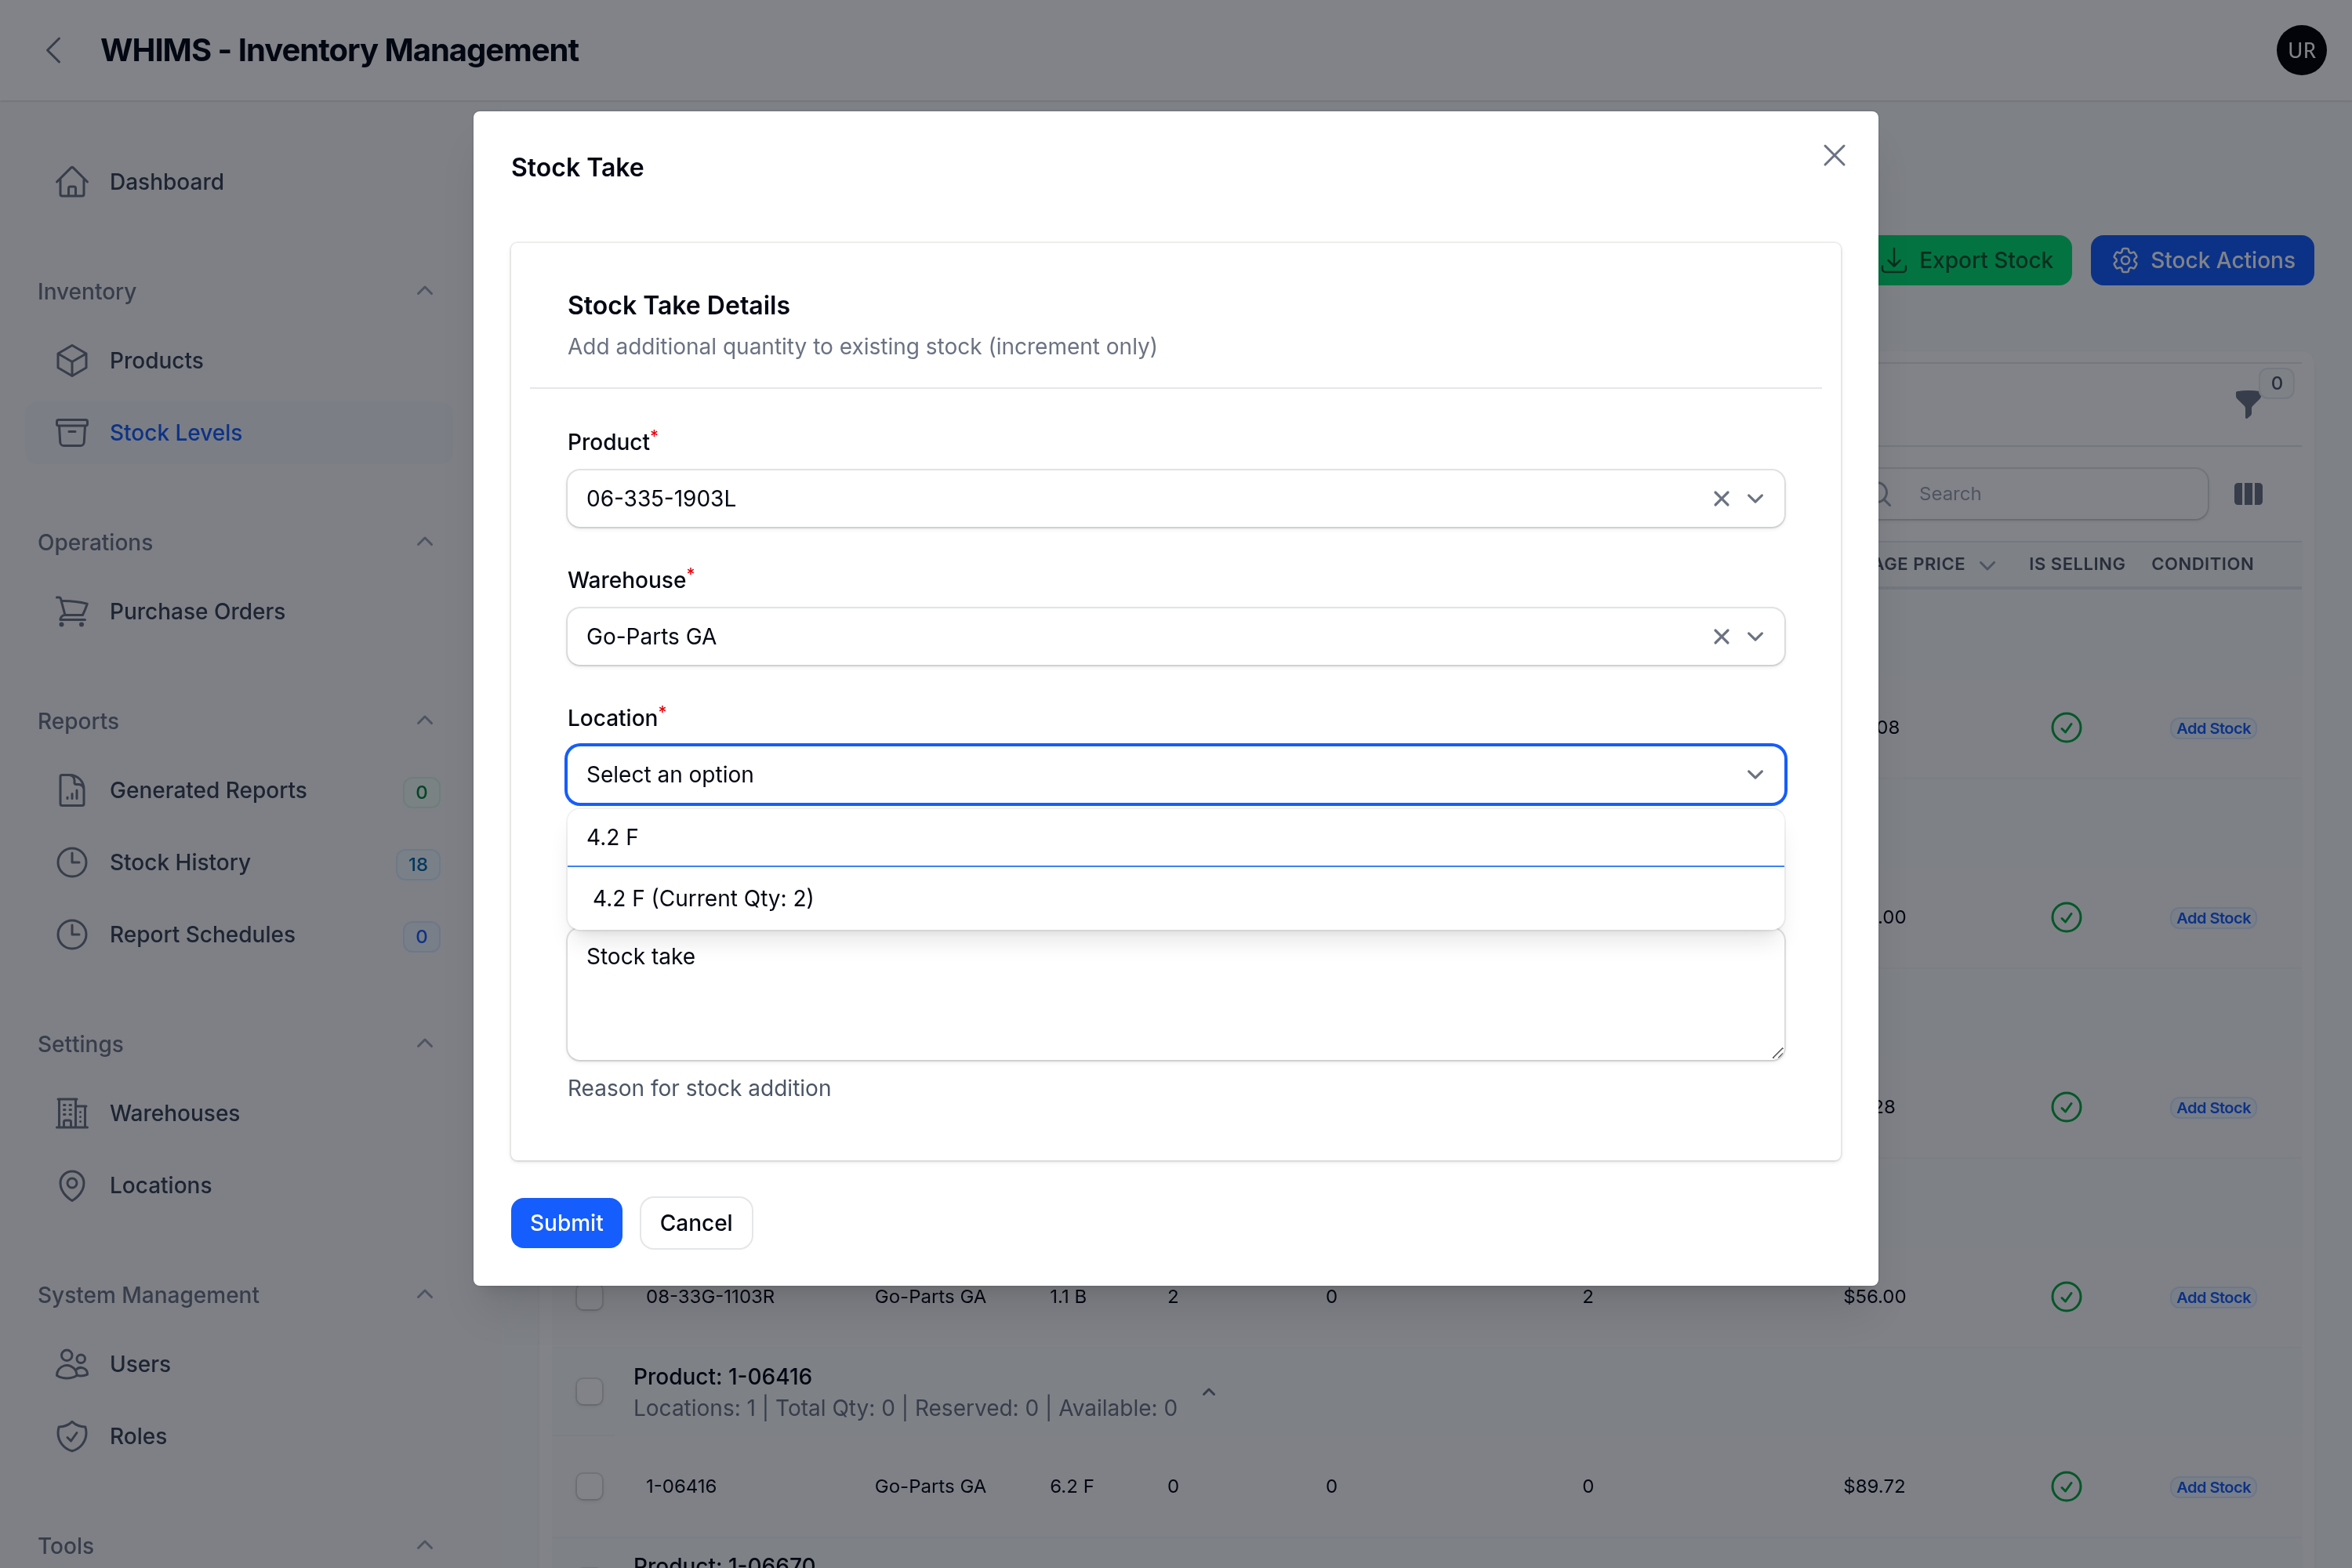
Click the Location box and pick the shelf. Only
shelves in the chosen warehouse are listed.
Figure 7 — The Location list tells you what is already on each shelf.
4.2 F (Current Qty: 2) means two units are there now. A shelf marked (No stock)
has none — picking it creates a brand-new stock record, which is perfectly normal when you are
putting a part somewhere for the first time.
Warning
Changing the product or the warehouse clears the location you had chosen. Always work
top to bottom: Product, then Warehouse, then Location. If you go back and change something above,
re-check the location before you submit.
Step 4 — Enter the quantity, price and reason
Type the number of units into Quantity to Add.
This is how many to add, not the new total. Whole numbers only, minimum 1.
Type the Unit Price if you know it. Optional. If you
enter one, WHIMS blends it with the existing price to work out a new weighted average for that
shelf. Leave it empty and the existing average price is kept.
Replace the Notes text with a real reason. It starts
off saying "Stock take". Change it to something a colleague could understand months later.
Step 5 — Save
Read the whole form once more — product, shelf, quantity.
Click Submit.
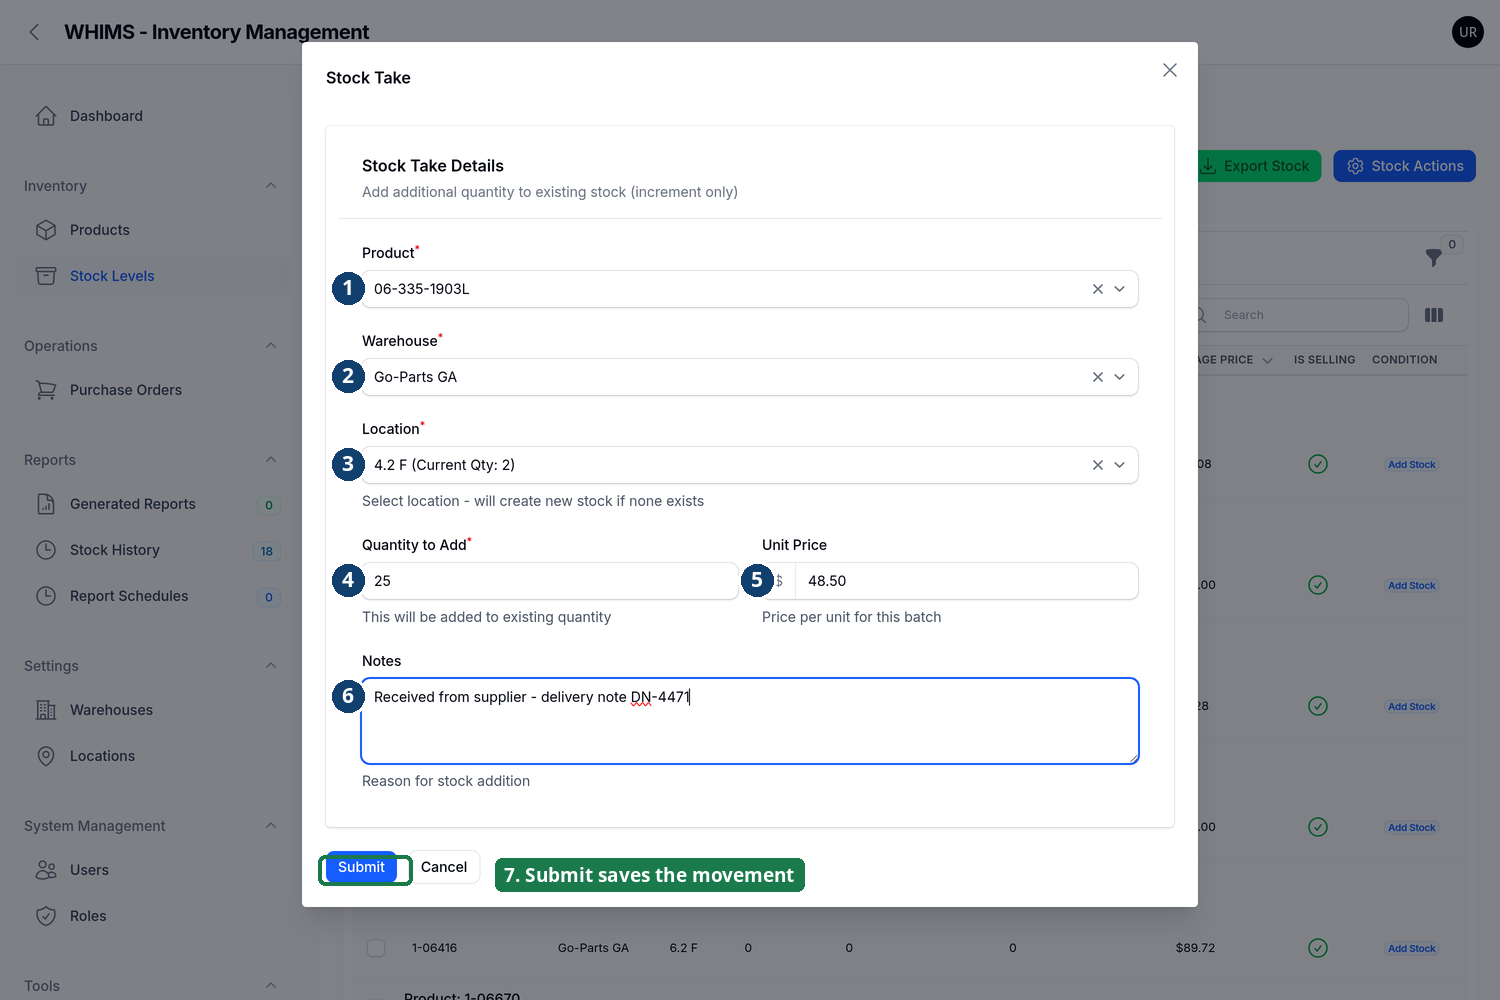
Figure 8 — A completed Stock Take. 1 Product. 2 Warehouse.
3 Location, showing the two units already there. 4 Quantity to Add — 25 units will be
added, giving 27. 5 Unit Price (optional). 6 Notes — the reason.
7 Submit saves it.
Step 6 — Read the confirmation
A green message appears at the top right:
Stock Take Successful — "Added 25 units. New total: 27" when the shelf already
held stock; or
Stock Take Successful — "Created new stock with 25 units" when the shelf was
empty and a new record was created.
If a red message appears instead, nothing was saved — see section 9.
Note — what if I get it wrong?
There is no undo. If you added 25 when you meant 5, open the product page and use
Adjust → Deduct from Stock for the difference (20), with a reason such
as "Correcting over-entry on stock take". Both entries stay in the history, which is exactly what an
auditor wants to see.
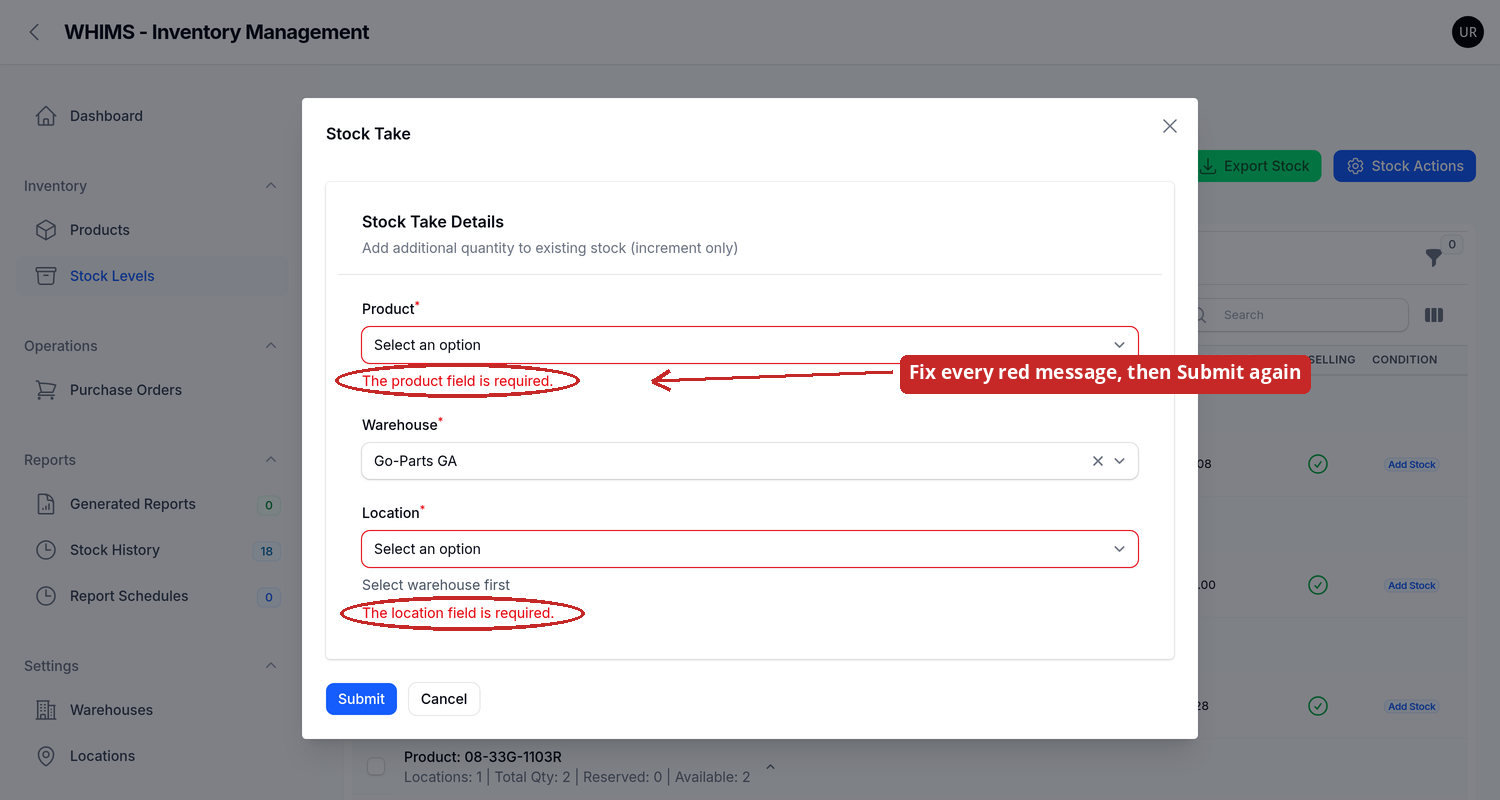
What happens if you submit an incomplete form
WHIMS checks the form before saving. Anything missing is marked in red and nothing is written
to your stock.
Figure 9 — Submitting with fields empty. The box turns red and the message
"The product field is required." appears underneath. Fill in every red field and click
Submit again.
ZZs4_3ZZ4.3Adding stock for many products — Bulk Stock Take
When a delivery covers dozens of parts, typing them one at a time is slow. Bulk Stock Take reads a
spreadsheet and adds every line in one go.
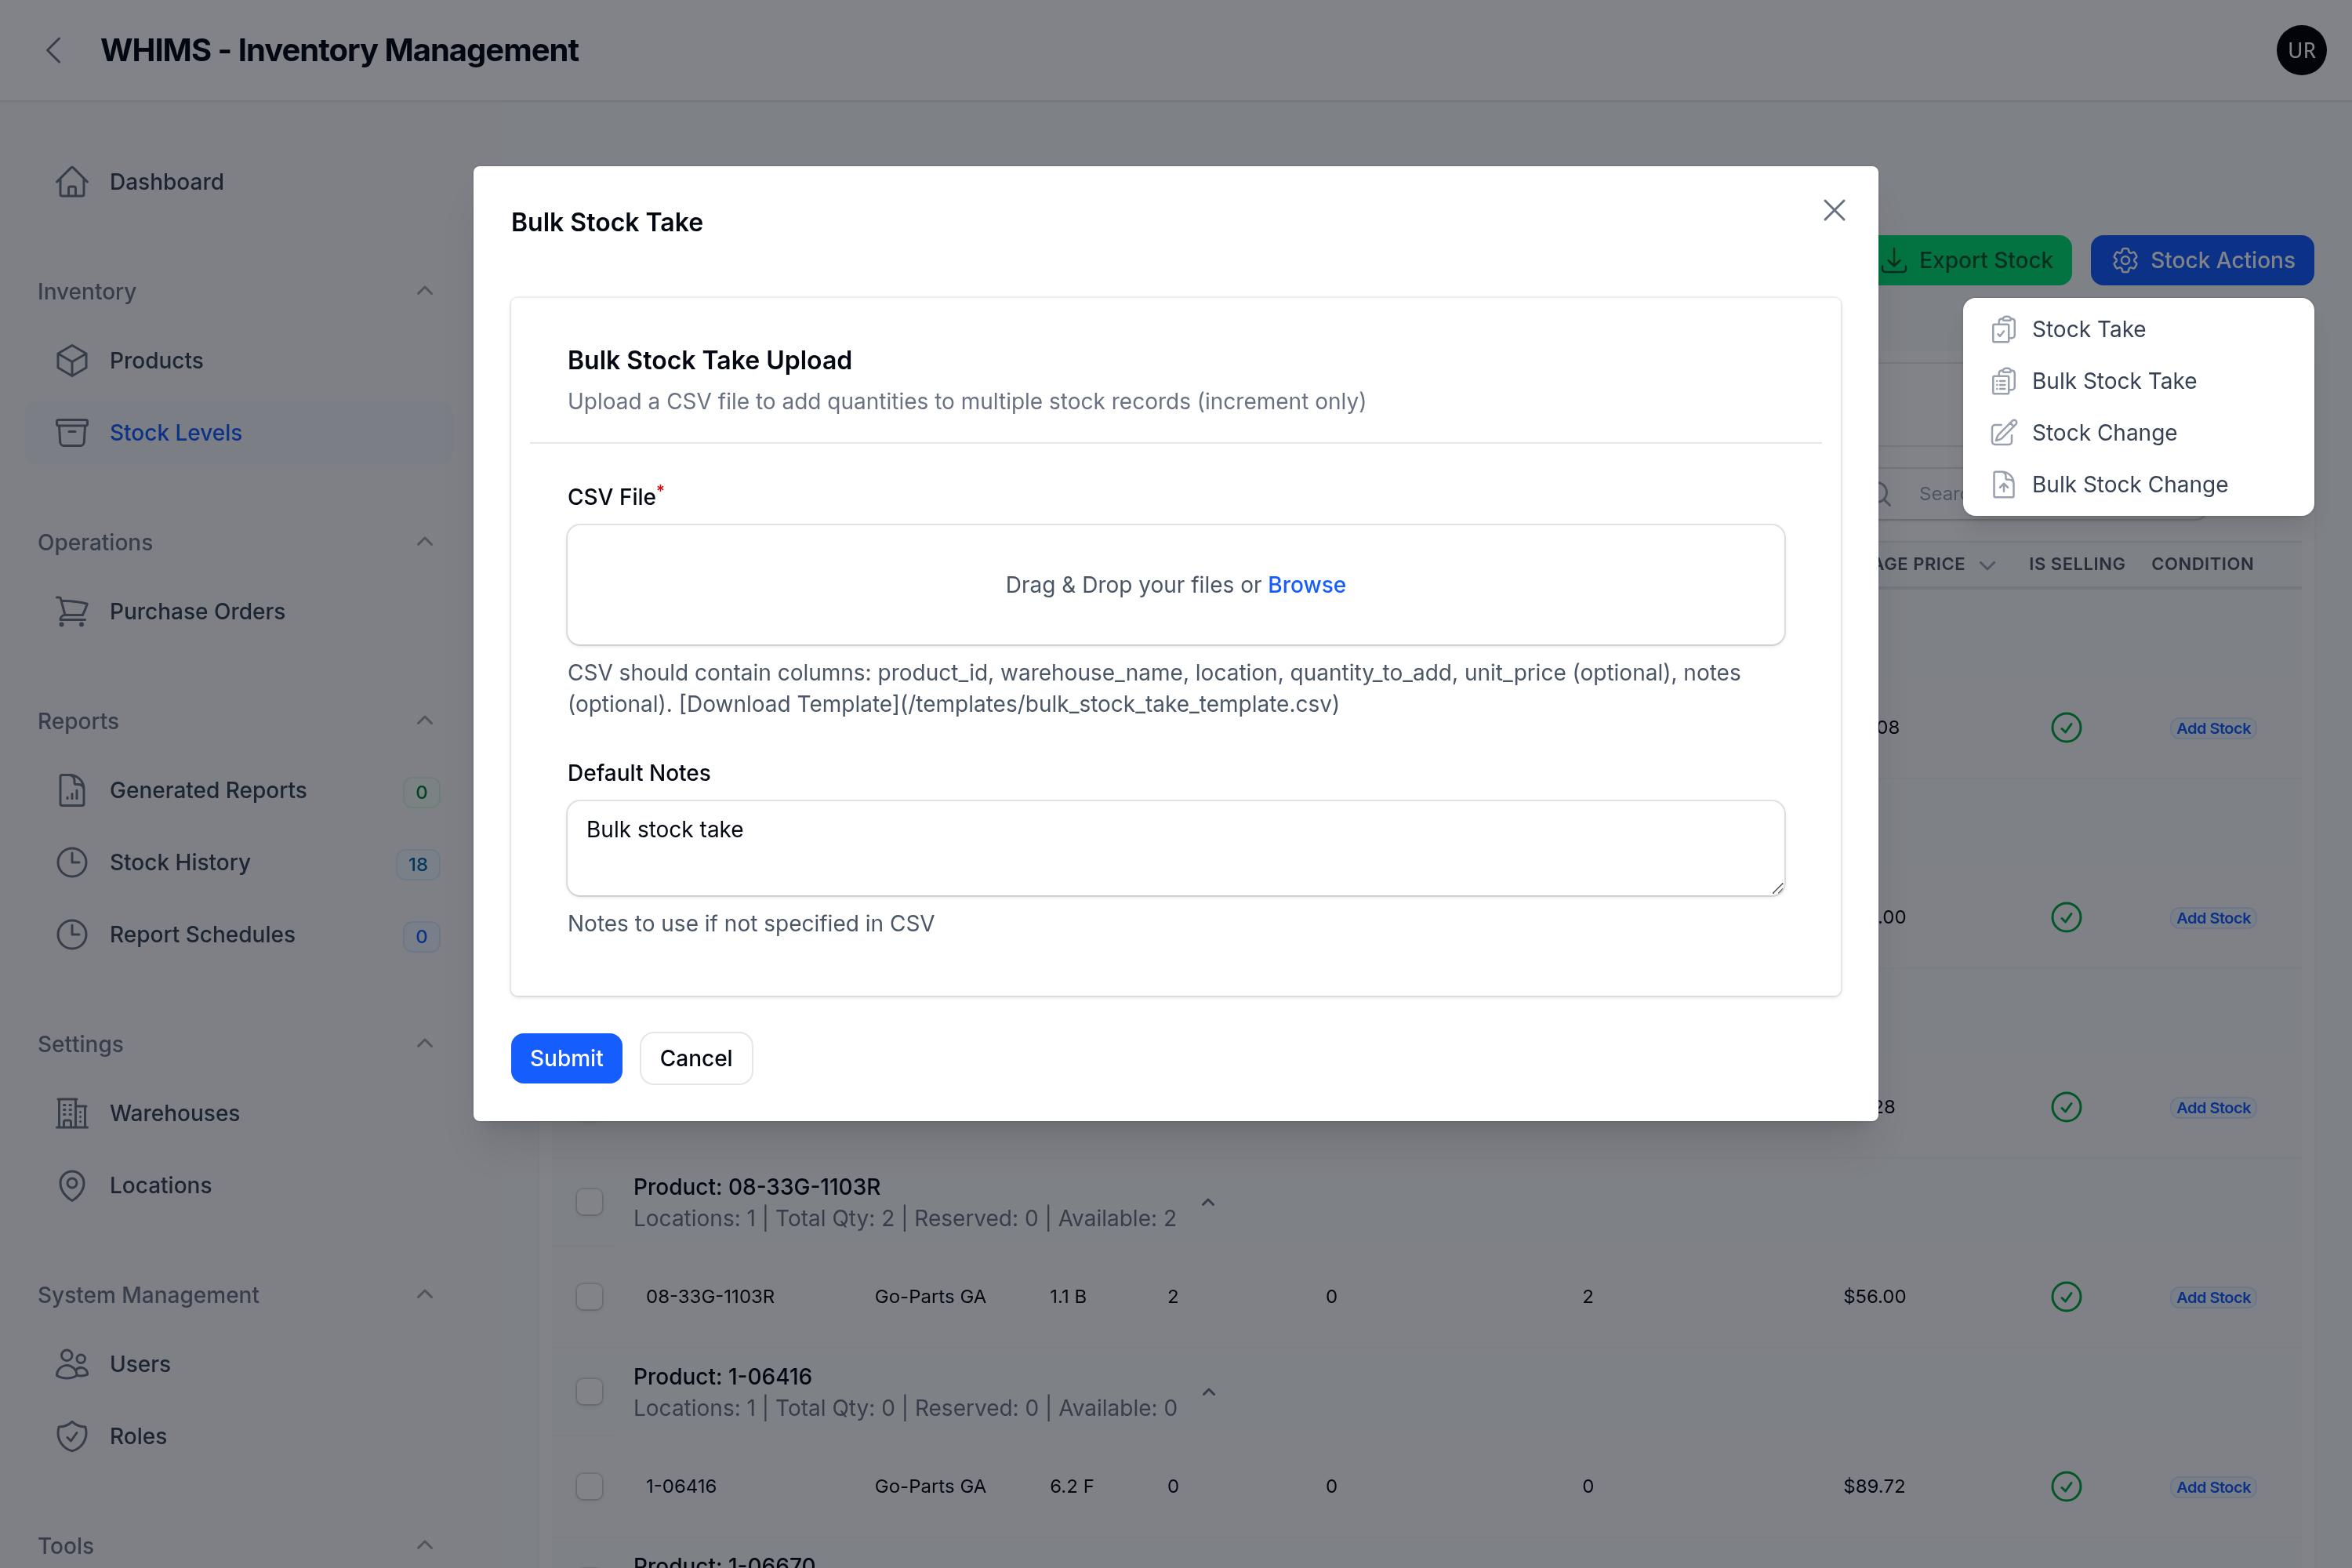
Go to Stock Levels → Stock Actions → Bulk Stock Take.
Click Download Template in the grey helper text under the upload
box. This gives you a spreadsheet with the correct column headings already in place.
Fill in one row per product/shelf. Columns are listed in section 6.5.
Do not rename or reorder the headings.
Save the file as CSV (in Excel: File → Save As → CSV).
Drag the file onto the upload box, or click Browse and choose it.
Check Default Notes. This reason is used for any row
where you left the notes column empty.
Click Submit.
Figure 10 — Bulk Stock Take. The link to the blank template sits in the small grey
text beneath the upload area.
When it finishes you get a message such as "Processed 12 records successfully. 2 errors occurred."
followed by the first few problem rows. Rows that succeeded are already saved — only the
listed rows failed. Fix those in the spreadsheet, delete the rows that worked, and upload again.
Warning — do not upload the same file twice
WHIMS does not check whether it has seen a file before. Uploading the same spreadsheet a second
time adds every quantity a second time. If you are unsure whether an upload went through, check
Reports → Stock History before repeating it.
ZZs4_4ZZ4.4Adding stock from the product page
If you are already looking at a product and can see its shelves, this is the quickest way to add a
few units.
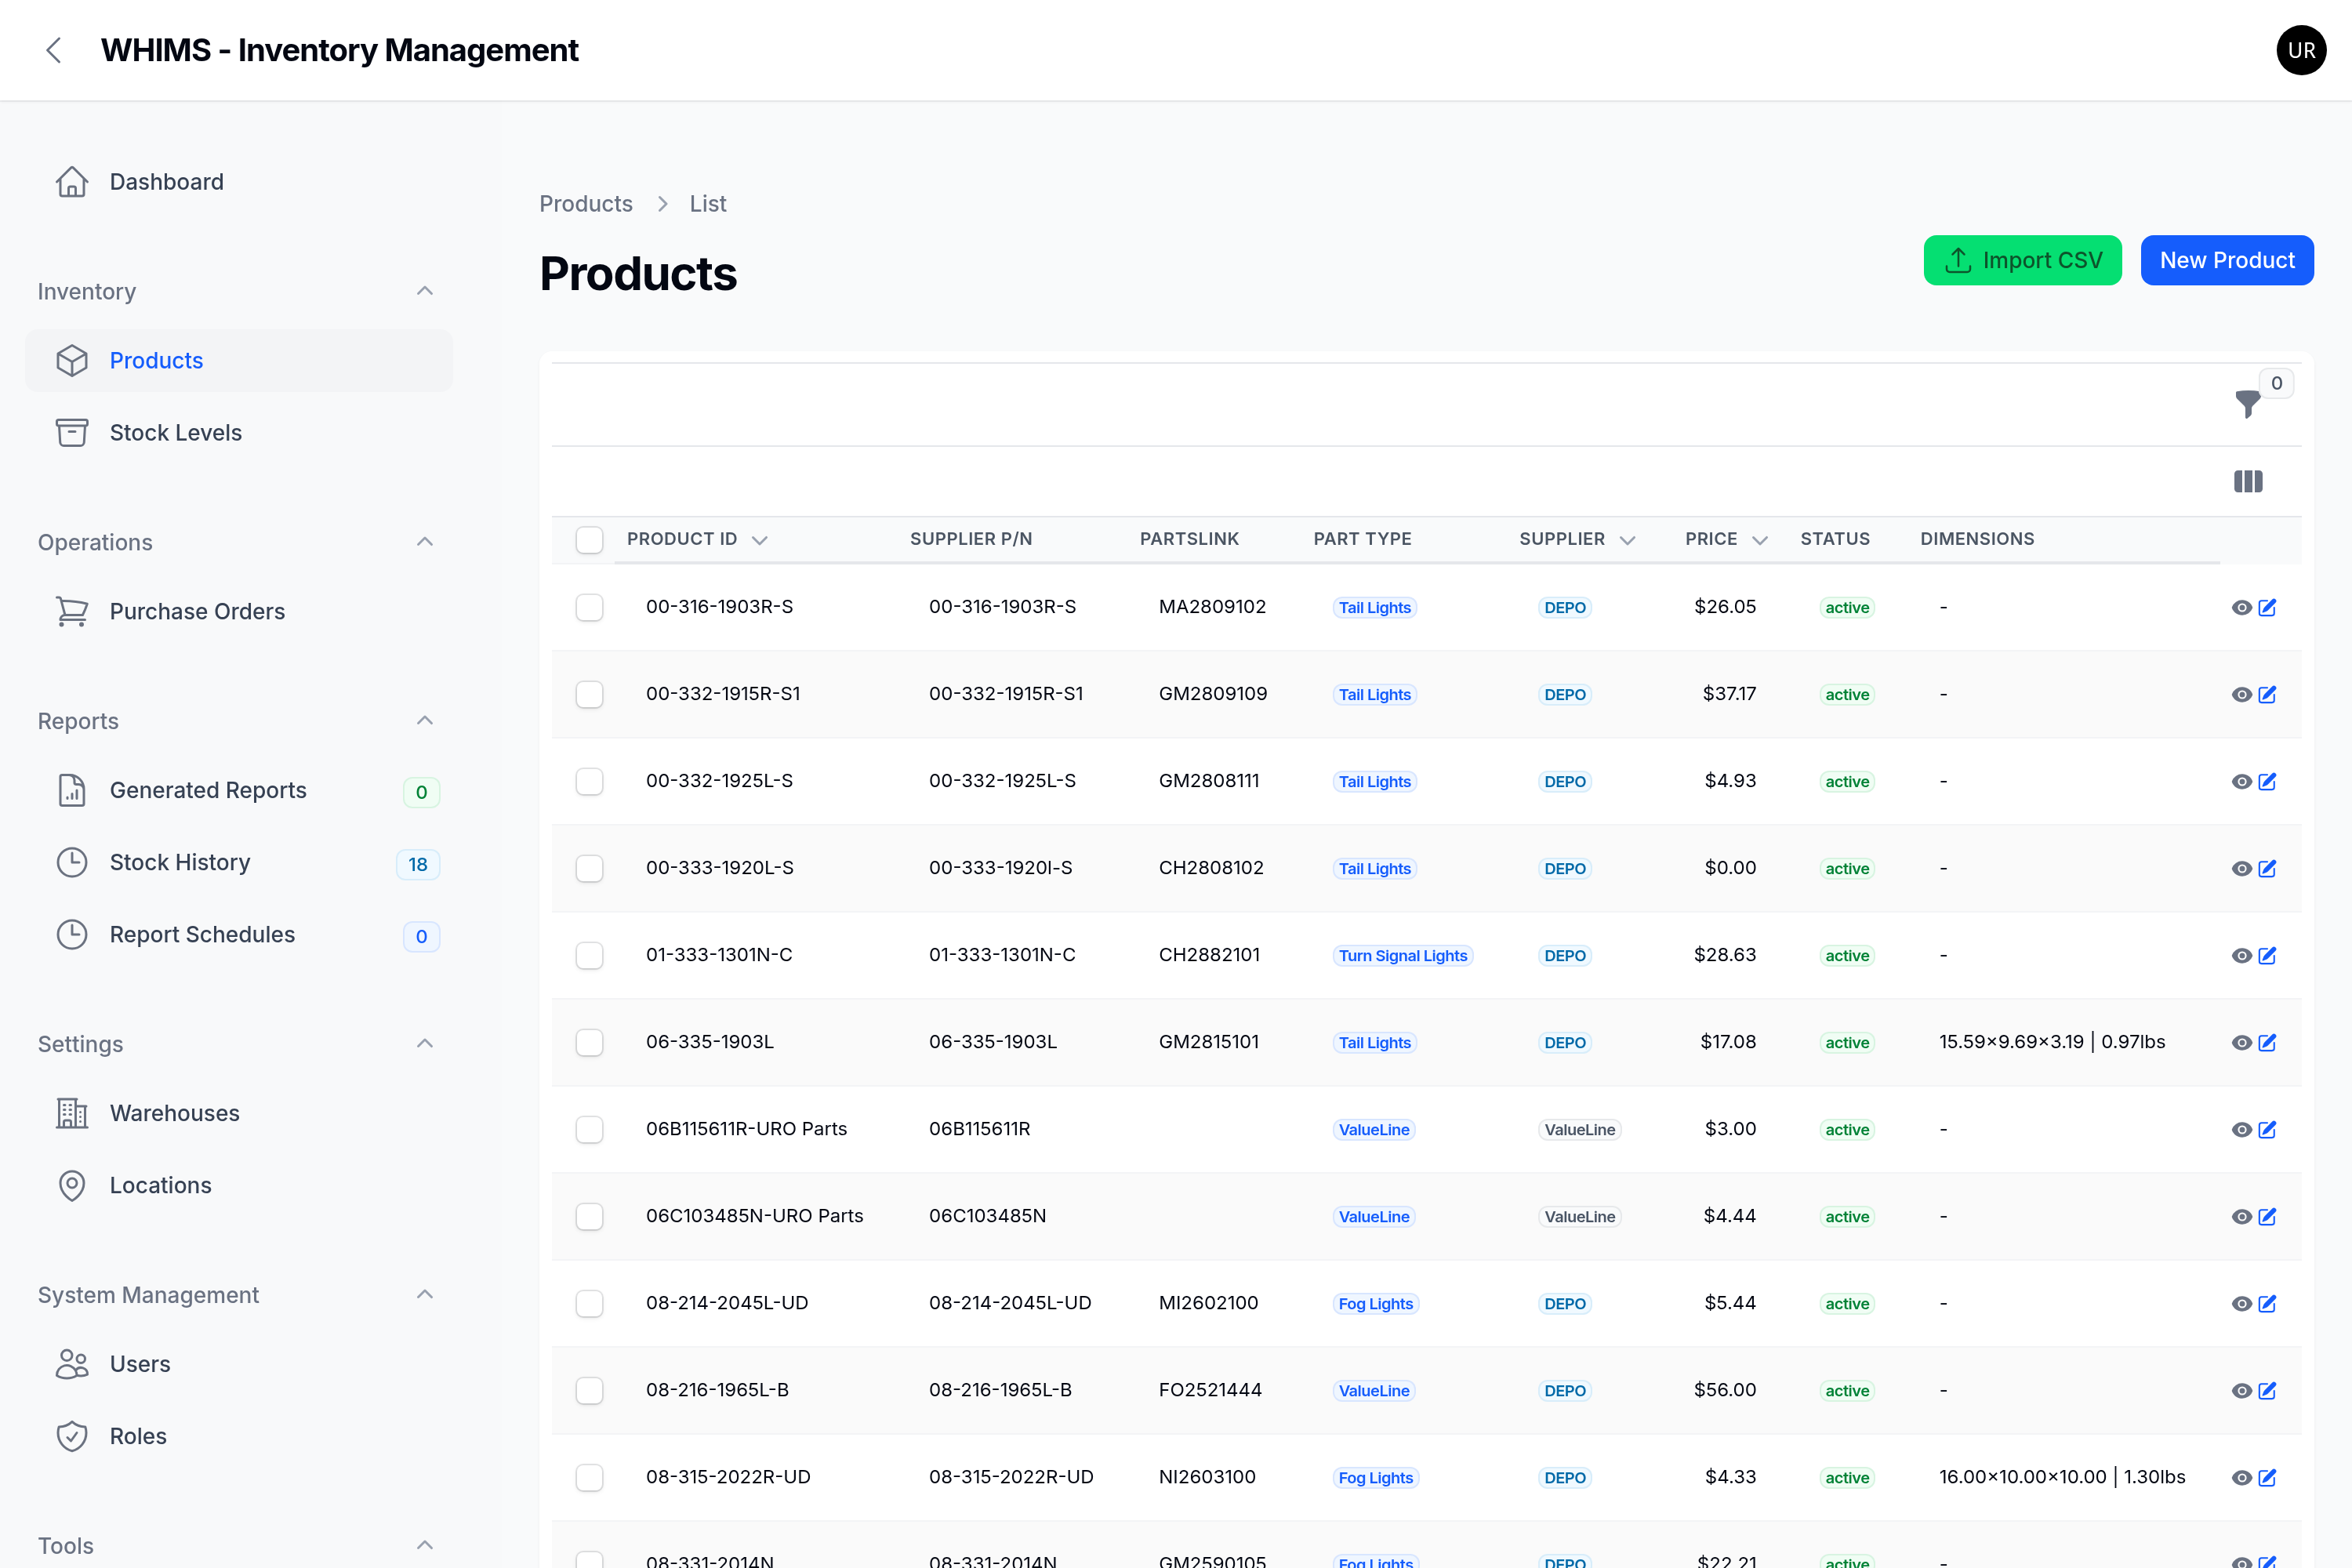
Go to Inventory → Products.
Search for the part and click its row to open it.
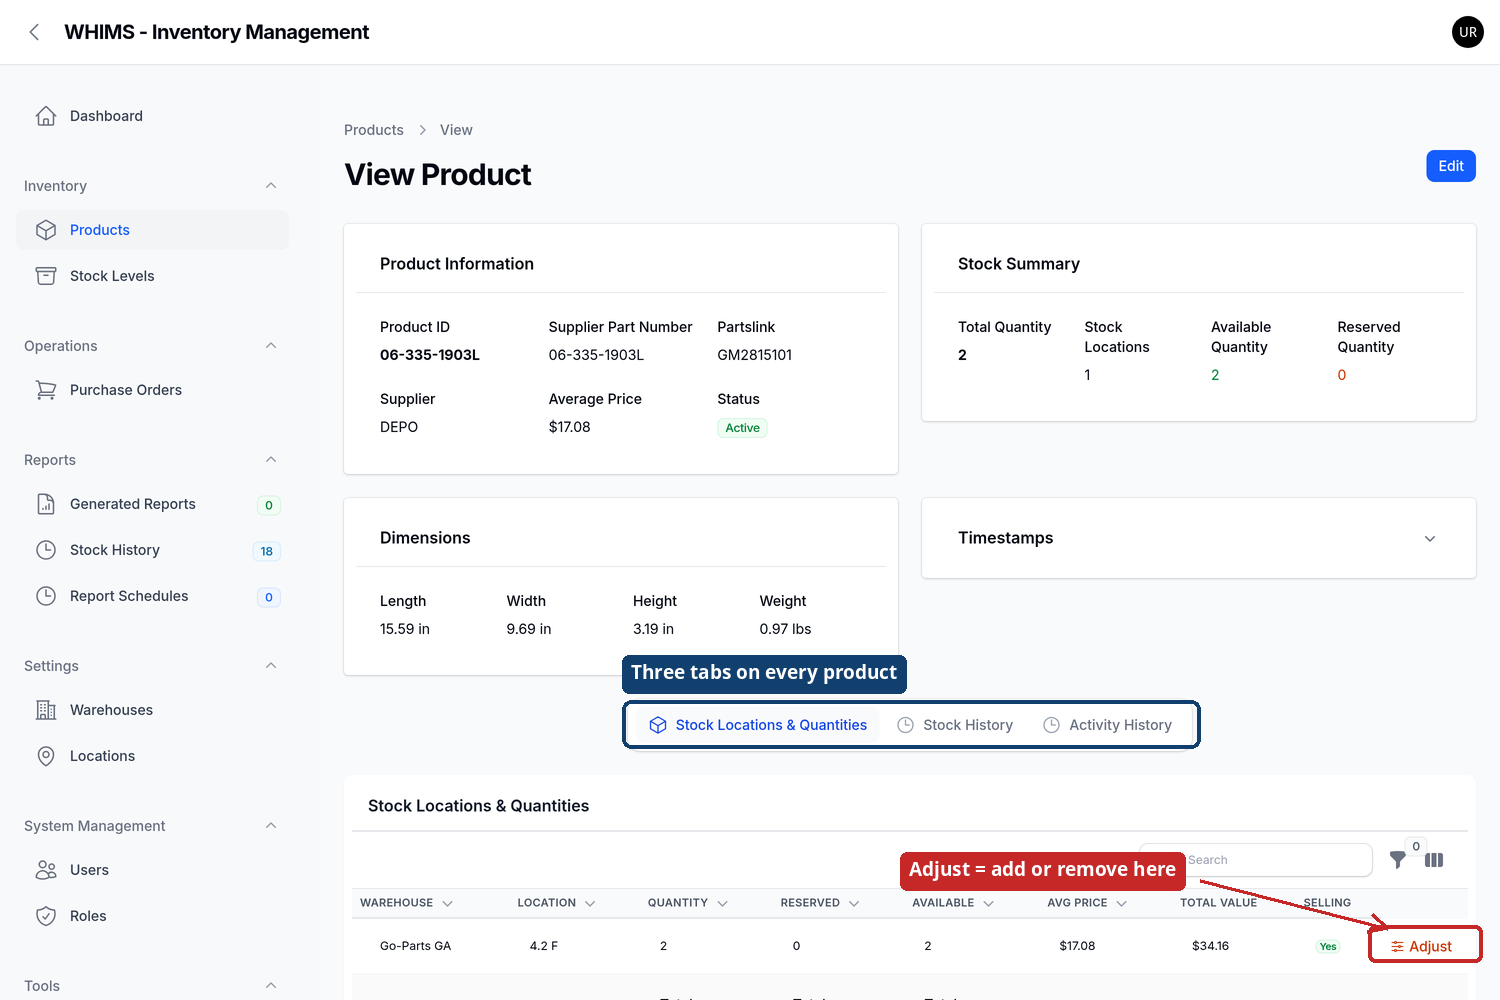
Click the Stock Locations & Quantities tab if it is not
already showing.
Find the row for the shelf you want and click the orange
Adjust button at the end of that row.
Figure 11 — The Products list. Use the Search box to find a part by its ID,
supplier part number or description, then click the row to open it.Figure 12 — The product page. The three tabs give you current stock, the movement
history, and a record of edits to the product itself. Each shelf has its own
Adjust button — make sure you click the one on the right row.
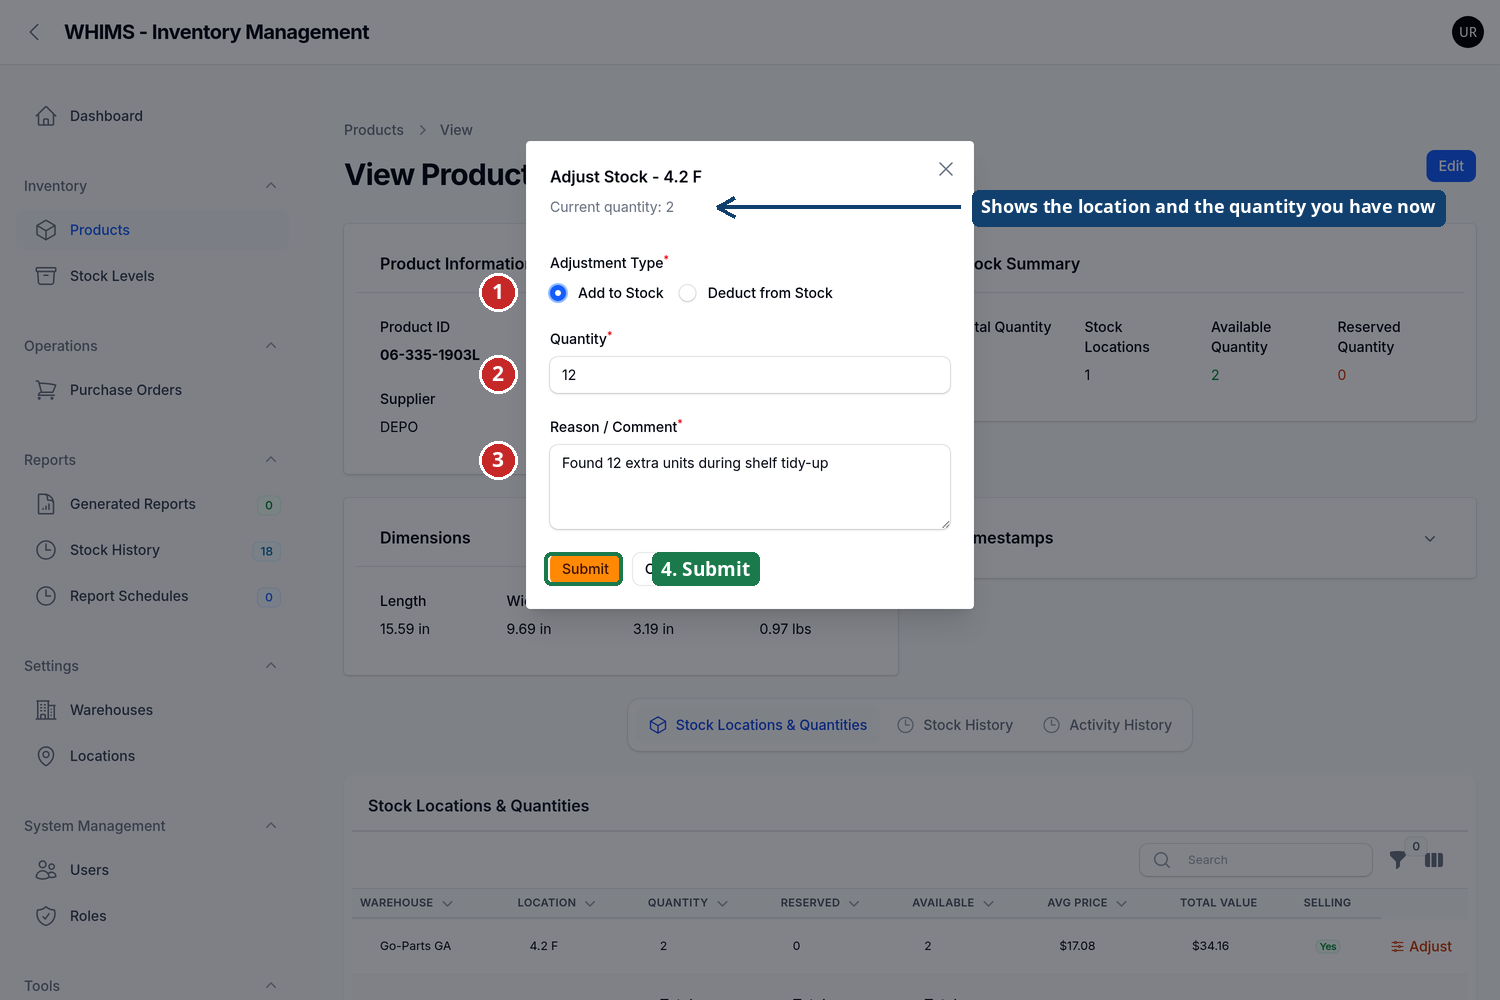
Leave Adjustment Type on Add to Stock.
Type how many units to add in Quantity. Minimum 1.
Type a Reason / Comment. This one is compulsory —
the form will not save without it.
Click Submit.
Figure 13 — The Adjust window. The heading names the shelf and the line beneath
tells you the quantity there right now — check both before you type. 1 Add or Deduct.
2 Quantity. 3 Reason (required). 4 Submit.
A green Stock Adjusted message confirms the result, for example
"12 units added to stock. New quantity: 14".
ZZs4_5ZZ4.5Removing stock — Deduct from Stock
Use this when units have physically left the shelf outside the normal sales process: damaged,
scrapped, lost, used internally, or given away.
Open the product and its Stock Locations & Quantities tab
(steps 1–4 of section 4.4).
Click Adjust on the correct shelf.
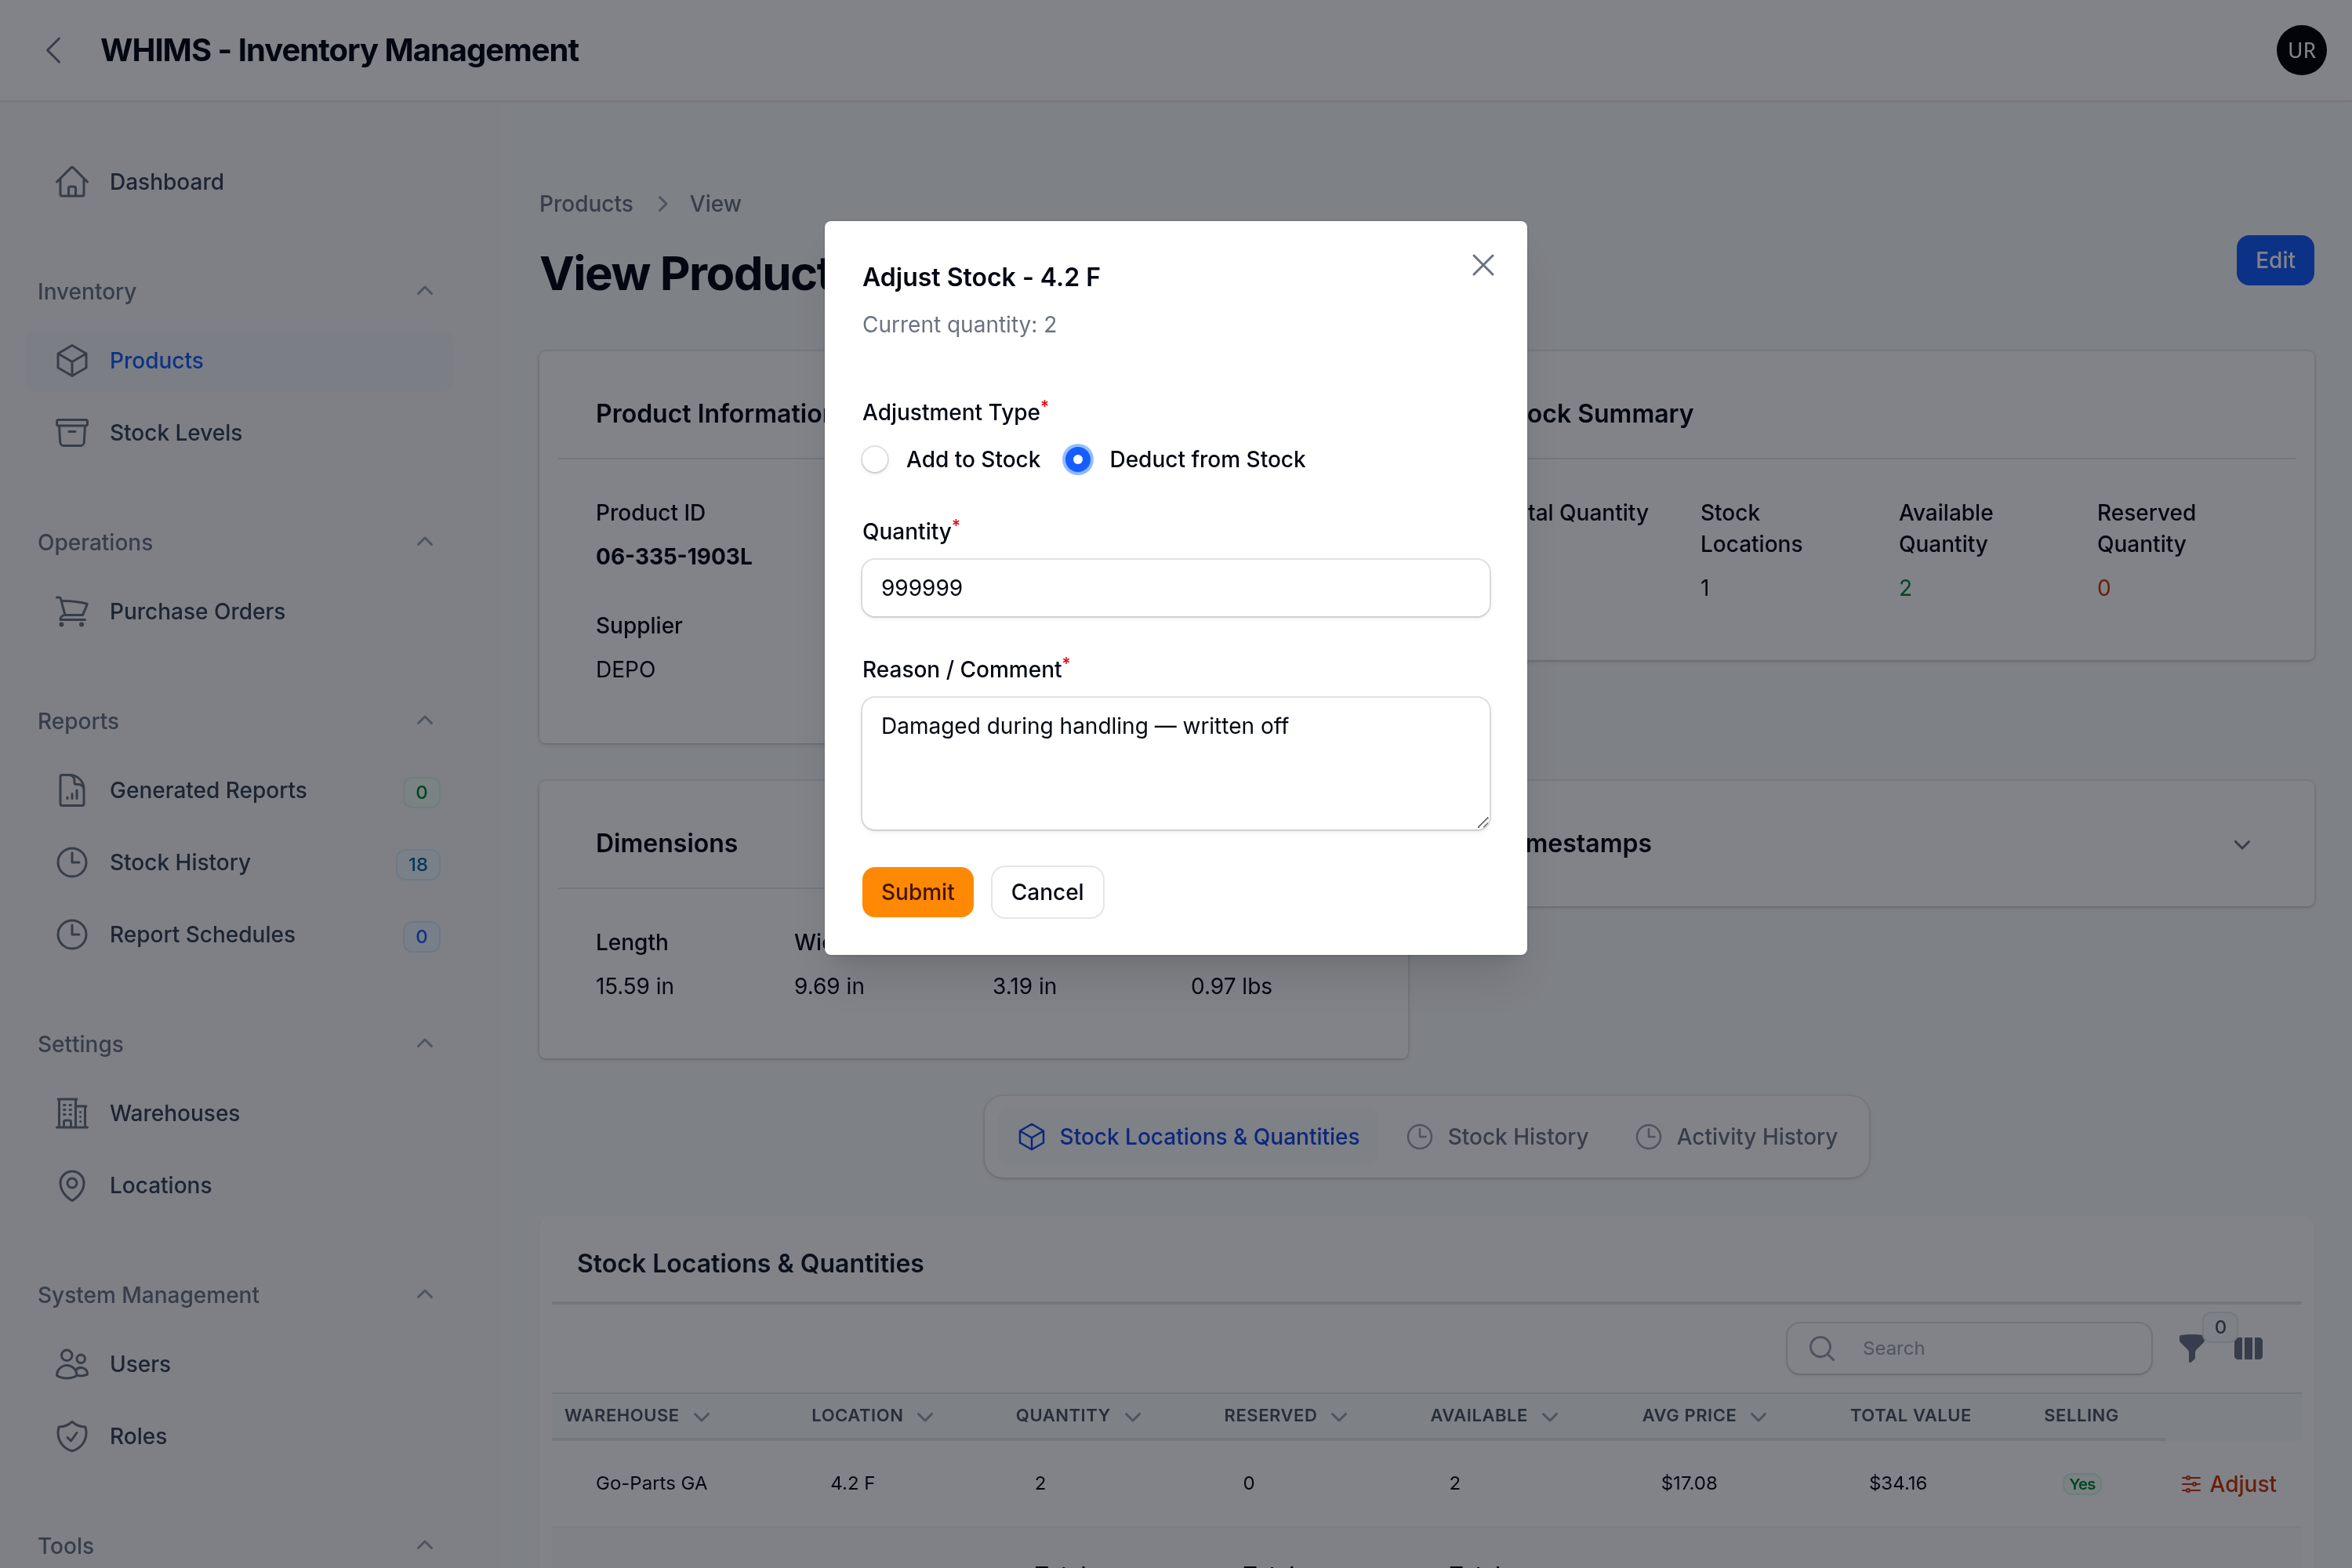
Click Deduct from Stock next to Adjustment Type.
Type how many units to remove in Quantity.
Enter it as a positive number — do not type a minus sign.
Type the Reason / Comment. Required. Say what
happened to the units.
Check the "Current quantity" line at the top of the window. You cannot remove
more than that.
Click Submit.
Figure 14 — The same window with Deduct from Stock selected. Everything else
works identically; only the direction changes.
You will see Stock Adjusted — "12 units deducted from stock. New quantity: 2".
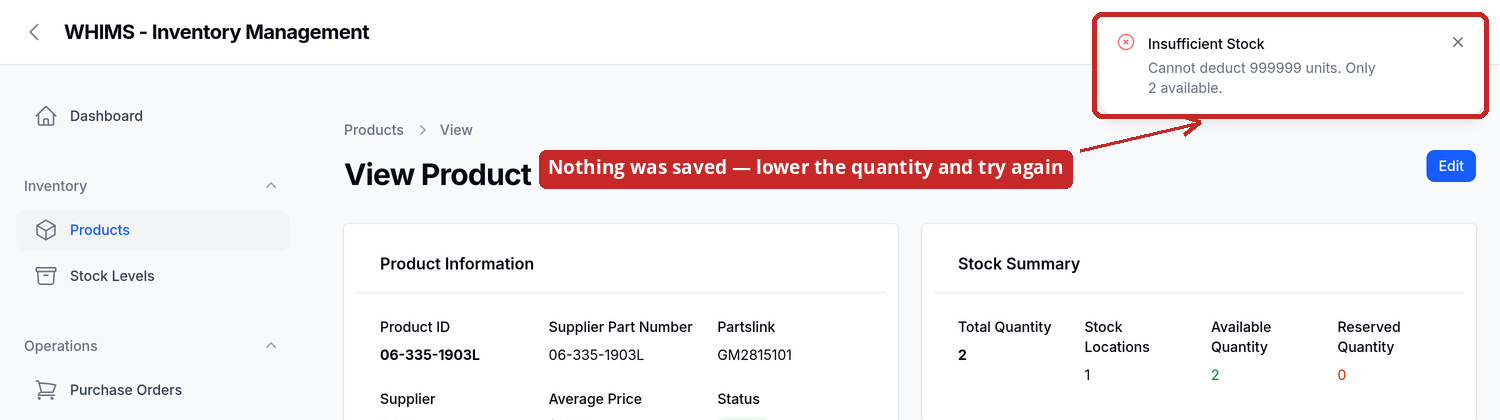
If you try to remove too many
WHIMS refuses and tells you exactly what is available. Nothing is saved — the shelf keeps
the figure it had.
Figure 15 —"Cannot deduct 999999 units. Only 2 available." Close the message,
correct the quantity, and submit again. If you genuinely believe more units left the shelf than
the system thought were on it, the shelf figure itself was wrong — count it and use
Stock Change instead.
ZZs4_6ZZ4.6Removing everything in a location — Empty Location
Important
This sets every product on the shelf to zero in one step and cannot be undone.
Only use it when a shelf is genuinely being cleared — for example when a bin is decommissioned or
its entire contents have been written off. Export the shelf first, every time.
Go to Settings → Locations.
Click the location you want to clear. The View Location Stock page opens,
listing everything currently on that shelf.
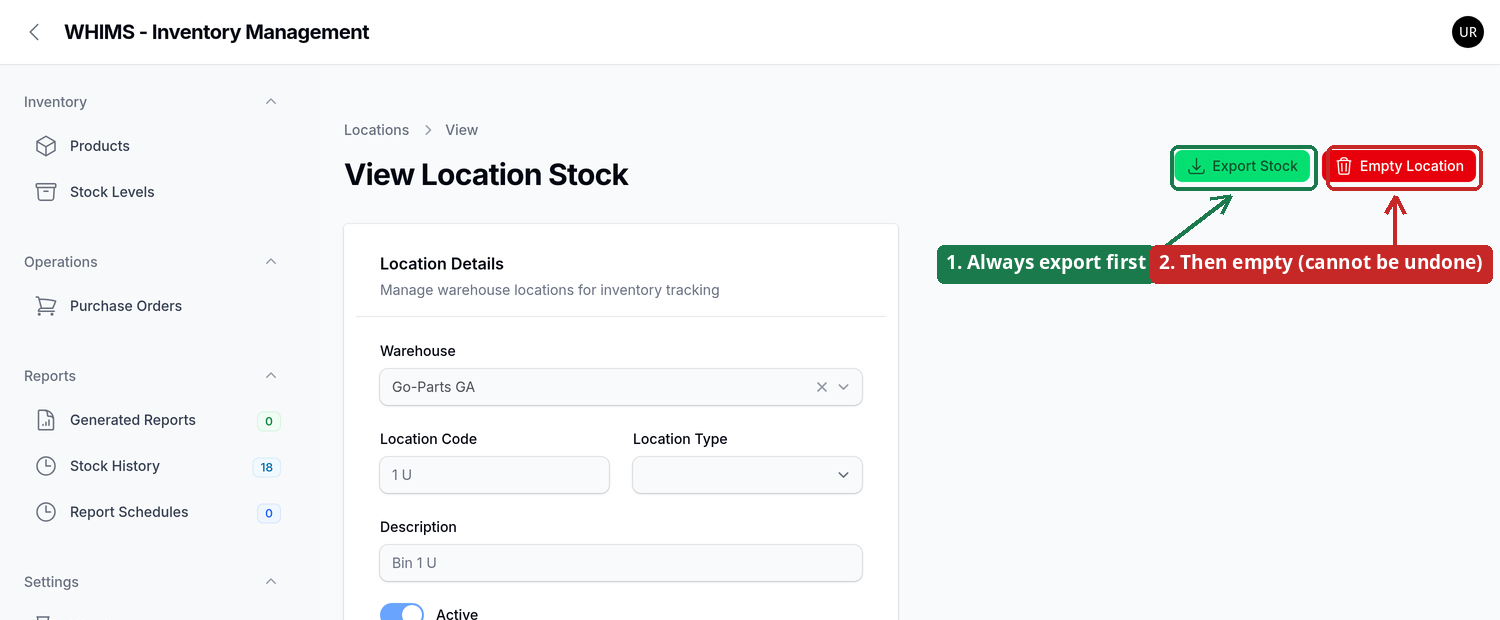
Click the green Export Stock button first. This
downloads a spreadsheet of the shelf's contents — your only record of what was there.
Click the red Empty Location button.
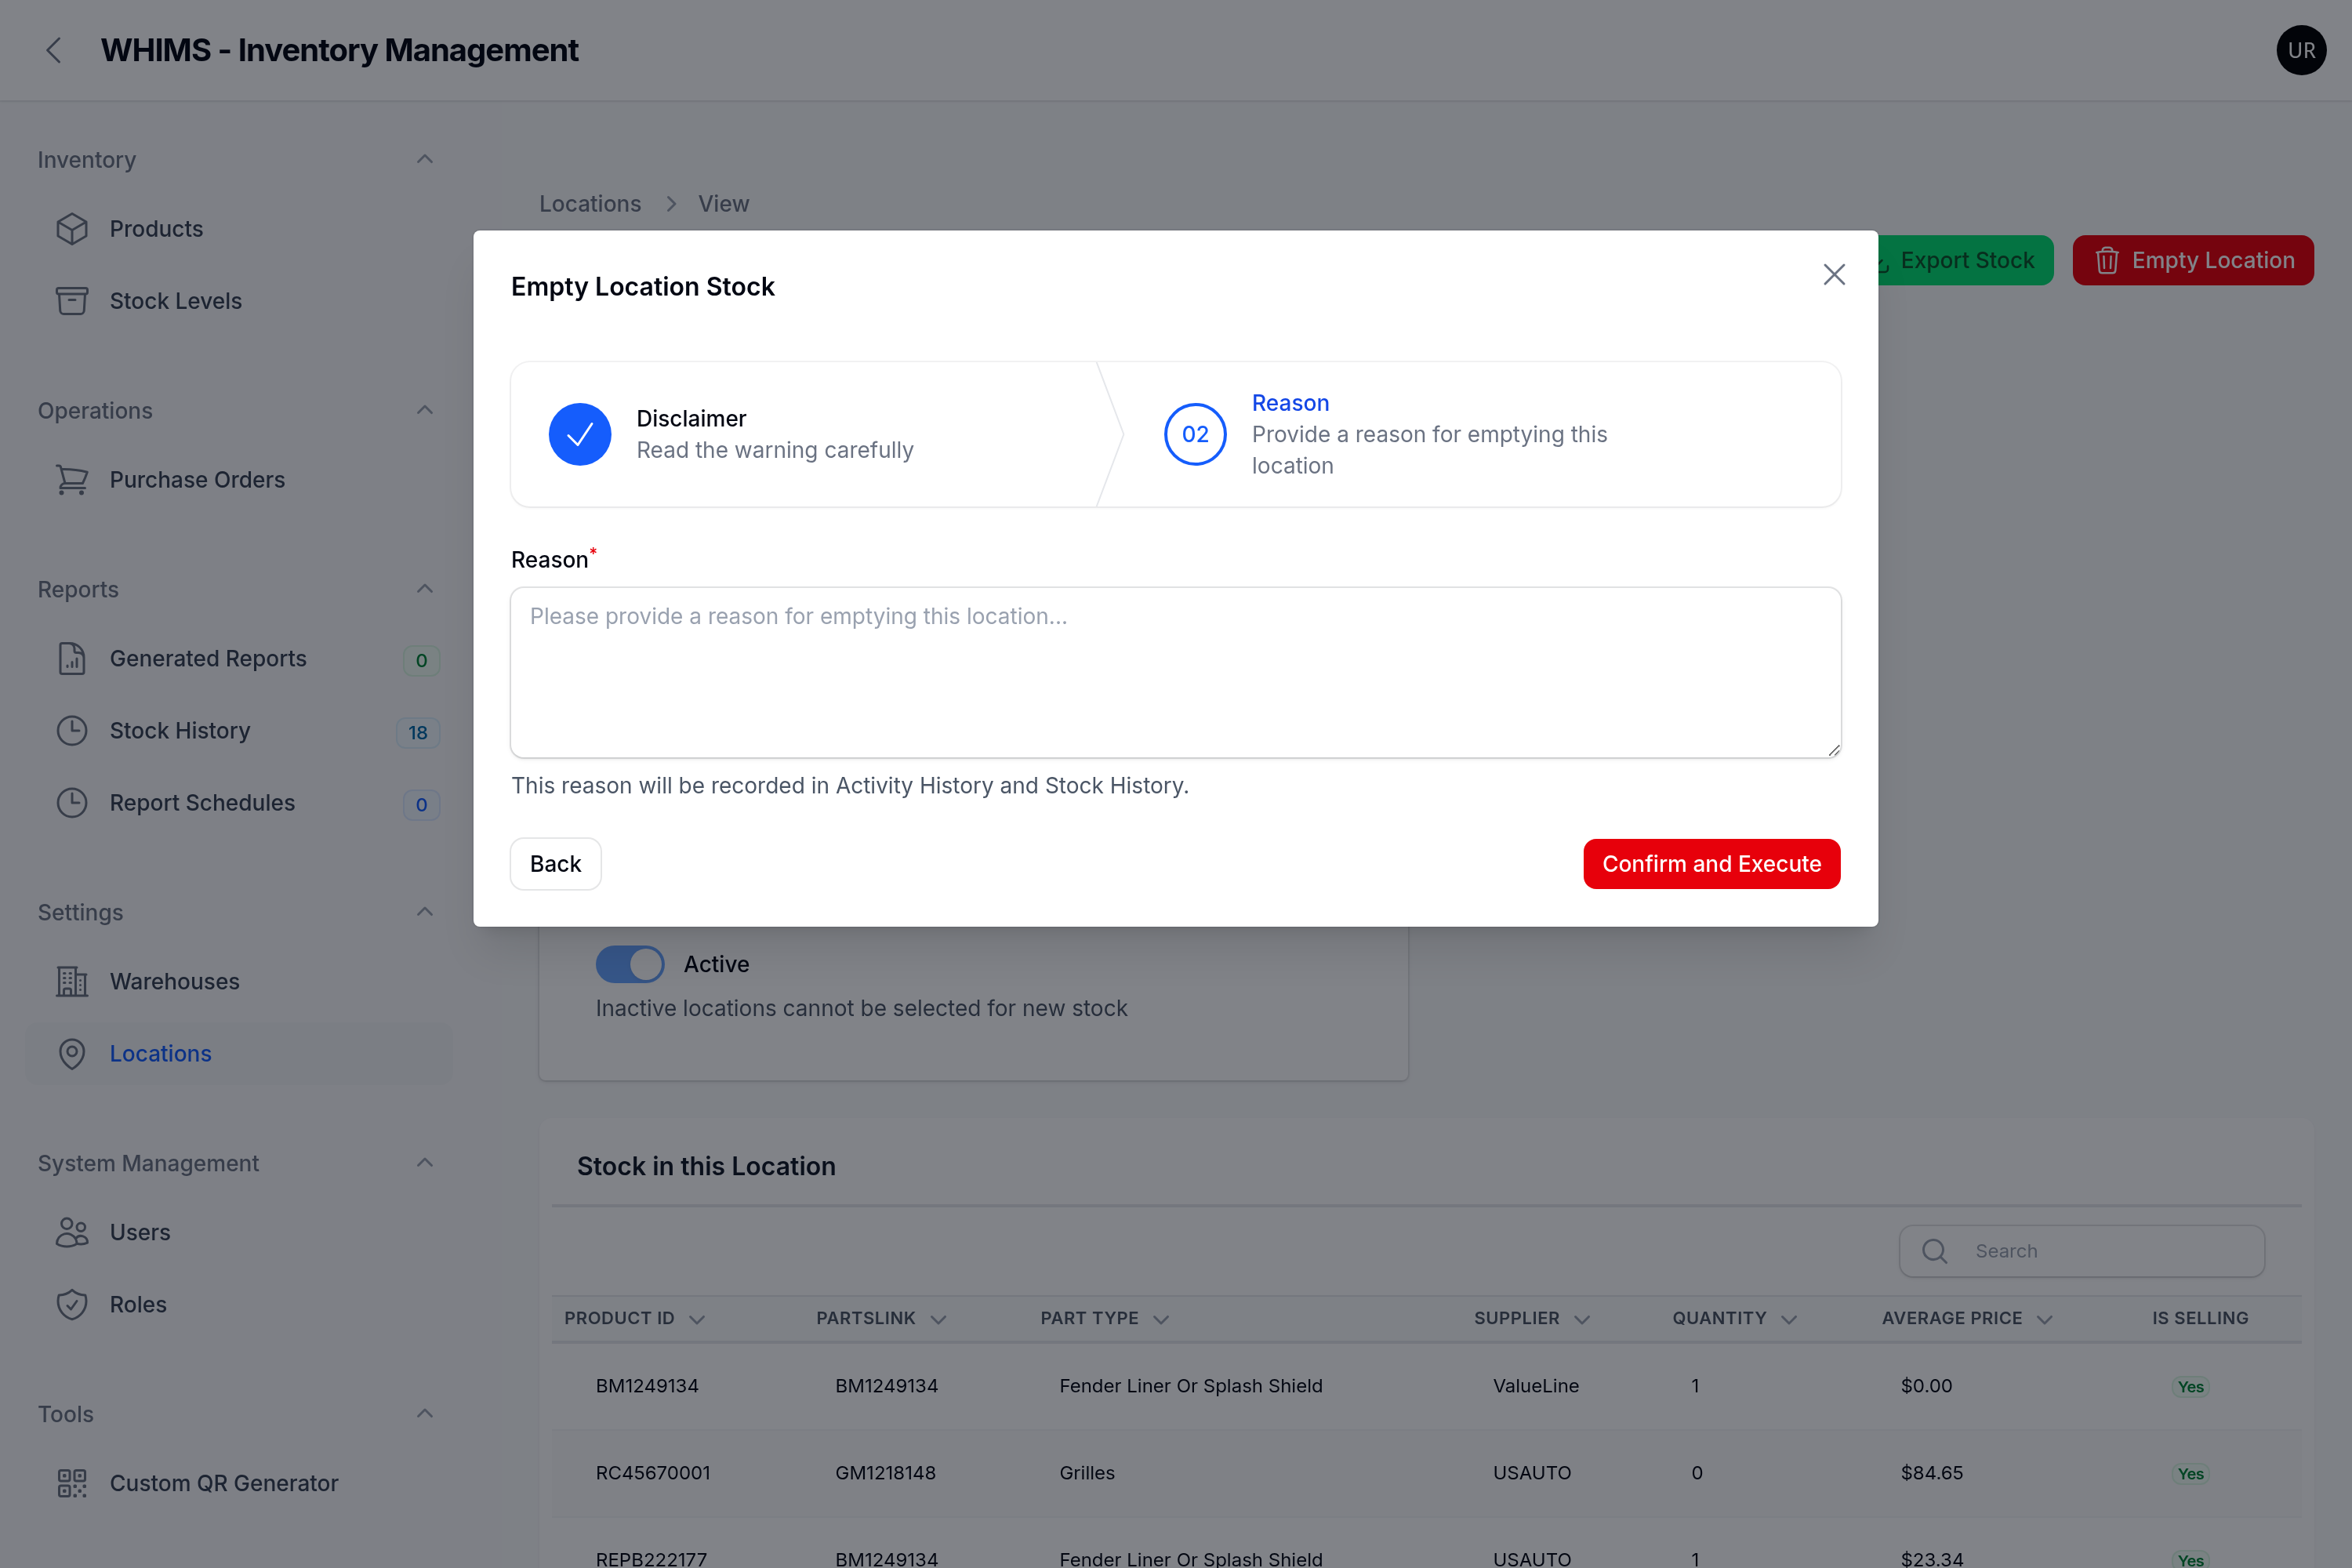
Figure 16 — The location page. Always use the green button before the red one.
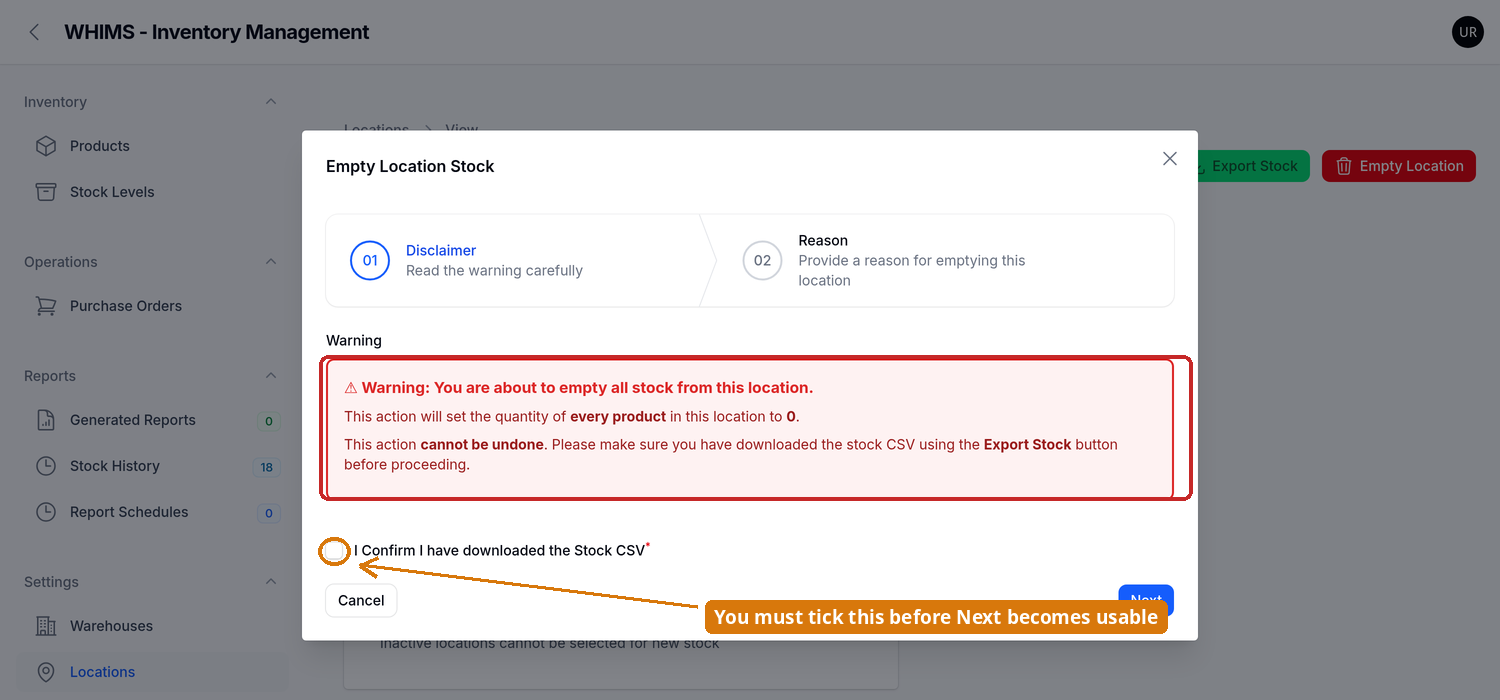
Read the red warning box carefully.
Tick I Confirm I have downloaded the Stock CSV. The wizard will not let
you continue until you do.
Click Next.
Figure 17 — Step 1 of the Empty Location wizard. Clicking Next
without ticking the box shows "You must confirm that you have downloaded the Stock CSV before
proceeding."
Type a full Reason. Required. It is written against
every single product on that shelf, so make it explain the whole clearance.
Click Confirm and Execute.
Figure 18 — Step 2. Back returns you to the warning;
closing the window with ✕ cancels everything safely.
A green Location Emptied Successfully message reports how many products were affected, for
example "Set stock to 0 for 8 product(s) in location 1 U." Products that were already at zero are
skipped; if the whole shelf was already empty you get "No Stock to Empty" instead and nothing changes.
ZZs4_7ZZ4.7Adjusting stock to a corrected count — Stock Change
Use this after a physical count. You type the number you counted, and WHIMS makes the shelf
match it — whether that means going up or down.
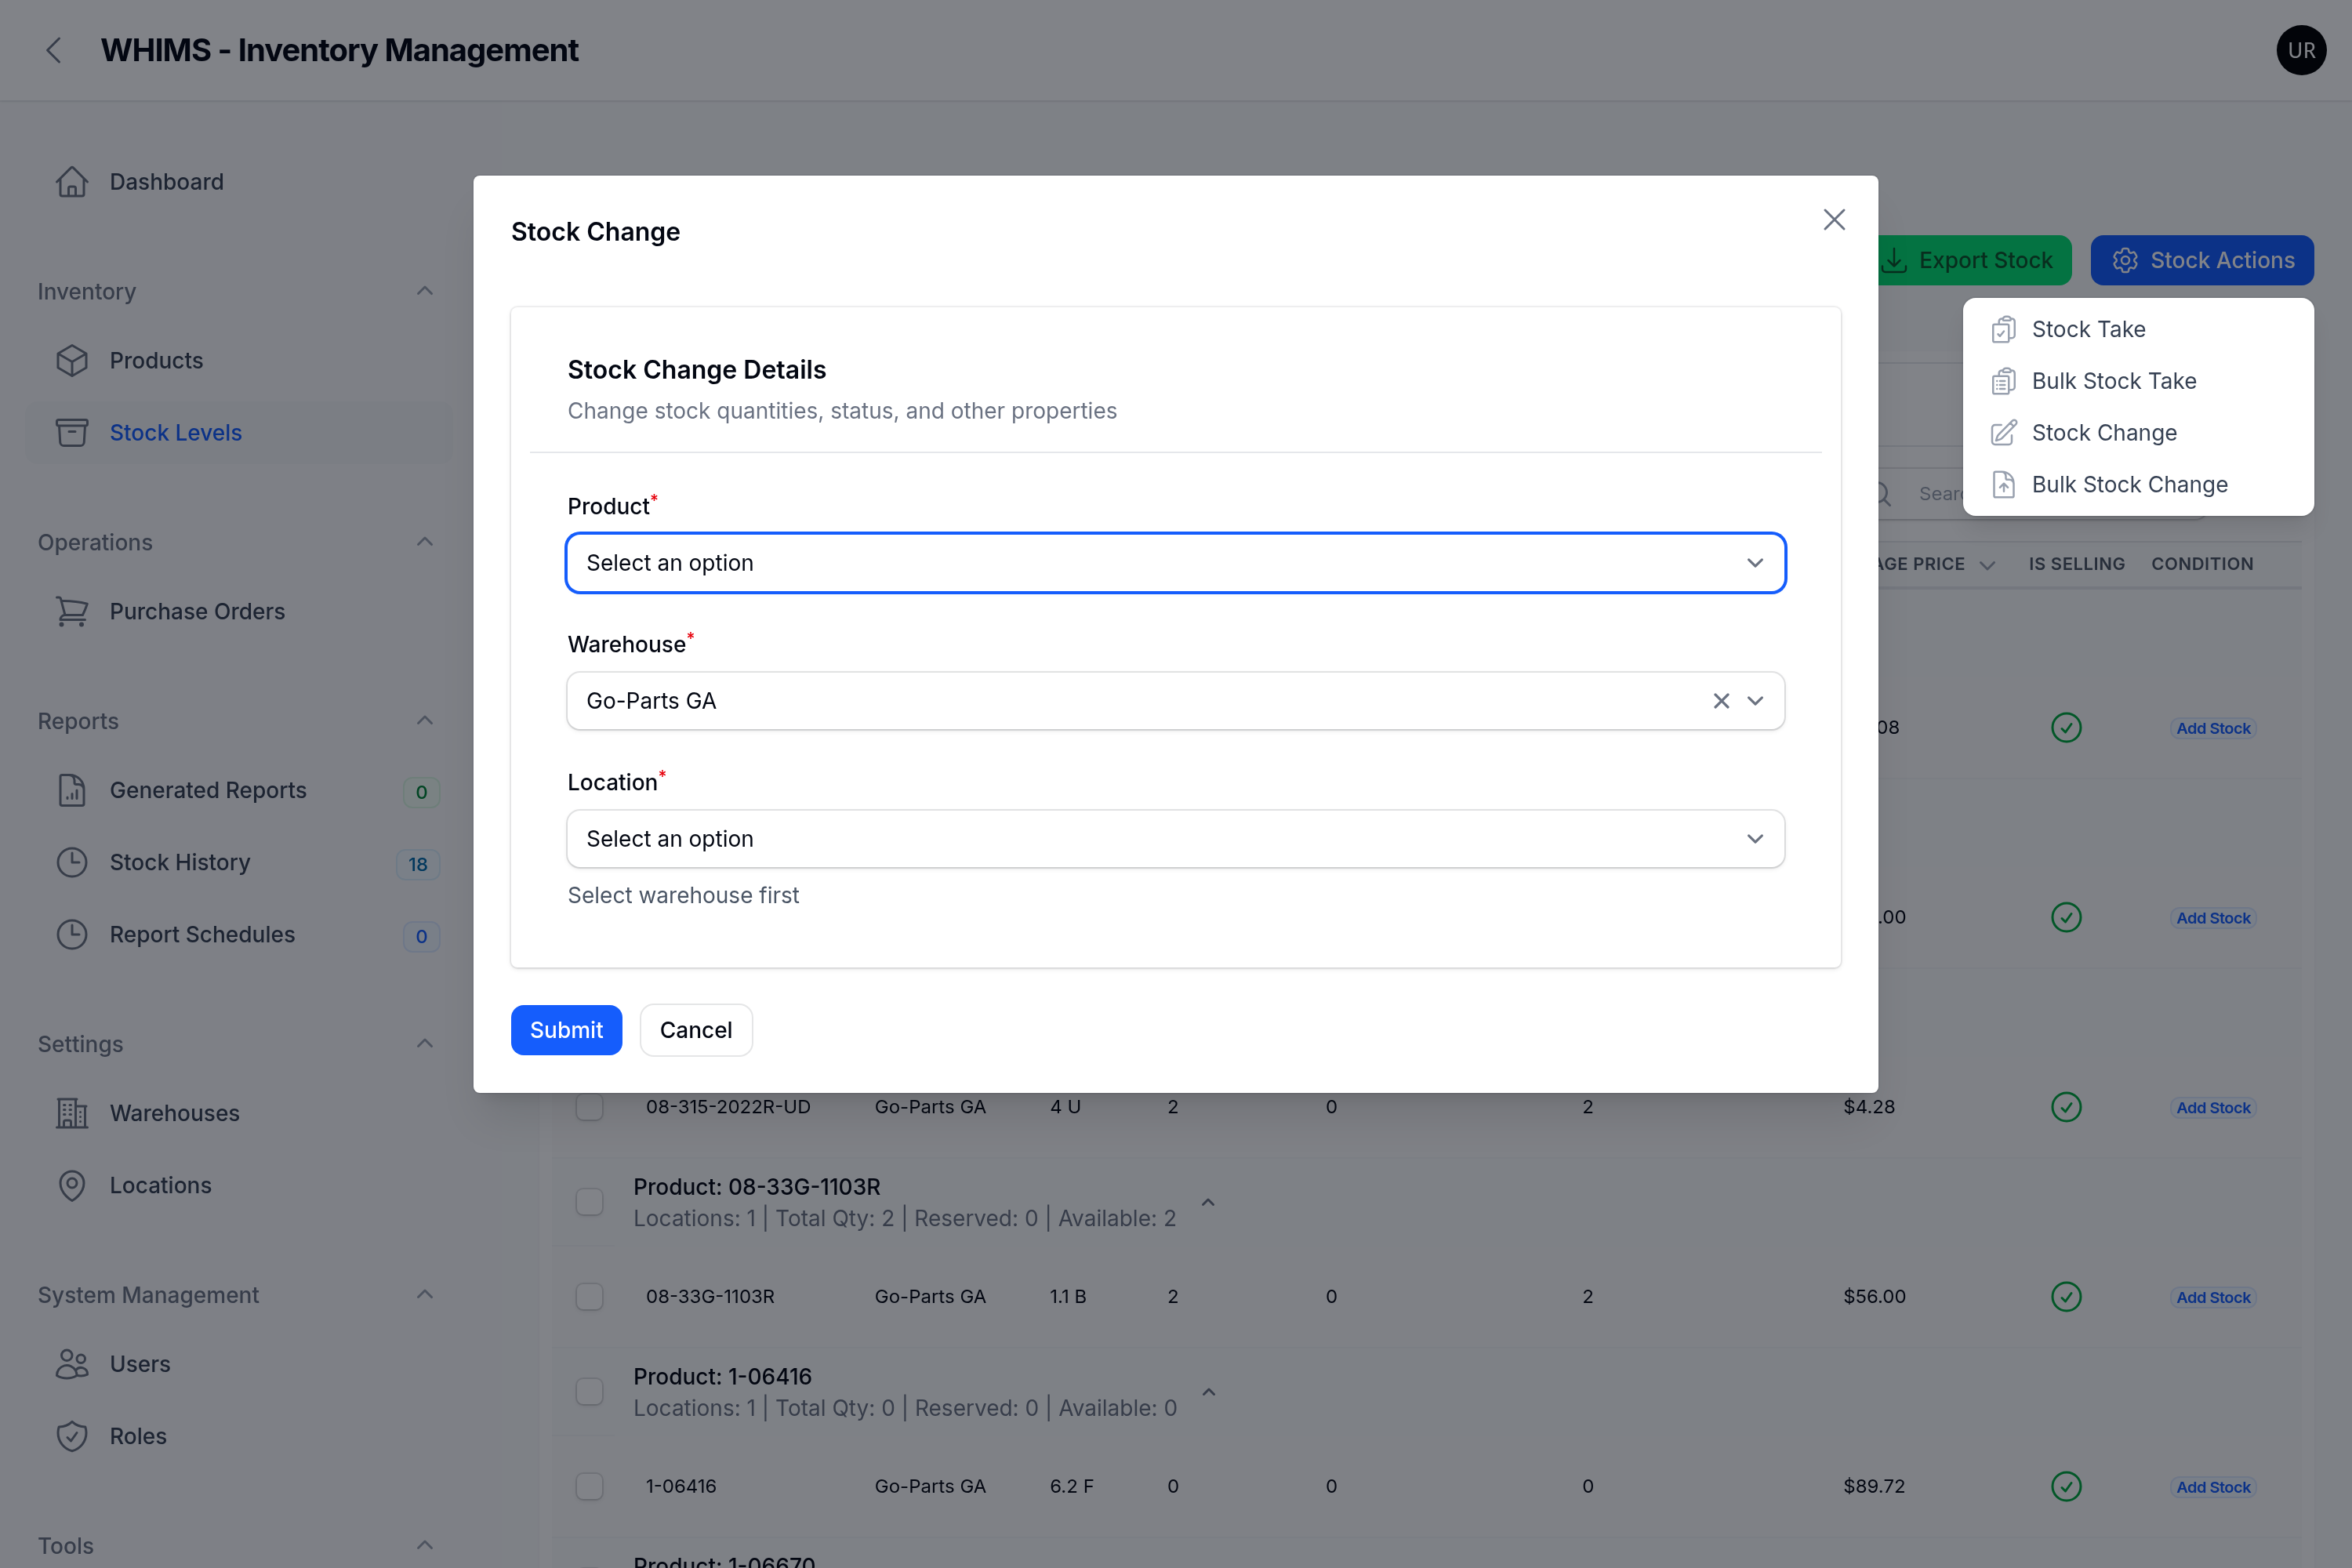
Go to Stock Levels → Stock Actions → Stock Change.
Figure 19 — The Stock Change form. Note the description at the top:
"Change stock quantities, status, and other properties". As with Stock Take, more fields appear
once you have chosen a product and a location.
Choose the Product. Type to search, then click it.
Check the Warehouse.
Choose the Location. Here the list shows
(Qty: 2, Available: 2) so you can see what the system currently believes.
Type the counted figure into New Quantity.
This is the final number, not a difference. Zero is allowed; negatives are not.
Fill in New Average Price only if the price is also
changing. Leaving it empty keeps the current price.
Check the Is Selling? switch. On means the stock can
be sold. Turn it off to hold the stock back — for quarantined or damaged goods, for instance.
Type the Notes. Record who counted, and when.
Click Submit.
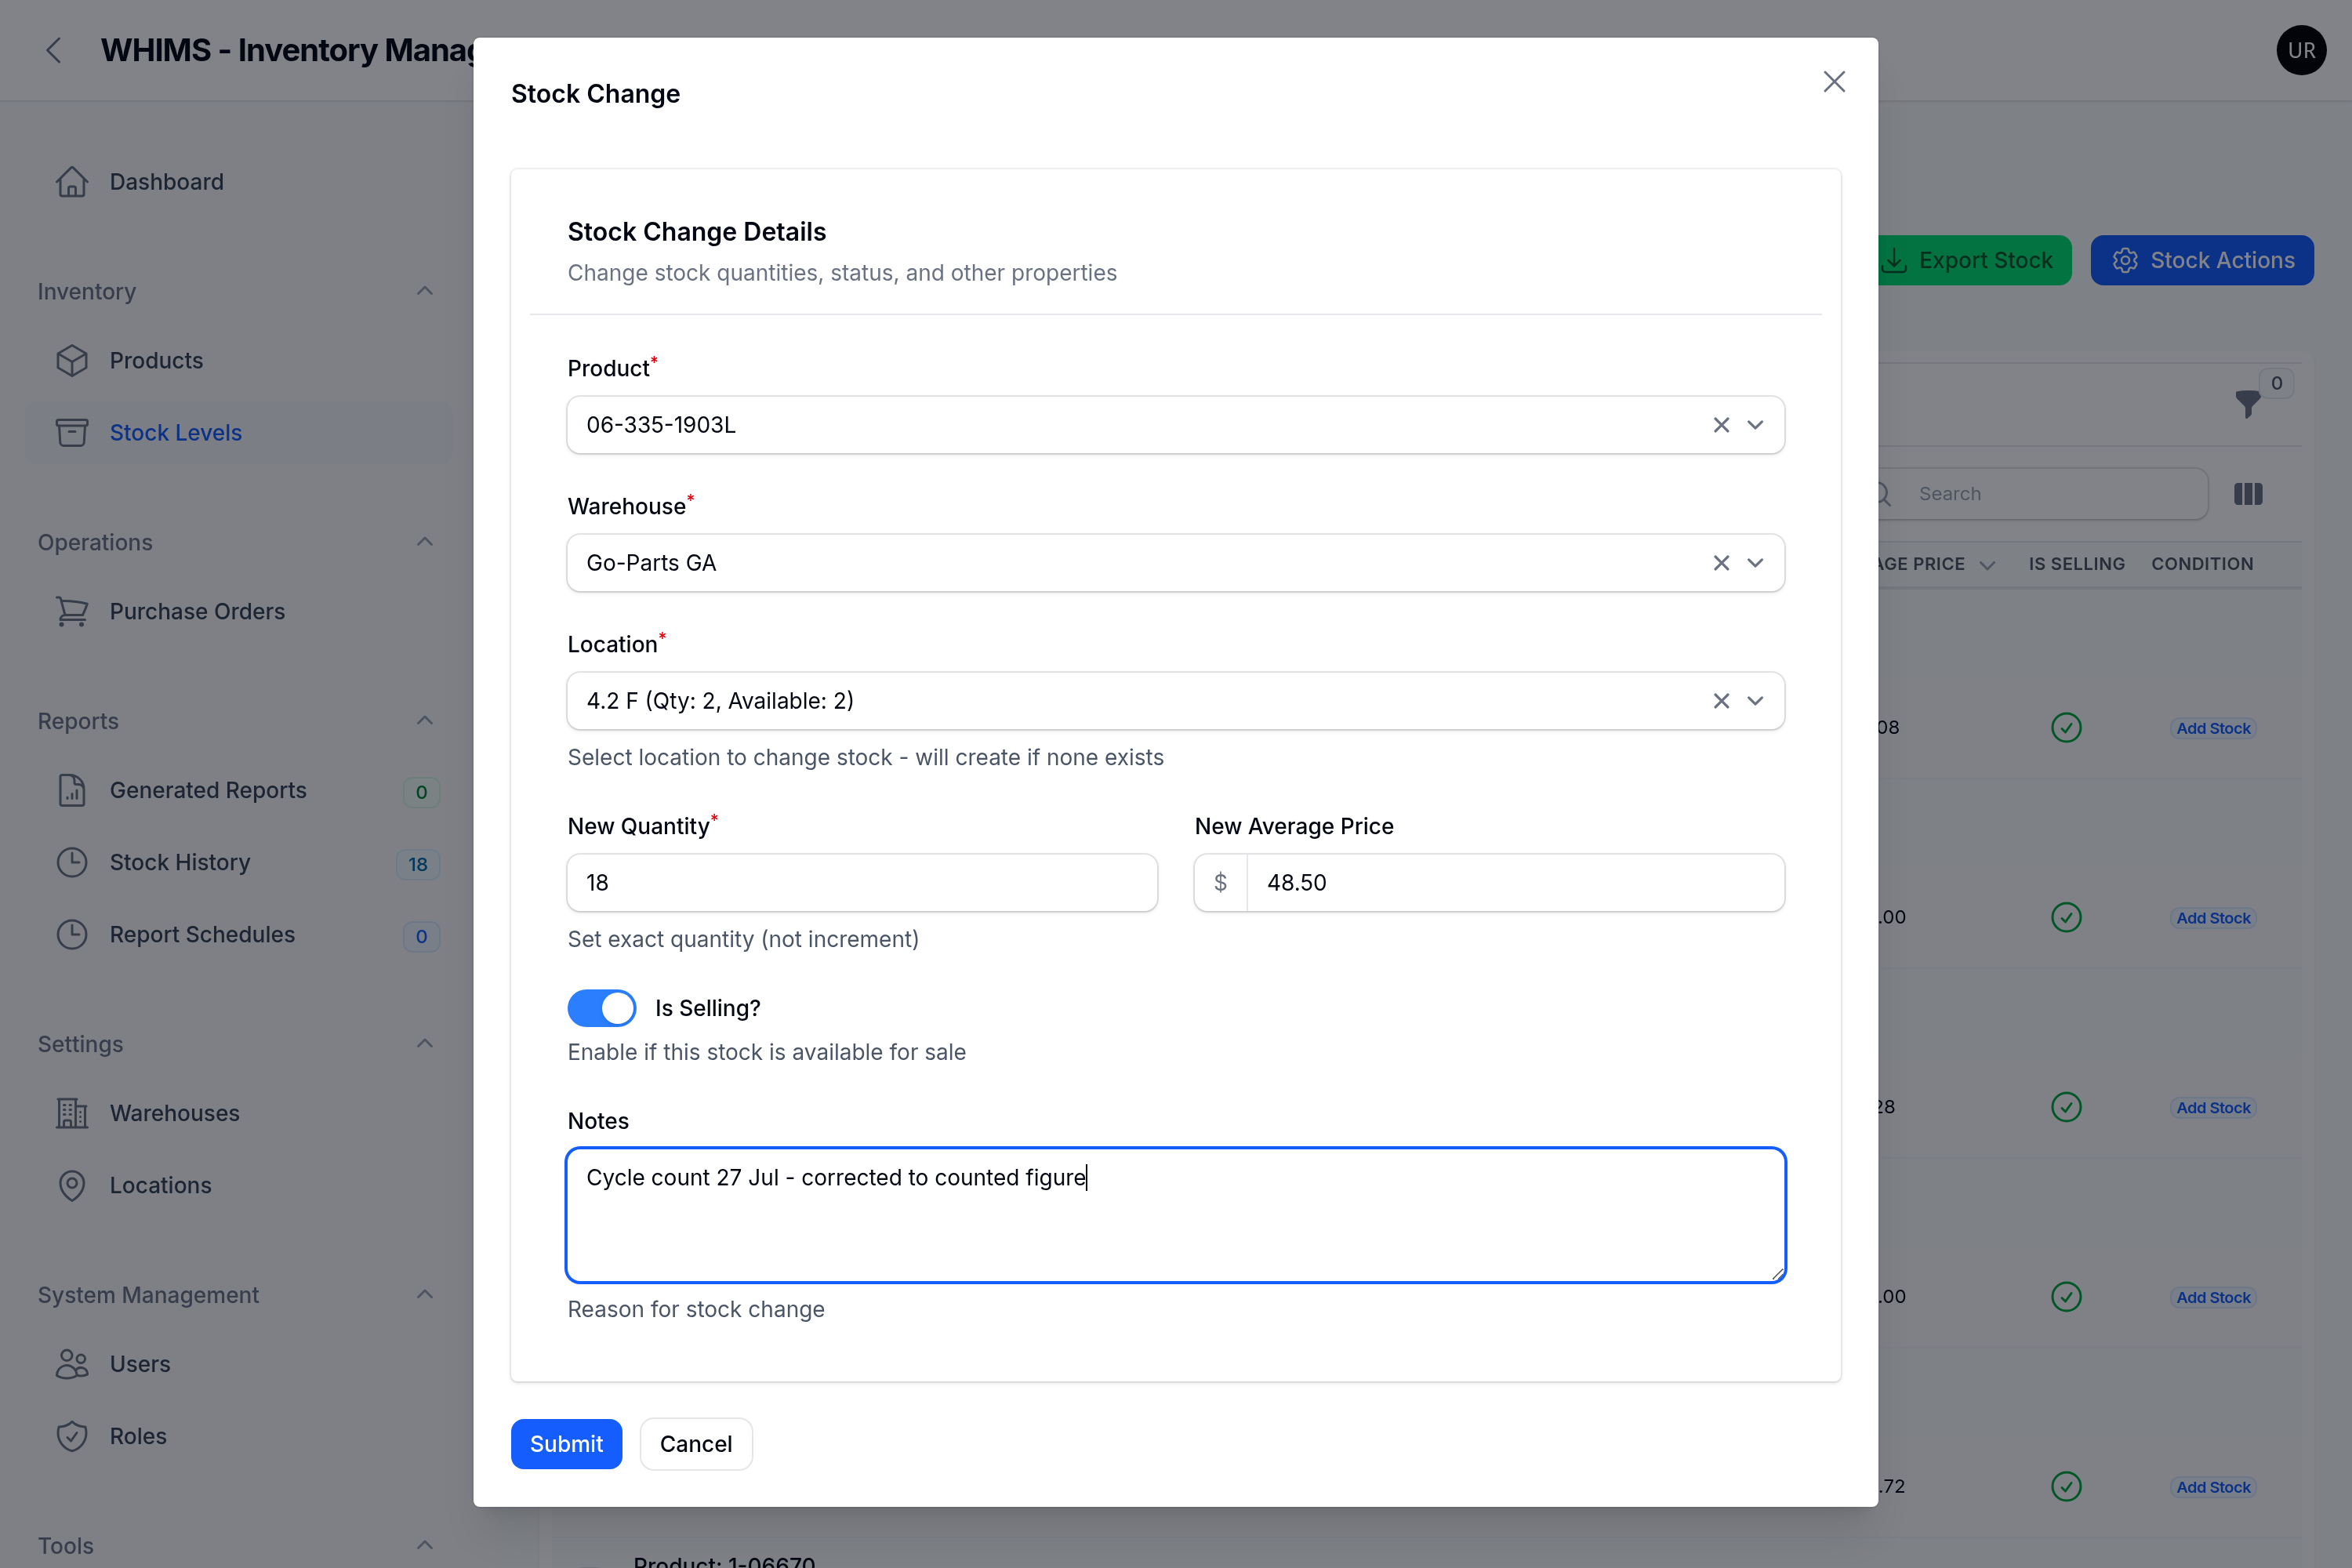
Figure 20 — A completed Stock Change. The shelf currently holds 2; after saving it
will hold exactly 18, and the history will record a change of +16.
The confirmation reads Stock Changed Successfully — "Stock updated from 2 to 18", or
"New stock created with quantity 18" if there was no record on that shelf before.
Warning
Because Stock Change replaces the figure, typing the wrong number here has an immediate and
total effect. Typing 1 instead of 100 wipes out 99 units. Read the number back to yourself before
clicking Submit.
ZZs4_8ZZ4.8Adjusting many records at once — Bulk Stock Change
The spreadsheet version of Stock Change — the right tool after a full warehouse count.
Go to Stock Levels → Stock Actions → Bulk Stock Change.
Download the template from the grey text under the upload box.
Fill in one row per shelf using the columns in section 6.5. The
new_quantity column is the counted figure, not a difference.
Save as CSV, upload the file, and click Submit.
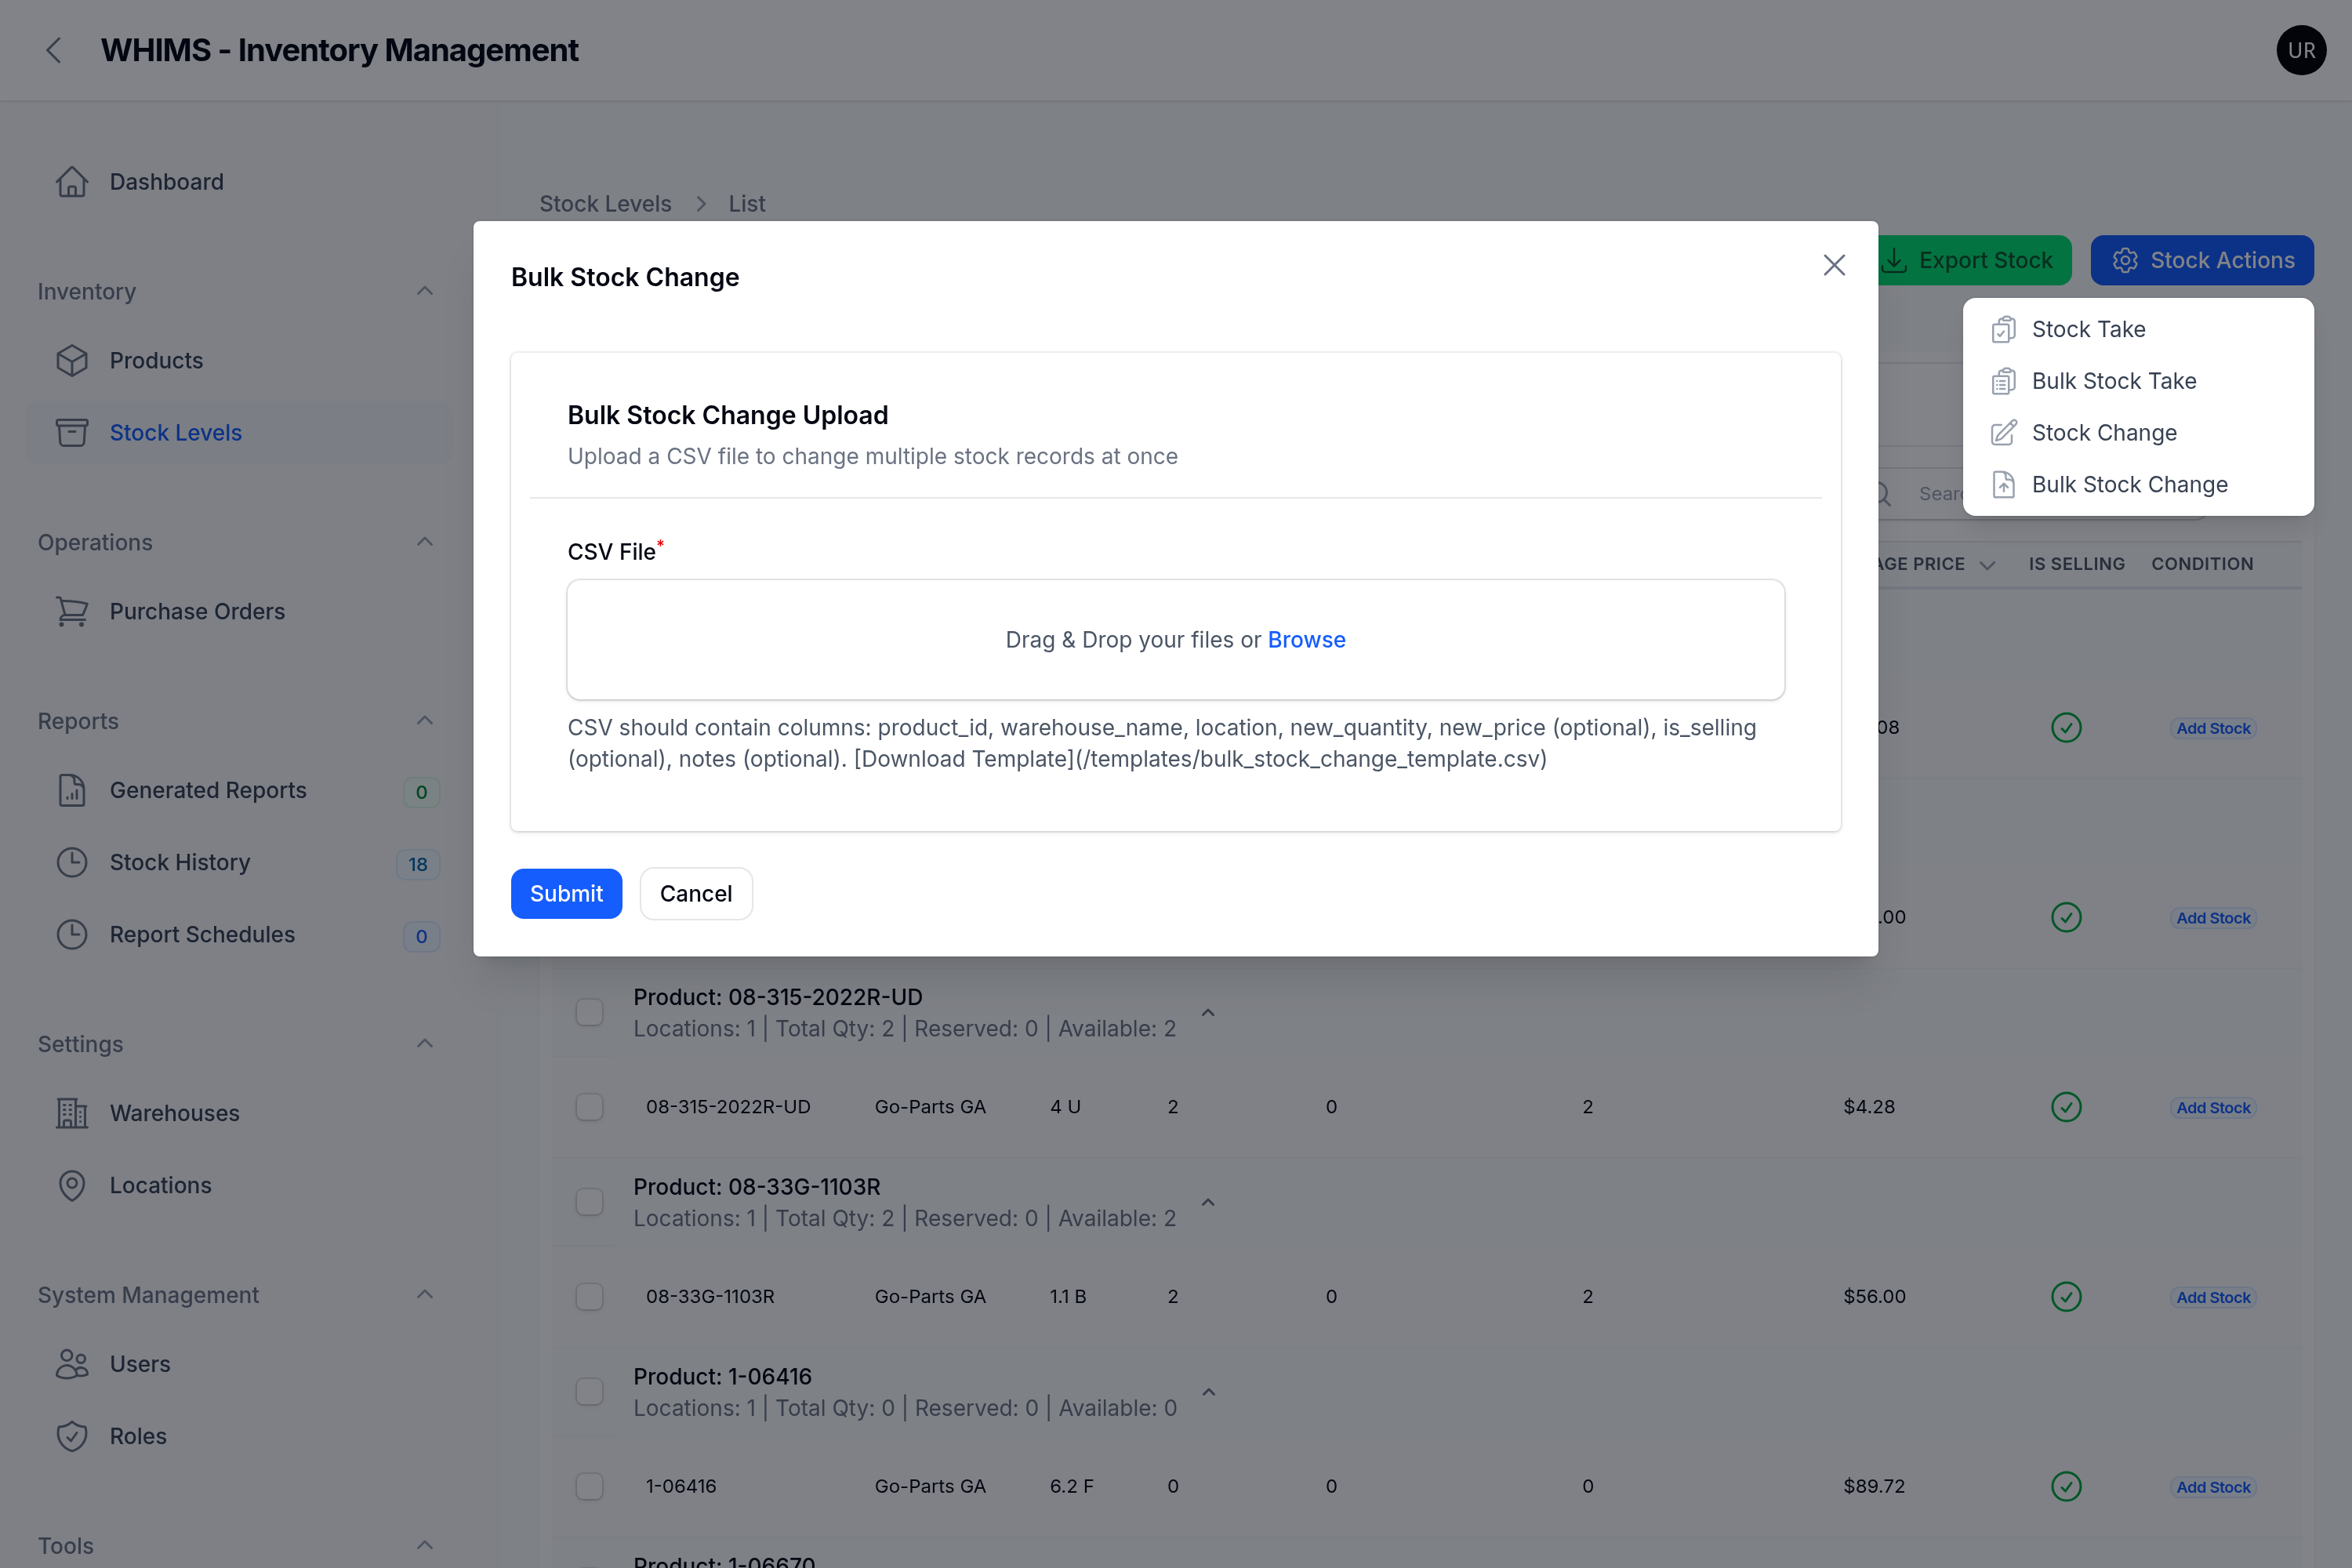
Figure 21 — Bulk Stock Change. Every row overwrites the quantity on the shelf it
names — treat this file with the same care as the single form.
Important
Check your spreadsheet before uploading, especially for blank quantity cells and stray rows at the
bottom. A single mistyped row silently overwrites a good stock figure, and the only way back is a
second correction.
ZZs4_9ZZ4.9Viewing and verifying updated stock
Never assume. Check every change.
Go to Inventory → Stock Levels.
Type the Product ID into the Search box above the table. The list
filters as you type.
Read the group heading — it gives Total Qty, Reserved and
Available across every shelf for that part.
Read the row for the shelf you changed and confirm the
Quantity column matches what you expected.
If the figure looks unchanged, refresh the page with F5 before
concluding anything is wrong.
Tip — reading the three quantity columns
Quantity is everything physically on the shelf. Reserved Quantity is the part of
it already promised to orders. Available Quantity is what is left to sell — quantity minus
reserved. Your stock movements change Quantity; reserved is managed by the order process and
cannot be edited here.
ZZs4_10ZZ4.10Reviewing stock history
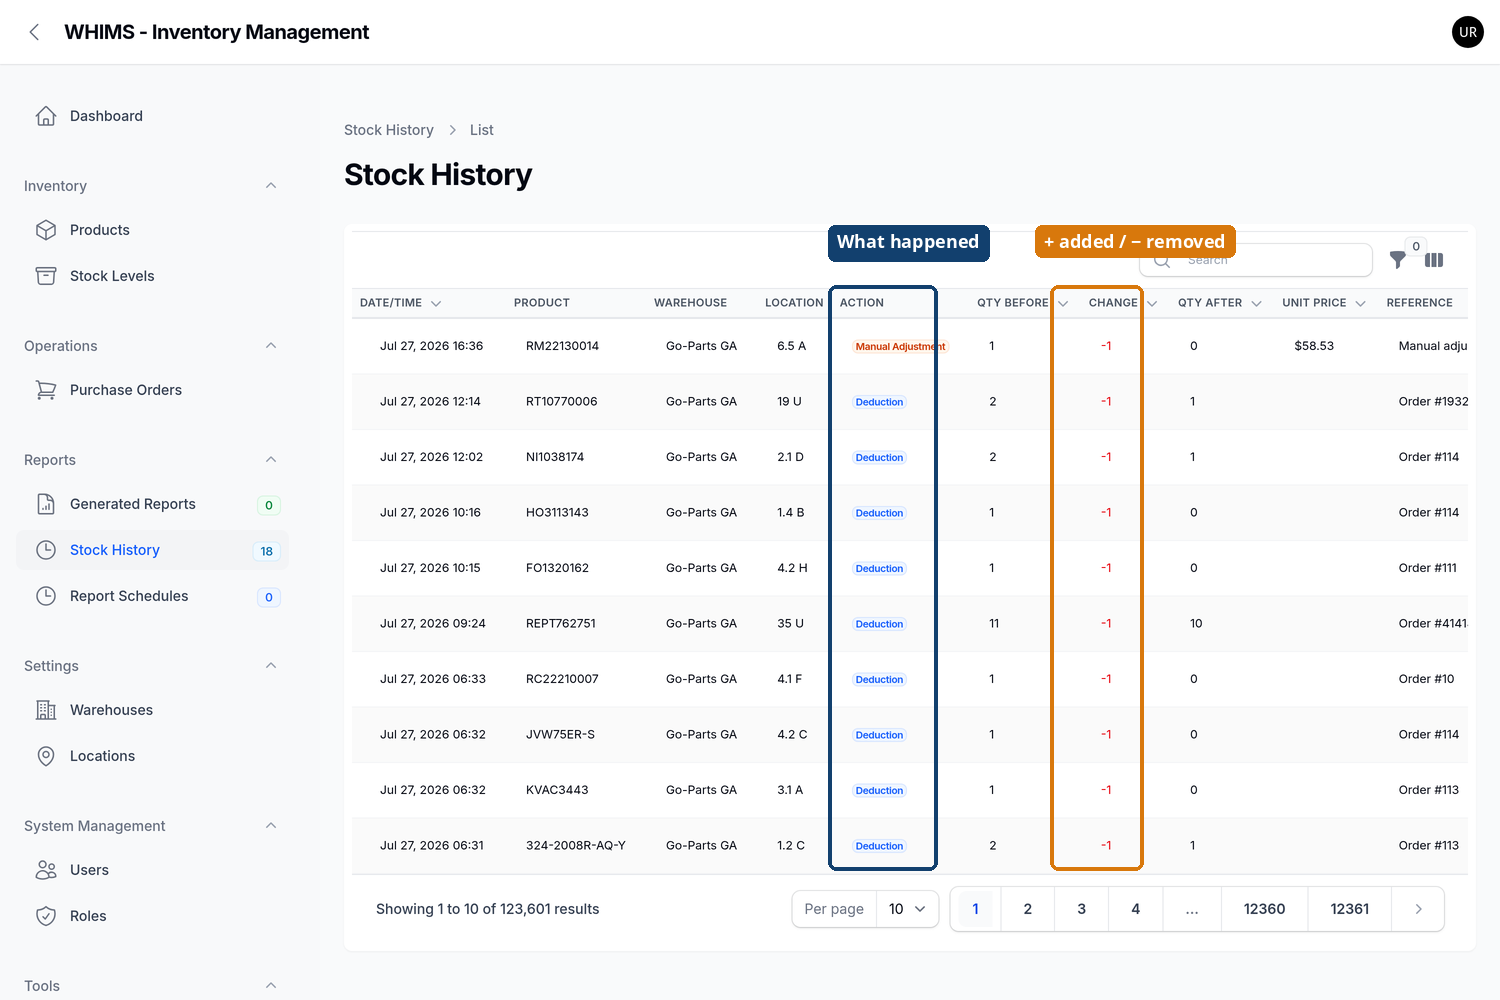
Every movement WHIMS has ever recorded is kept. There are two ways in.
All movements, across every product
Go to Reports → Stock History.
The newest entries are at the top.
Use the funnel icon to filter by Action Type, Warehouse or Product, or type
into the Search box.
Figure 22 — Stock History. The Action column says what kind of movement it
was; the Change column shows the size and direction — green with a plus for stock in, red with
a minus for stock out. Qty Before and Qty After let you follow the running balance.
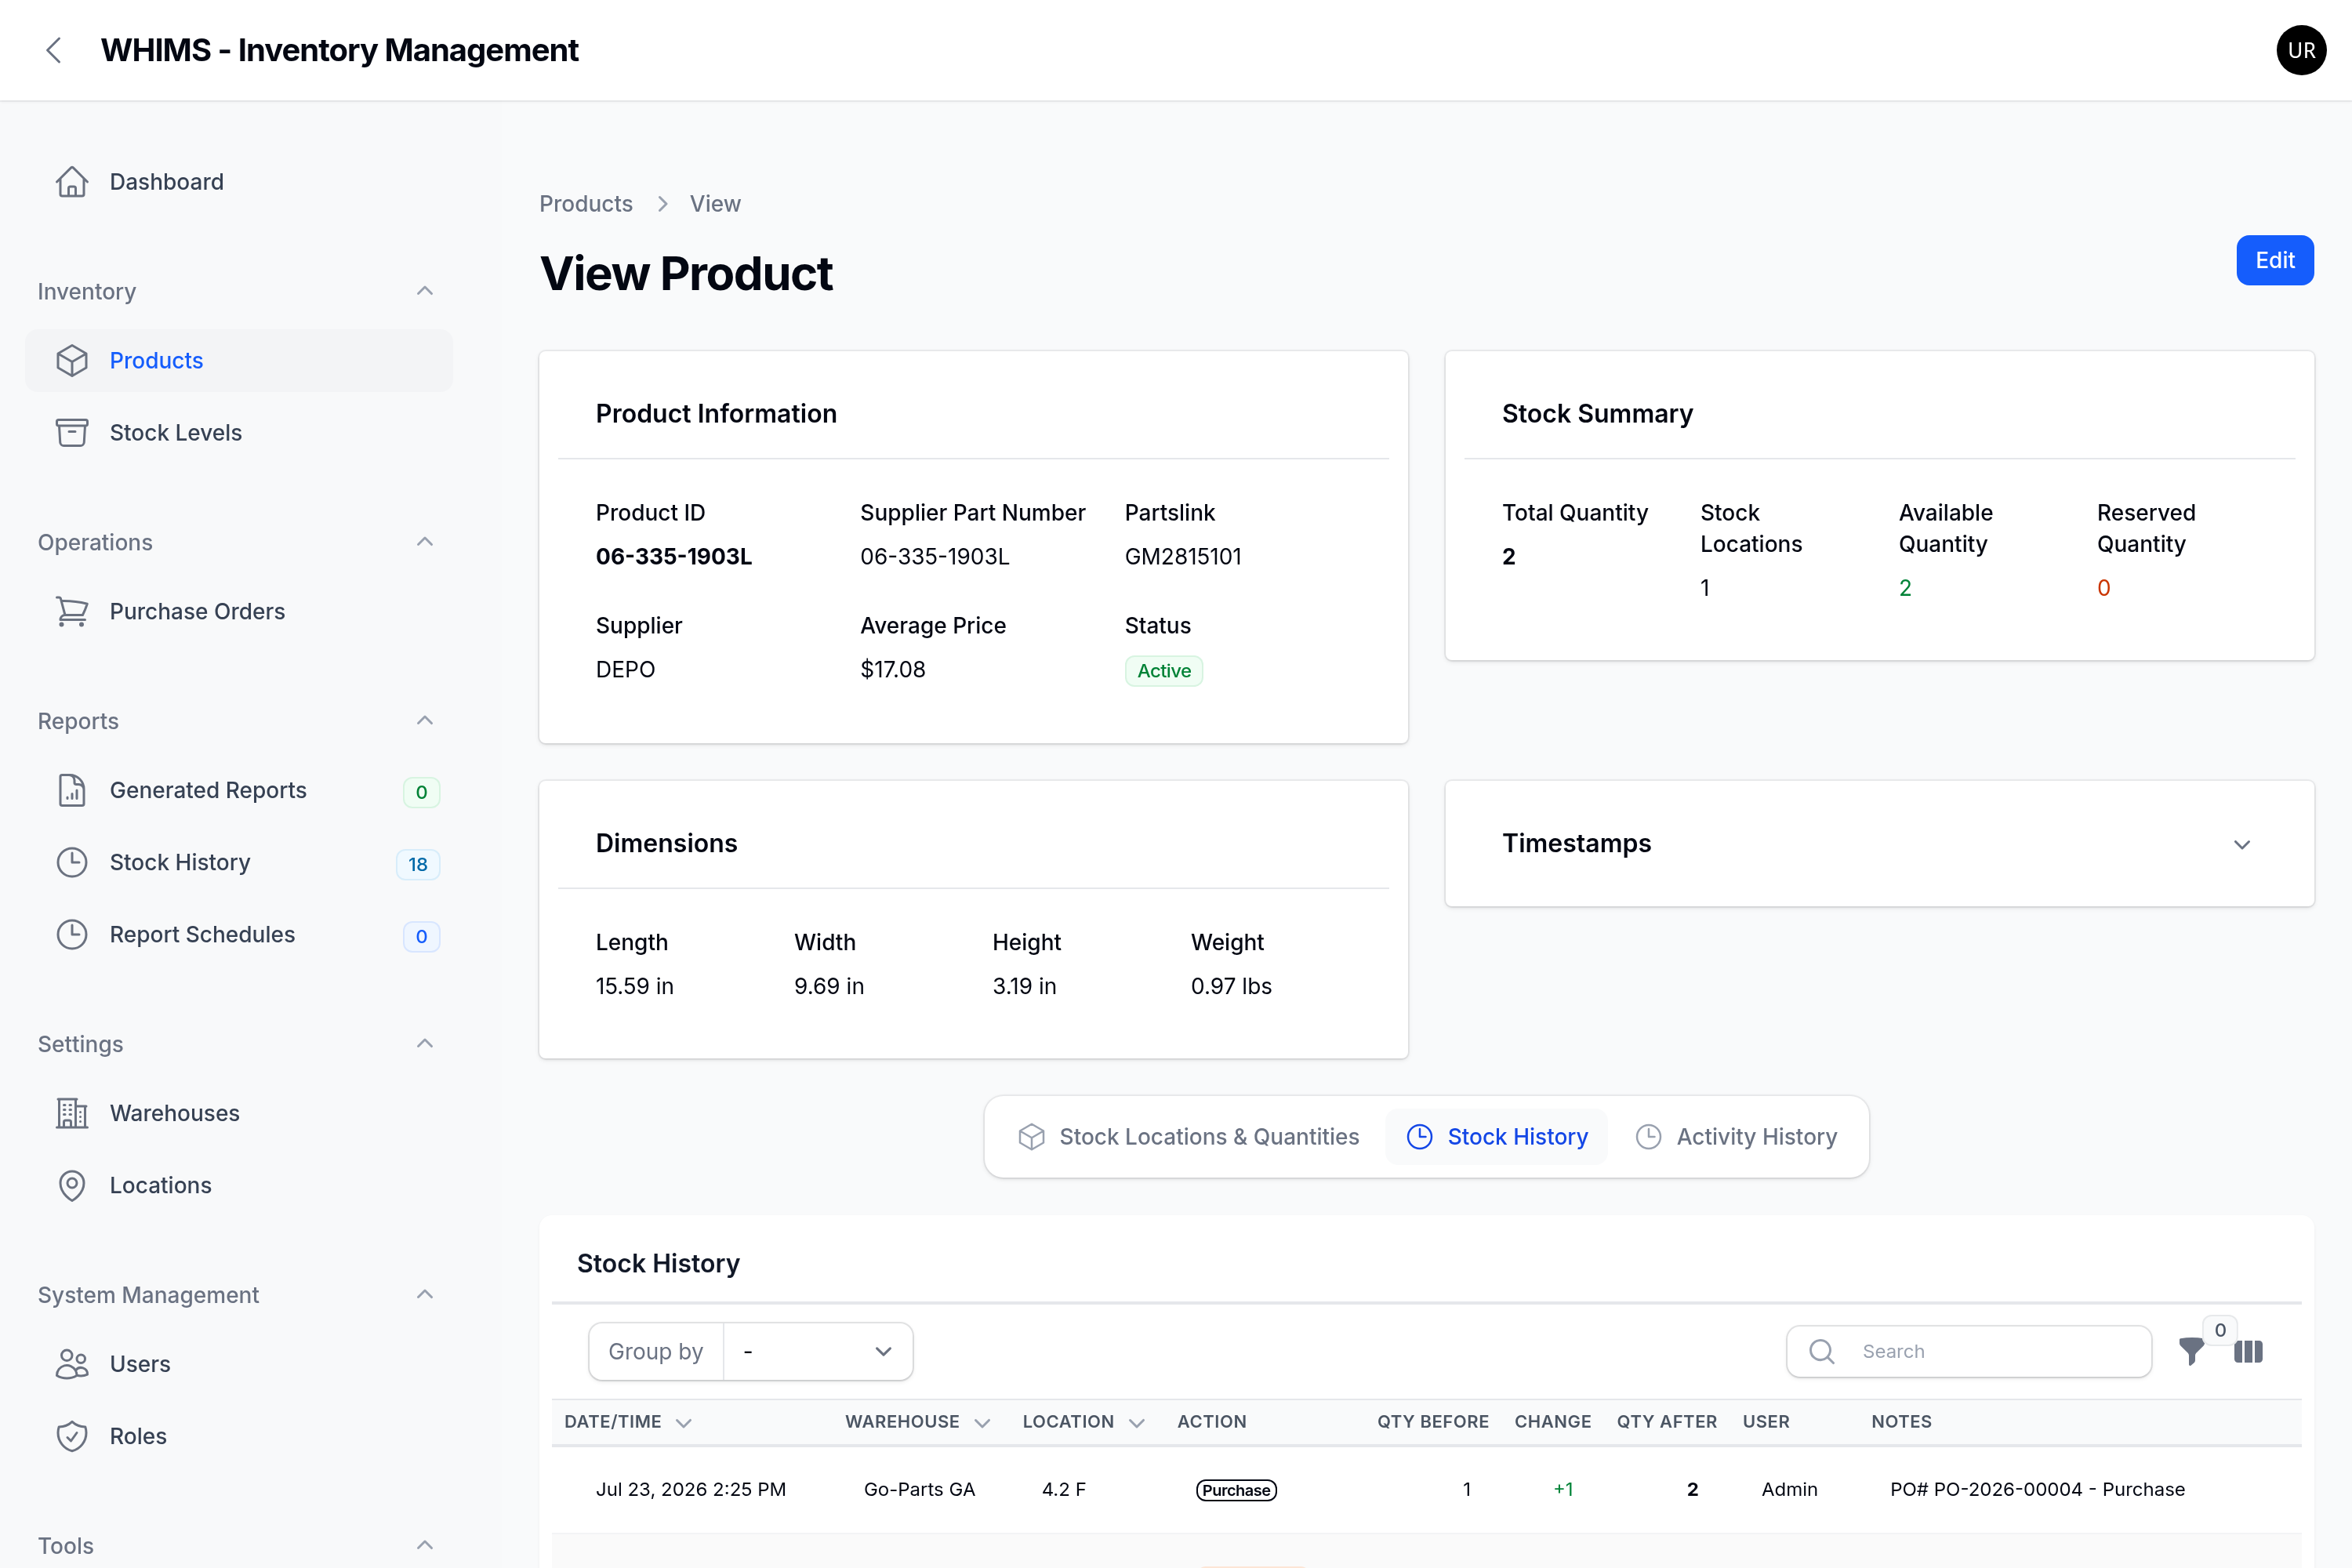
Movements for one product
Open the product from Inventory → Products.
Click the Stock History tab.
Figure 23 — The same information limited to one part, with the reason you typed in
the Notes column. This tab refreshes itself about once a minute.
Note
Stock History is permanent and read-only. There are no edit or delete buttons anywhere on these
screens, for anyone. That is deliberate — it is what makes the log trustworthy.