| Version | Date | Change | Author |
|---|---|---|---|
| 1.0 | 27 July 2026 | First release. Covers Stock Take, Bulk Stock Take, Stock Change, Bulk Stock Change, the Adjust window on the product page, and Empty Location. | Inventory Systems Team |
What this feature does, when to use each option, and why getting it right matters to everyone who touches stock.
WHIMS keeps a running count of how many units of every part you hold, and exactly where each one sits — which warehouse, and which shelf or bin inside that warehouse. That count is what salespeople, buyers and pickers rely on all day.
Most of the time the count looks after itself: receiving a purchase order adds stock, and selling or shipping removes it. But real warehouses are not tidy. Boxes turn up without paperwork, items get damaged, a shelf gets counted and the number on the screen simply does not match the number on the shelf.
The Stock Add / Remove / Adjust feature is the set of tools that lets a person step in and correct the count by hand. There are three things you can do:
Every one of these actions is written into a permanent log called Stock History, together with your name, the date and time, and the reason you typed. Nothing you do here is anonymous, and nothing is silently overwritten.
A stock figure that nobody trusts is worse than no figure at all. Staff stop looking at the screen, start walking to the shelf, and the system quietly becomes decoration. These tools exist so that the moment somebody notices a difference, they can fix it properly — in seconds, with a reason attached — instead of leaving it for "someone else, later".
Use it when: goods arrive without a purchase order; a customer return is put back on the shelf; you find units that were never entered; you are setting up a brand-new shelf for the first time.
What it does: takes the number that is there now and adds your figure to it. If the shelf held 2 and you add 25, it becomes 27.
Where: Stock Levels → Stock Actions → Stock Take, or the Adjust button on a product, choosing Add to Stock.
Use it when: items are damaged, scrapped, lost or stolen; samples are given away; parts are consumed internally; a shelf is cleared out.
What it does: takes the number that is there now and subtracts your figure from it. If the shelf held 14 and you remove 12, it becomes 2.
Where: the Adjust button on a product, choosing Deduct from Stock. To clear an entire shelf at once, use Locations → Empty Location.
Use it when: you have physically counted a shelf during a stock take or cycle count and the system disagrees with what you found.
What it does: replaces the number with the figure you type. You do not work out the difference — you type what is actually there. If the system says 2 and you counted 18, you type 18.
Where: Stock Levels → Stock Actions → Stock Change.
Stock Take adds to the number that is already there. Stock Change replaces it. If a shelf holds 2 units and you meant to end up with 18:
Typing 18 into Stock Take would leave you with 20. When in doubt, use Stock Change and type the number you counted.
This guide is titled "Add / Remove / Adjust" because that is what people say. The buttons on the screen use slightly different words. Here is the translation — keep this table handy for your first few weeks.
| You want to… | Button in WHIMS | Where you find it | Best for |
|---|---|---|---|
| Add stock | Stock Take | Stock Levels → Stock Actions | One product |
| Add stock | Bulk Stock Take | Stock Levels → Stock Actions | Many products, from a spreadsheet |
| Add stock | Adjust → Add to Stock | Products → open a product → Stock Locations & Quantities | One shelf you are looking at |
| Remove stock | Adjust → Deduct from Stock | Products → open a product → Stock Locations & Quantities | One shelf |
| Remove stock | Empty Location | Locations → open a location | Clearing a whole shelf to zero |
| Adjust stock | Stock Change | Stock Levels → Stock Actions | One product |
| Adjust stock | Bulk Stock Change | Stock Levels → Stock Actions | Many products, from a spreadsheet |
"Stock Take" in WHIMS means add these units to the shelf. It does not mean "wipe the shelf and start again". If you are doing a full physical count and want to set the shelf to exactly what you counted, use Stock Change.
Sales staff quote from the screen. An overstated figure leads to an order you cannot fill; an understated figure loses a sale you could have made.
Purchasing decisions are made from these numbers. Bad numbers mean money tied up in parts you already had, or a shortage nobody saw coming.
WHIMS stores the shelf, not just the quantity. Correct locations turn a five-minute hunt into a ten-second walk.
Quantity multiplied by average price feeds the value of your inventory. Wrong counts distort that figure straight away.
Every correction is logged with a reason. Patterns — repeated shortages on one shelf, one supplier, one shift — become obvious instead of invisible.
When the book figure is usually right, a stock take is a quick confirmation rather than a week of investigation.
Numbered steps are things you do, in order. Bullet points are lists of possibilities. Names of things you click look like this: Stock Actions. Menu paths look like this: Inventory → Stock Levels. Screenshots appear immediately after the step they illustrate, with numbered markers matching the steps.
Four kinds of coloured box appear throughout:
Extra background — useful to know, but you can carry on without it.
A faster or safer way to do the same job.
Something that commonly goes wrong. Read before you click.
A rule you must follow, or something that cannot be undone afterwards.
What you need in place — and what you need to know — before you change a single number.
To use any of these tools you need:
WHIMS records three staff roles: Administrator, Warehouse Manager and Operations. Your administrator sets yours when your account is created.
In the current version of WHIMS the stock screens do not restrict these buttons by role. Anyone who can sign in to the admin area can run Stock Take, Stock Change, Adjust and Empty Location. Control of who can change stock therefore rests entirely on who has an account.
Two consequences worth taking seriously: never share your login, and never leave your session open on an unattended screen. Every movement is stamped with the signed-in user's name — if someone else uses your session, the record will say you did it.
Before you open any form, collect the following. Trying to find it halfway through is how mistakes happen.
| What you need | Why | Example |
|---|---|---|
| Product ID | Identifies the exact part. WHIMS also lets you search by supplier part number or Partslink number. | 06-335-1903L |
| Warehouse | Which site the stock is at. | Go-Parts GA |
| Location (shelf or bin) | Stock is held per location, not per warehouse. The same part on two shelves is two separate records. | 4.2 F |
| The number of units | Either how many to add/remove, or the exact figure you counted. | 25 |
| A reason | Written into the permanent history. Make it useful to someone reading it in six months. | Received from supplier — delivery note DN-4471 |
| Unit price (optional) | Only when you are adding stock and know what this batch cost. | 48.50 |
Write the reason before you open the form. A good reason answers what happened and how you know — "Cycle count 27 Jul, counted by R. Patel, 18 on shelf" beats "adjustment" every single time.
These tools change quantities. They cannot invent the things being counted. Before you start:
The stock record itself does not need to exist. If a product has never been held on a
particular shelf, Stock Take and Stock Change will create the record for you. The dropdown tells you
which is which: (Current Qty: 2) means stock is already there, (No stock) means a
new record will be created.
A guided tour of the screens, so that nothing you see later is a surprise.
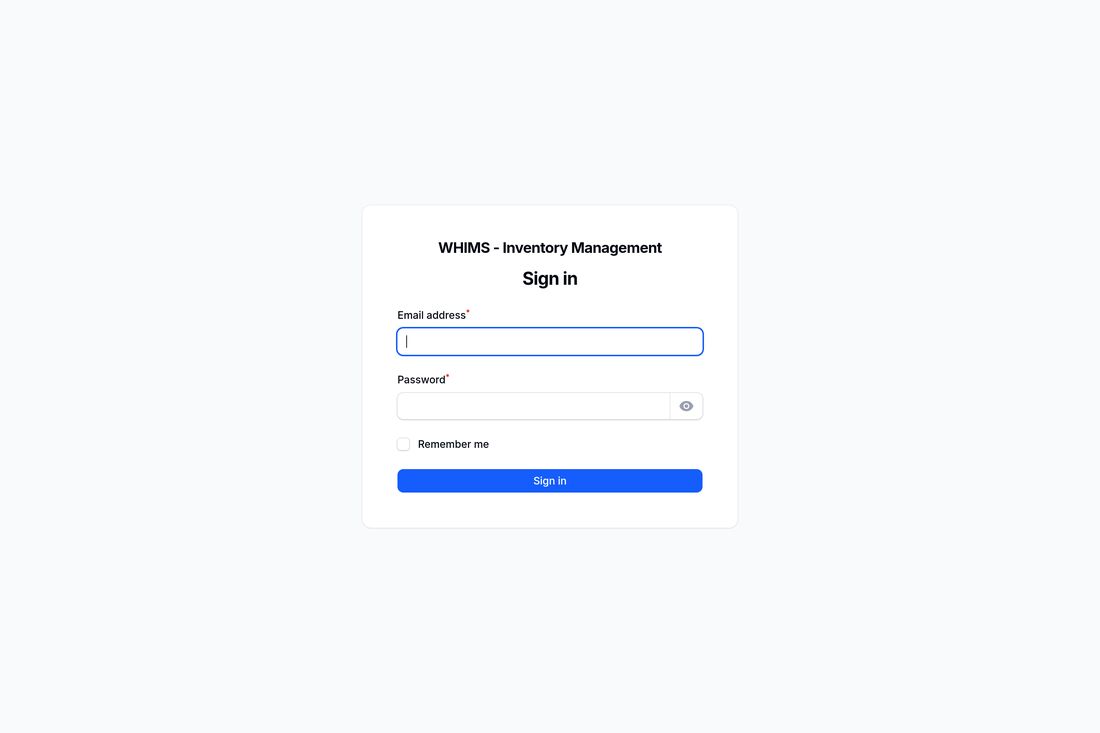
/admin.
After signing in you land on the Dashboard. The menu runs down the left-hand side and is divided into groups. Three of them matter for stock work:
| Menu group | Item | What it is for |
|---|---|---|
| Inventory | Products | The catalogue of parts. Open a product here to see its shelves and use the Adjust button. |
| Stock Levels | The main stock screen — quantities by product and location, and the Stock Actions menu. | |
| Reports | Stock History | The permanent log of every movement, across all products. |
| Settings | Warehouses | Your sites. |
| Locations | Shelves and bins. Also where Empty Location lives. |
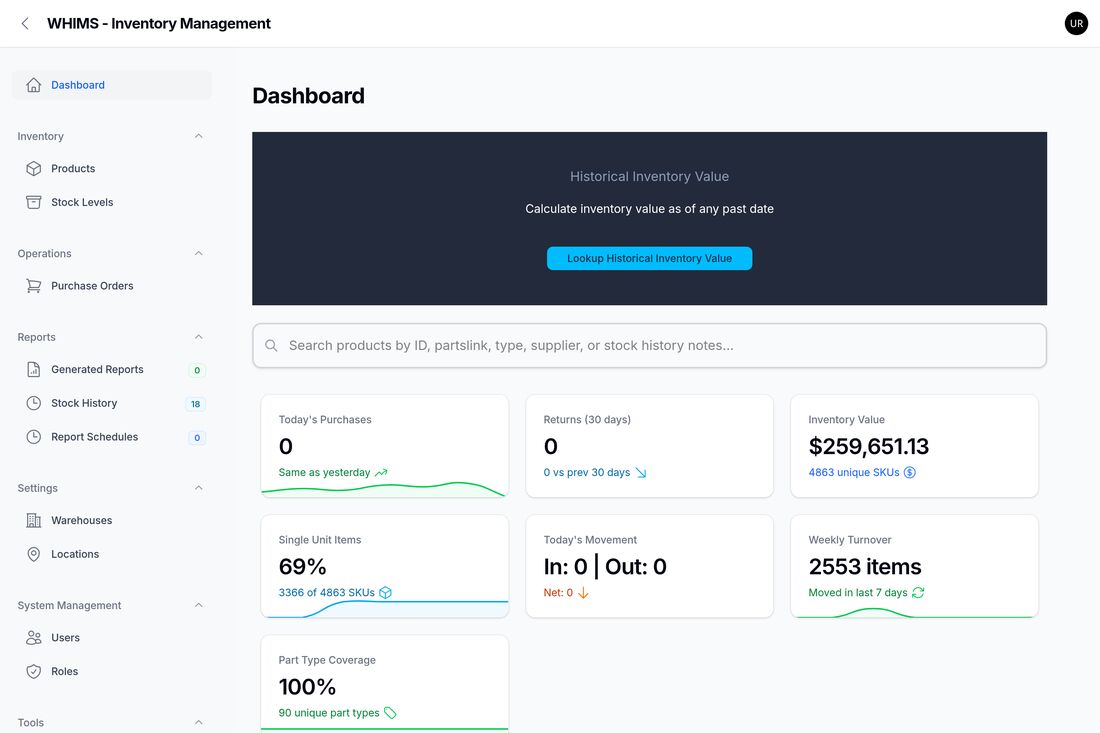
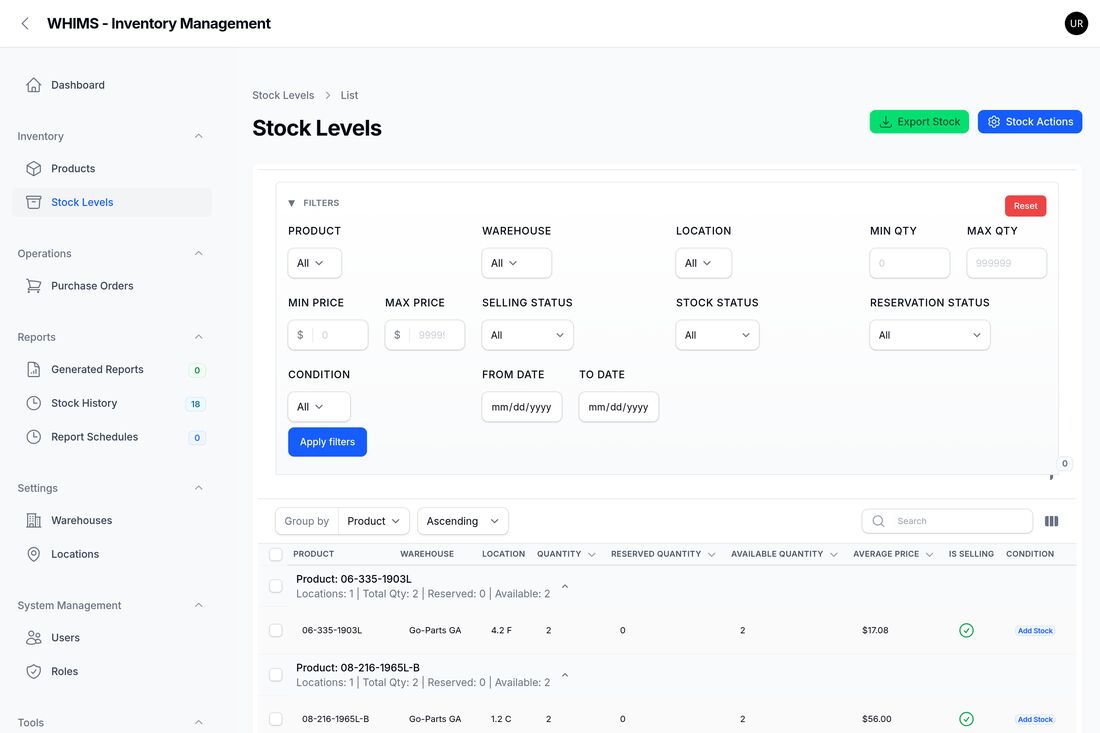
Go to Inventory → Stock Levels. This is the home of day-to-day stock work.
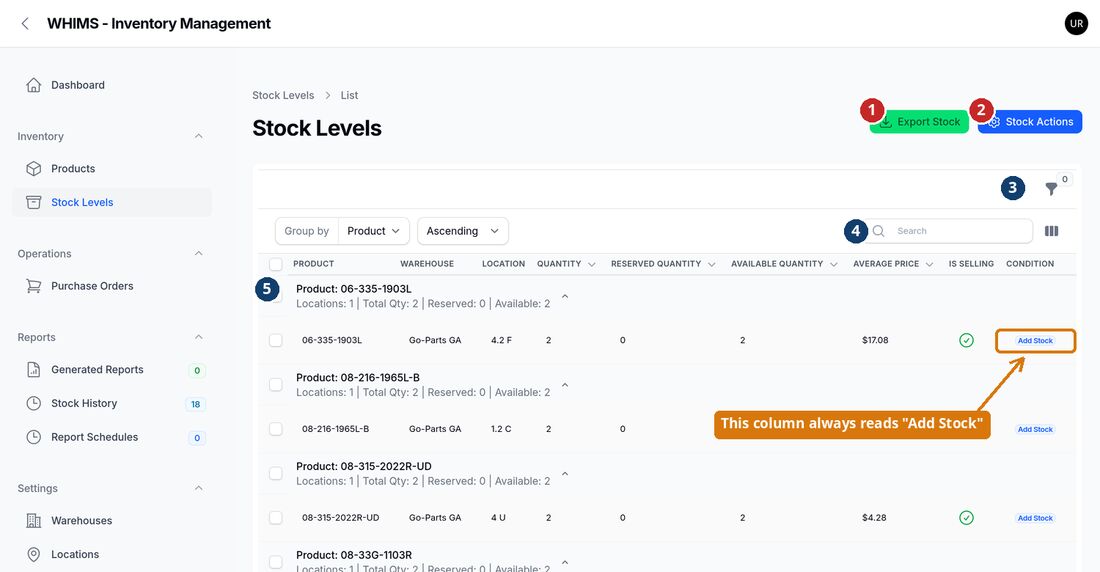
Rows are grouped by product. The grey heading row above each group gives you the summary at a glance — Locations, Total Qty, Reserved and Available — and the rows beneath it show each individual shelf. Click the small arrow at the right of a heading to fold that product away.
The last column is headed Condition, but every row displays the same blue text, "Add Stock". It is not a button and clicking it does nothing. The real condition of a stock record (New, Used, Refurbished, Damaged) is not shown correctly in this column at present. If you need to work by condition, use the Condition filter in the filter panel instead. This has been reported to the systems team.
Click the blue Stock Actions button at the top right. Four options drop down.
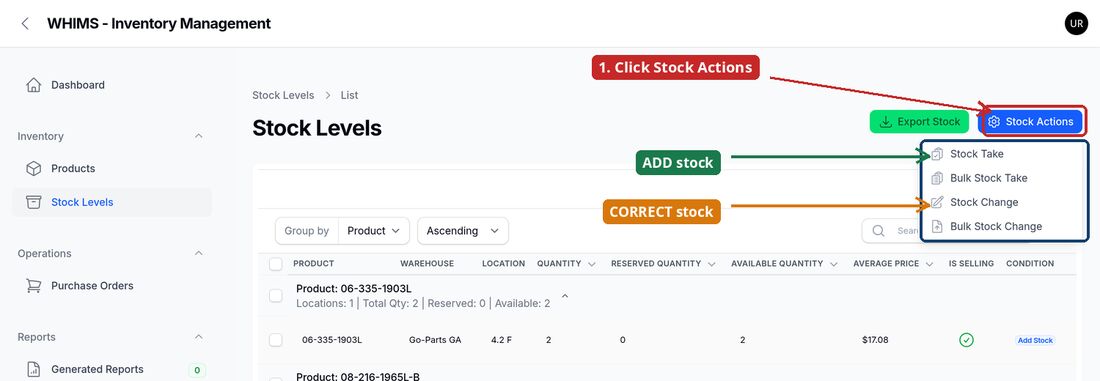
| Menu option | Effect | Use it for |
|---|---|---|
| Stock Take | Adds to what is there | One product, one shelf. |
| Bulk Stock Take | Adds to what is there | Many products at once, from a CSV spreadsheet. |
| Stock Change | Replaces the figure | One product, one shelf, where you know the true count. |
| Bulk Stock Change | Replaces the figure | Many products at once, from a CSV spreadsheet. |
Click the funnel icon above the table to open the filters. Set as many as you like, then click Apply filters. Reset clears them all.
| Button | Where | What happens when you click it |
|---|---|---|
| Export Stock | Stock Levels | Builds a spreadsheet of every stock record and confirms with a green message. Changes nothing. |
| Stock Actions | Stock Levels | Opens the menu of four stock tools. |
| Apply filters / Reset | Filter panel | Narrows or clears the list. Changes nothing. |
| Adjust | Product page, Stock Locations & Quantities | Opens the add-or-remove window for that one shelf. |
| Export Stock | Location page | Downloads a spreadsheet of everything on that shelf. |
| Empty Location | Location page | Starts the two-step wizard that sets every product on that shelf to zero. |
| Submit | Any form | Saves. This is the point of no return. |
| Cancel / ✕ | Any form | Closes without saving. Safe to use at any time. |
| What you see | What it means |
|---|---|
| Green button | Safe, read-only action — usually a download. |
| Blue button | The normal way forward: open a menu, apply filters, submit a form. |
| Orange button | Changes stock. Think before clicking. |
| Red button | Destructive and permanent. Empty Location is the only one here. |
| Green tick in Is Selling | This stock is available for sale. |
| Red cross in Is Selling | Held back — not offered to customers. |
| Green +5 in Stock History | Stock went up by 5. |
| Red −5 in Stock History | Stock went down by 5. |
| Red asterisk * beside a field name | You must fill this in. |
| Number beside the funnel icon | How many filters are switched on. |
| Green message, top right | Success — your change was saved. |
| Red message, top right | Refused — nothing was saved. Read it and try again. |
Every task, from opening the screen to checking that your change landed. Follow the numbered steps exactly; the screenshot after each set matches the numbers.
Bookmark this page in your browser. It is the screen you will use most, and it is one click from everything else in this guide.
Use this when units have arrived, or you have found units that the system does not know about, and you want to increase the figure on one shelf.
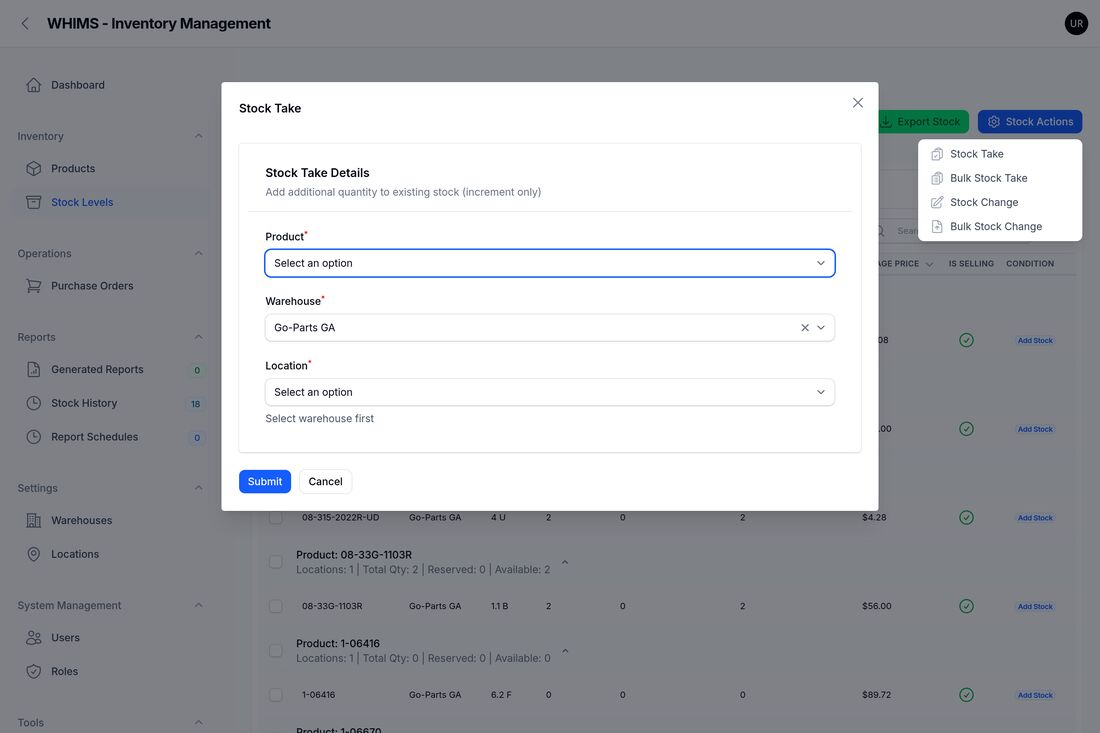
06-335-1903L. The list
narrows as you type.You can also search by supplier part number, Partslink number or part description. If nothing at all is found, the product is not in WHIMS yet — see section 9.
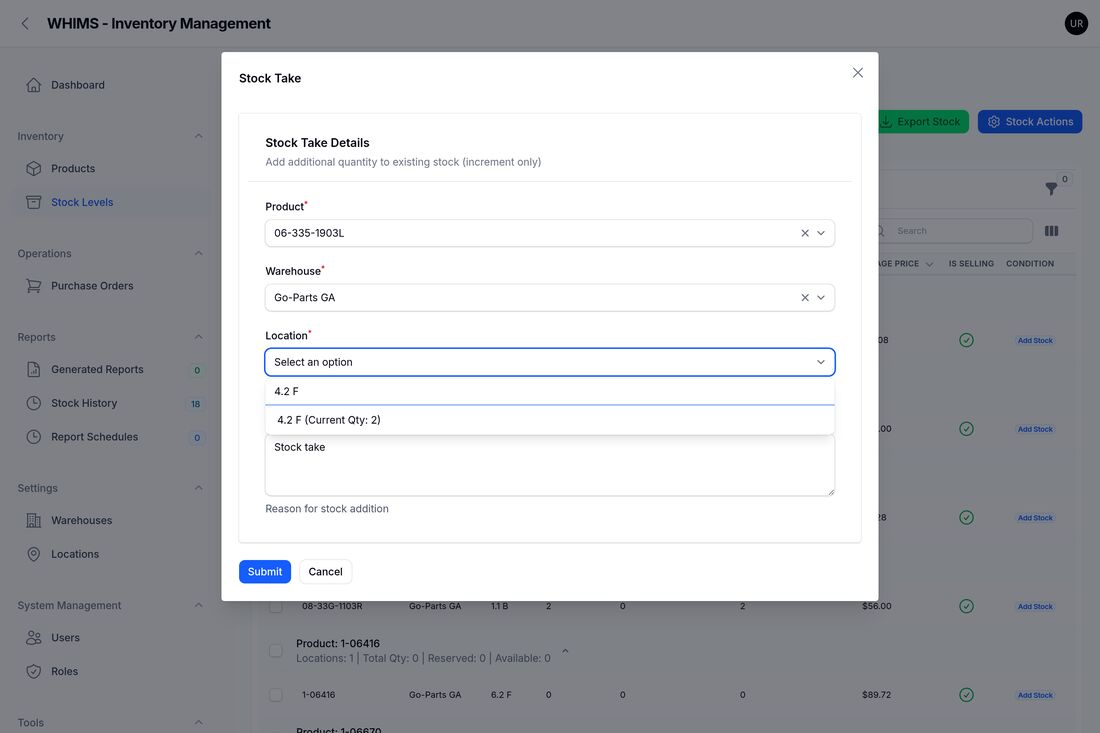
4.2 F (Current Qty: 2) means two units are there now. A shelf marked (No stock)
has none — picking it creates a brand-new stock record, which is perfectly normal when you are
putting a part somewhere for the first time.Changing the product or the warehouse clears the location you had chosen. Always work top to bottom: Product, then Warehouse, then Location. If you go back and change something above, re-check the location before you submit.
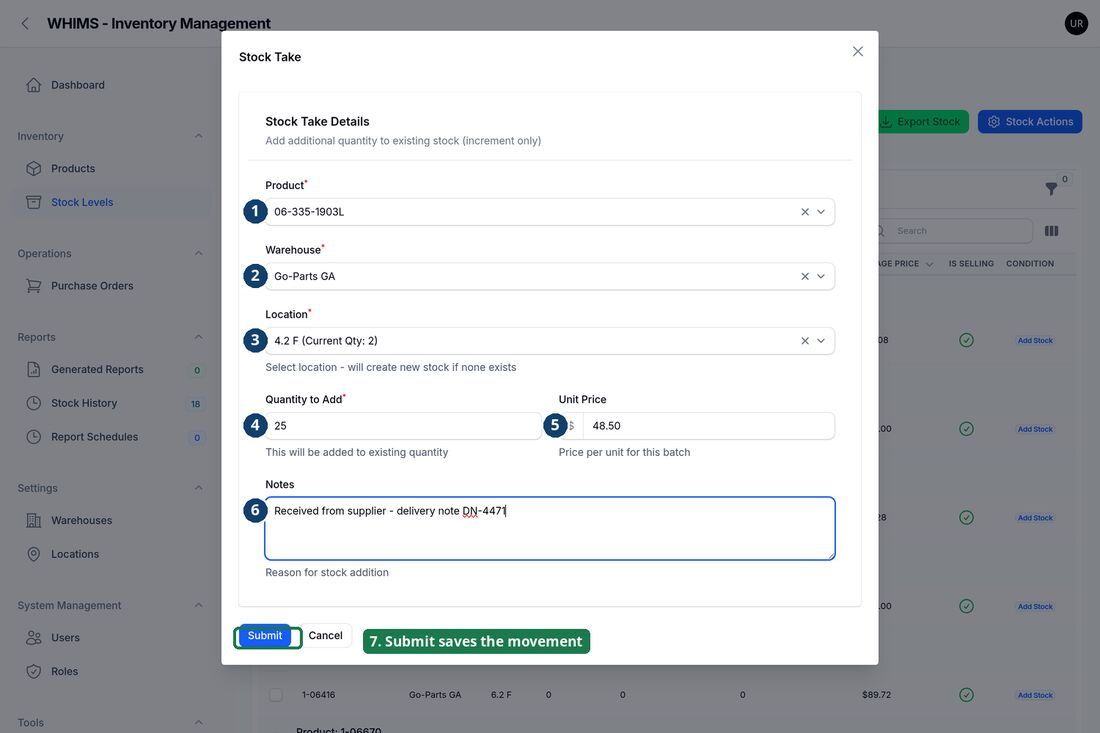
A green message appears at the top right:
If a red message appears instead, nothing was saved — see section 9.
There is no undo. If you added 25 when you meant 5, open the product page and use Adjust → Deduct from Stock for the difference (20), with a reason such as "Correcting over-entry on stock take". Both entries stay in the history, which is exactly what an auditor wants to see.
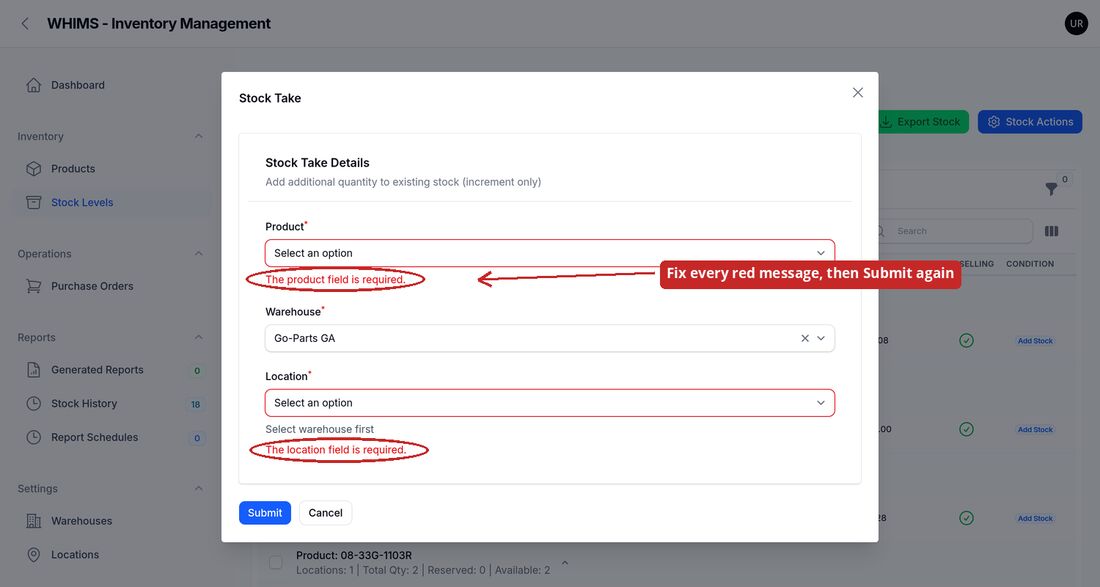
WHIMS checks the form before saving. Anything missing is marked in red and nothing is written to your stock.
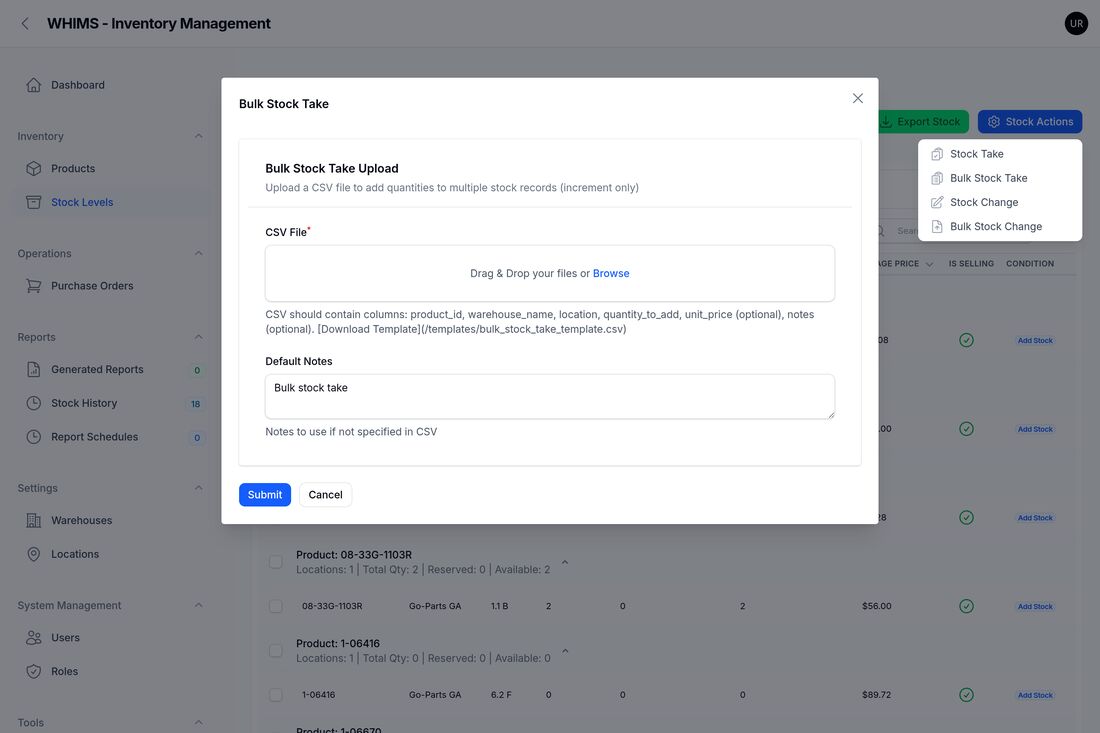
When a delivery covers dozens of parts, typing them one at a time is slow. Bulk Stock Take reads a spreadsheet and adds every line in one go.
When it finishes you get a message such as "Processed 12 records successfully. 2 errors occurred." followed by the first few problem rows. Rows that succeeded are already saved — only the listed rows failed. Fix those in the spreadsheet, delete the rows that worked, and upload again.
WHIMS does not check whether it has seen a file before. Uploading the same spreadsheet a second time adds every quantity a second time. If you are unsure whether an upload went through, check Reports → Stock History before repeating it.
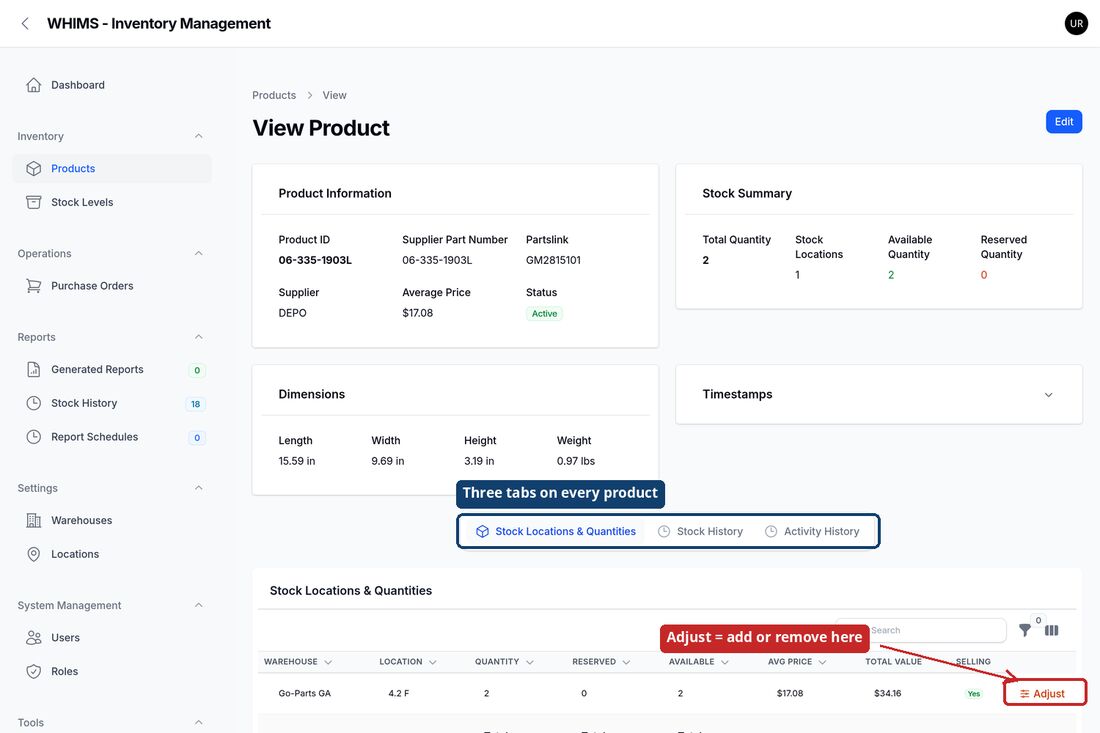
If you are already looking at a product and can see its shelves, this is the quickest way to add a few units.
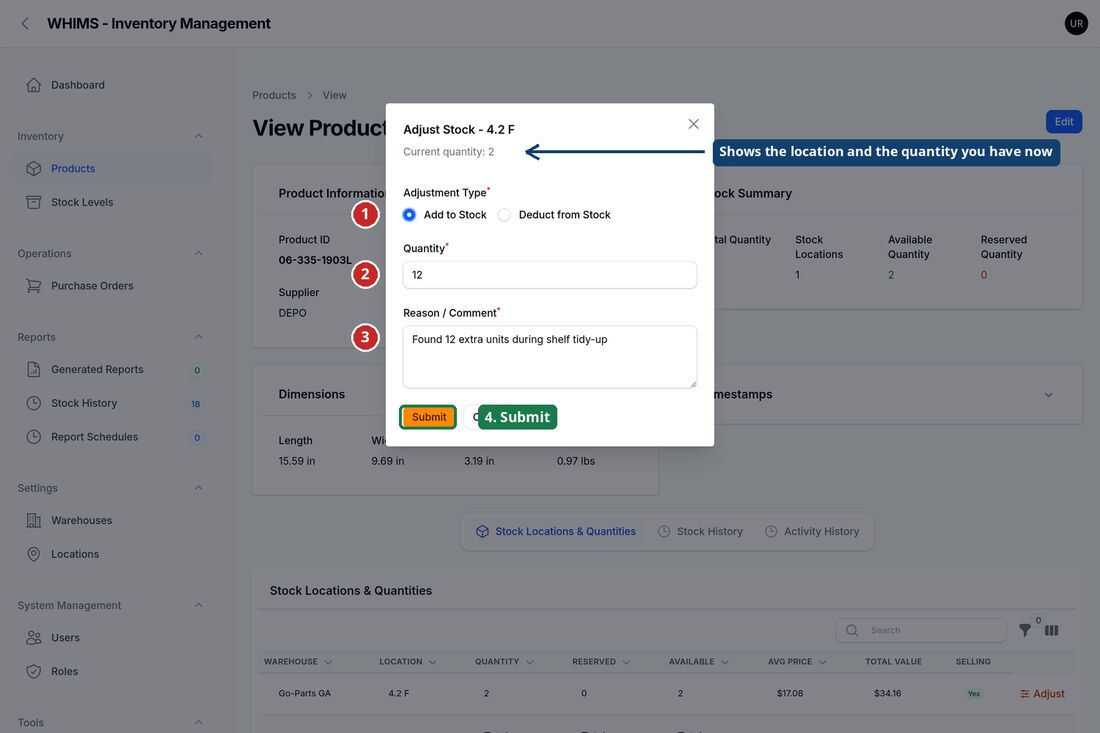
A green Stock Adjusted message confirms the result, for example "12 units added to stock. New quantity: 14".
Use this when units have physically left the shelf outside the normal sales process: damaged, scrapped, lost, used internally, or given away.
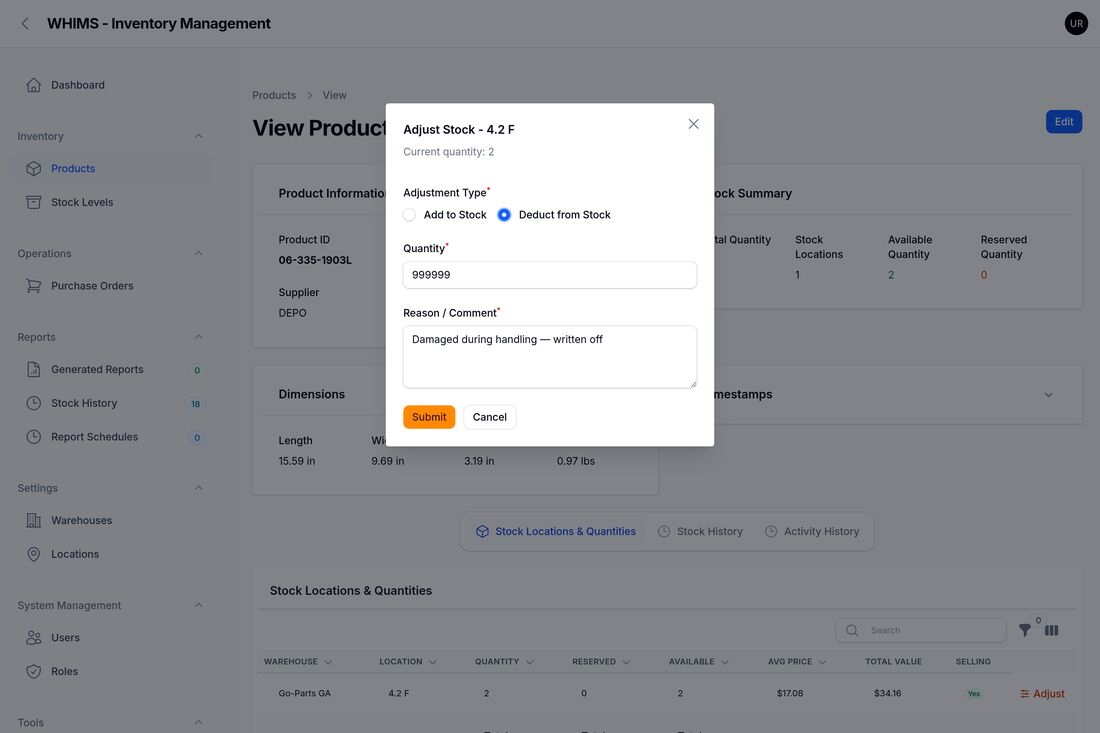
You will see Stock Adjusted — "12 units deducted from stock. New quantity: 2".
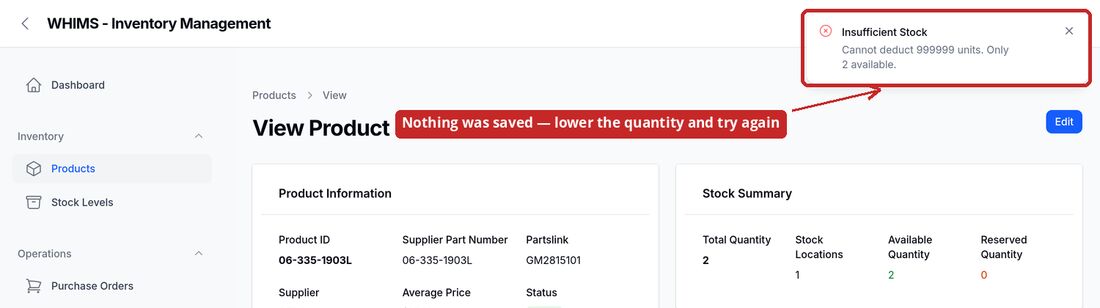
WHIMS refuses and tells you exactly what is available. Nothing is saved — the shelf keeps the figure it had.
This sets every product on the shelf to zero in one step and cannot be undone. Only use it when a shelf is genuinely being cleared — for example when a bin is decommissioned or its entire contents have been written off. Export the shelf first, every time.
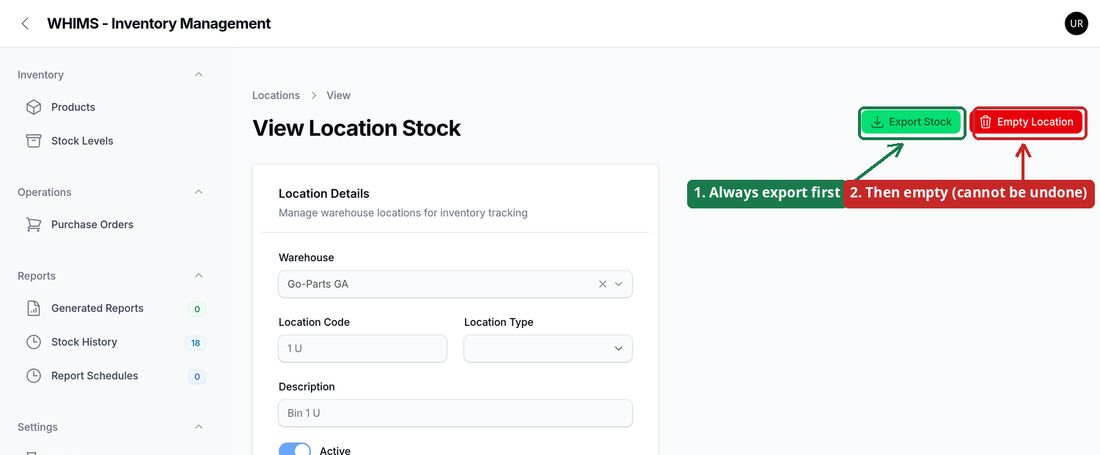
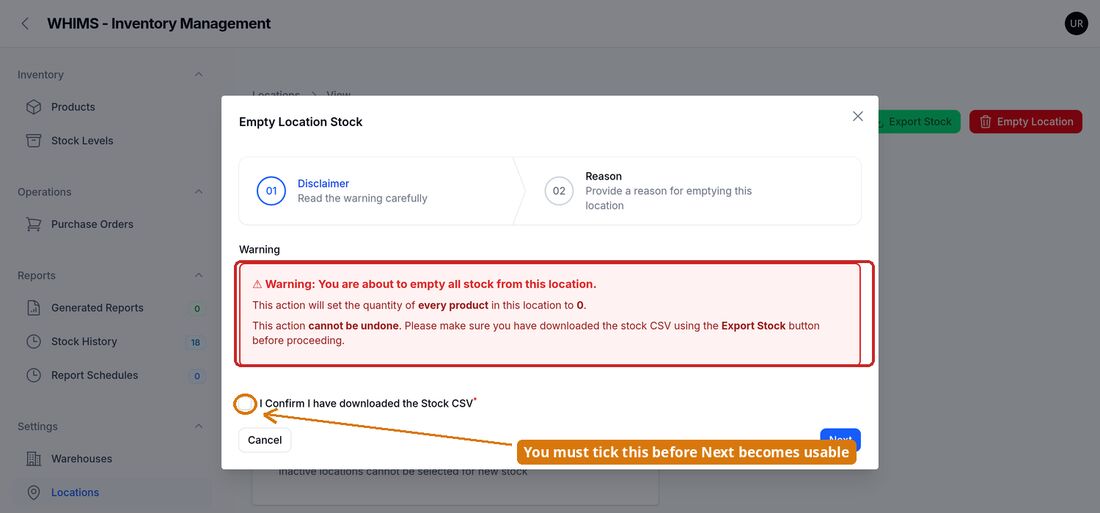
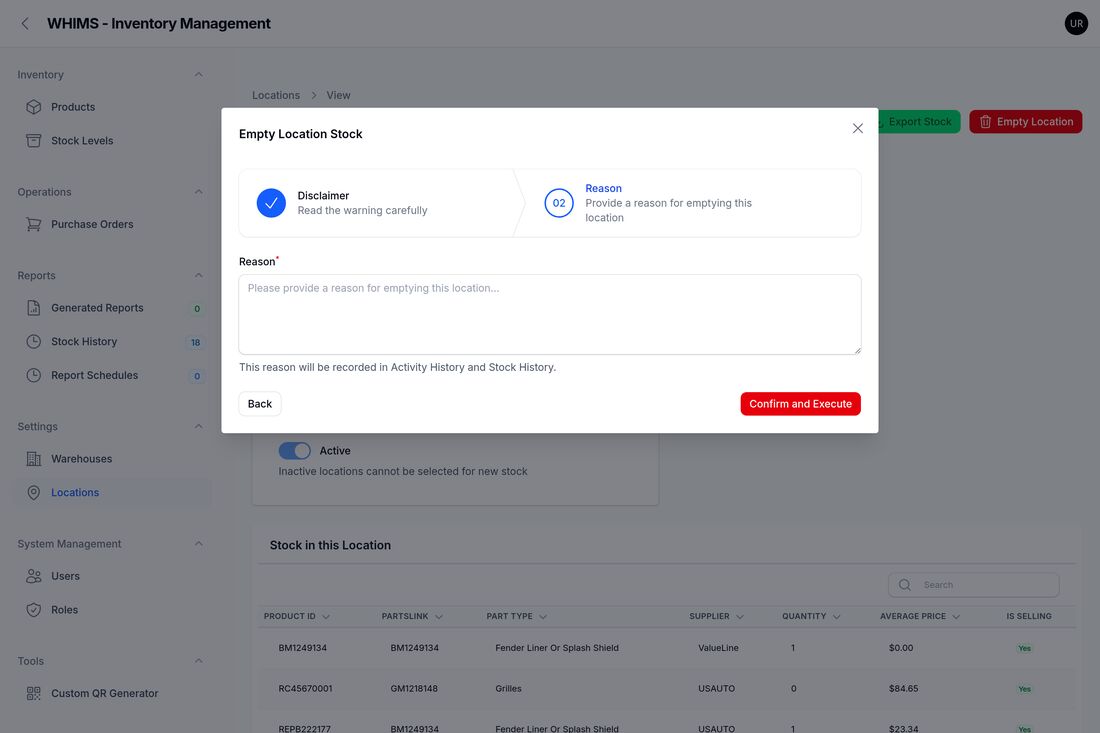
A green Location Emptied Successfully message reports how many products were affected, for example "Set stock to 0 for 8 product(s) in location 1 U." Products that were already at zero are skipped; if the whole shelf was already empty you get "No Stock to Empty" instead and nothing changes.
Use this after a physical count. You type the number you counted, and WHIMS makes the shelf match it — whether that means going up or down.
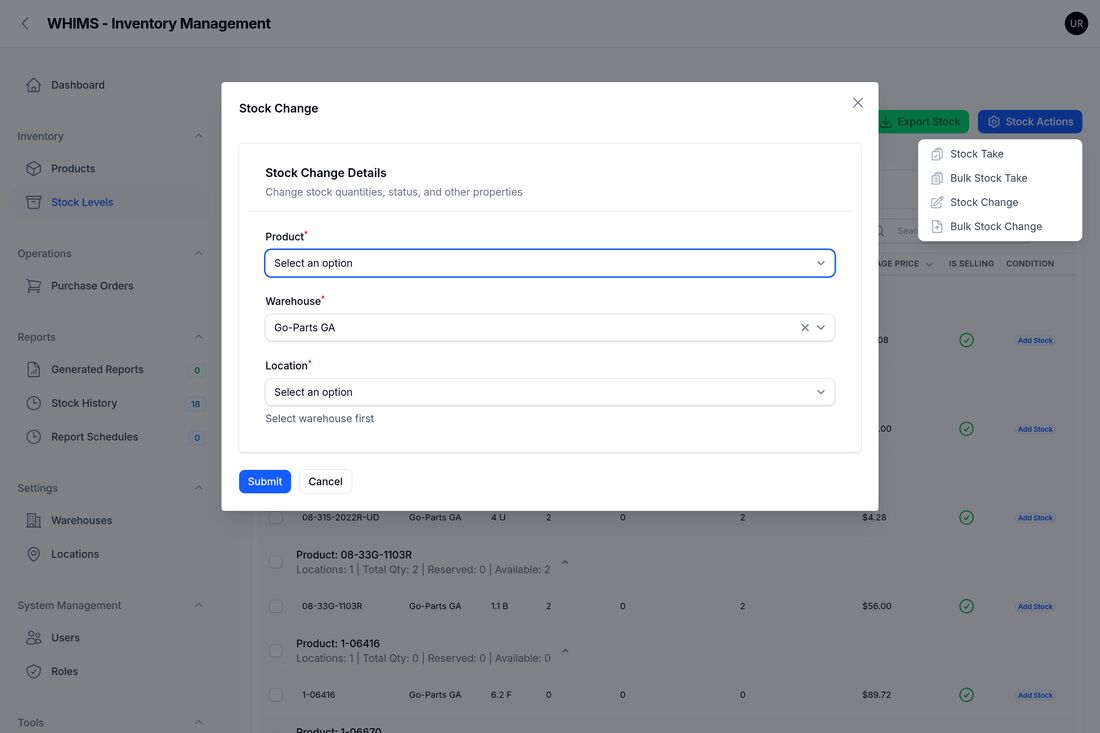
(Qty: 2, Available: 2) so you can see what the system currently believes.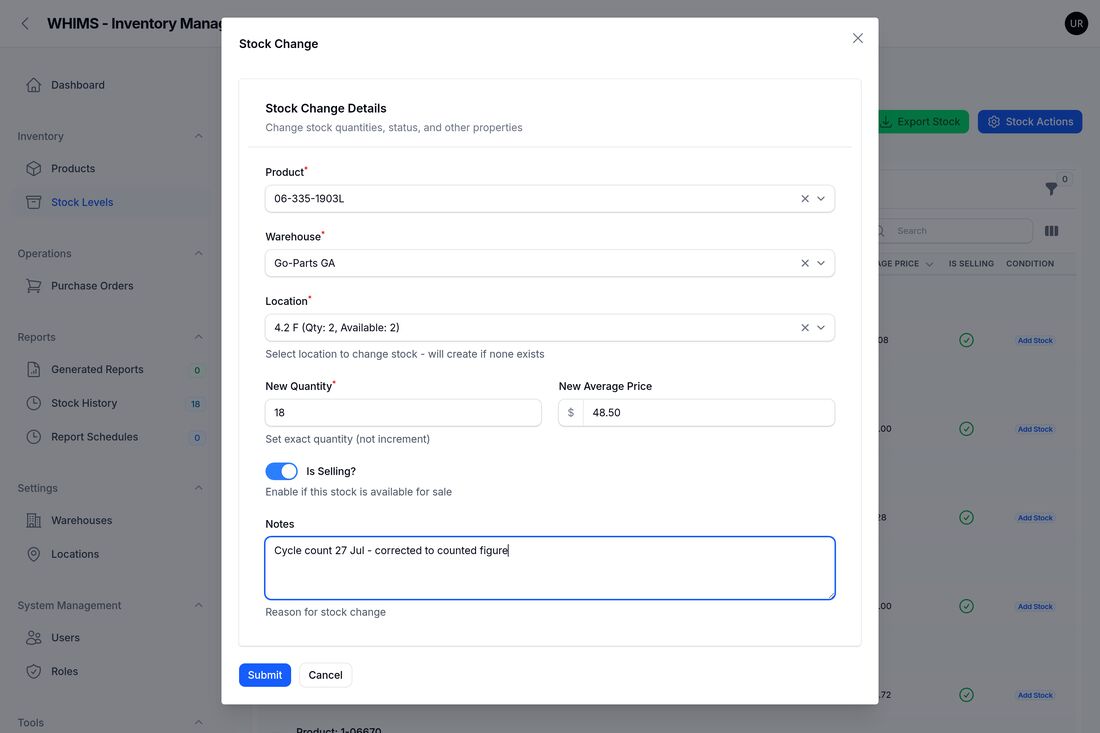
The confirmation reads Stock Changed Successfully — "Stock updated from 2 to 18", or "New stock created with quantity 18" if there was no record on that shelf before.
Because Stock Change replaces the figure, typing the wrong number here has an immediate and total effect. Typing 1 instead of 100 wipes out 99 units. Read the number back to yourself before clicking Submit.
The spreadsheet version of Stock Change — the right tool after a full warehouse count.
new_quantity column is the counted figure, not a difference.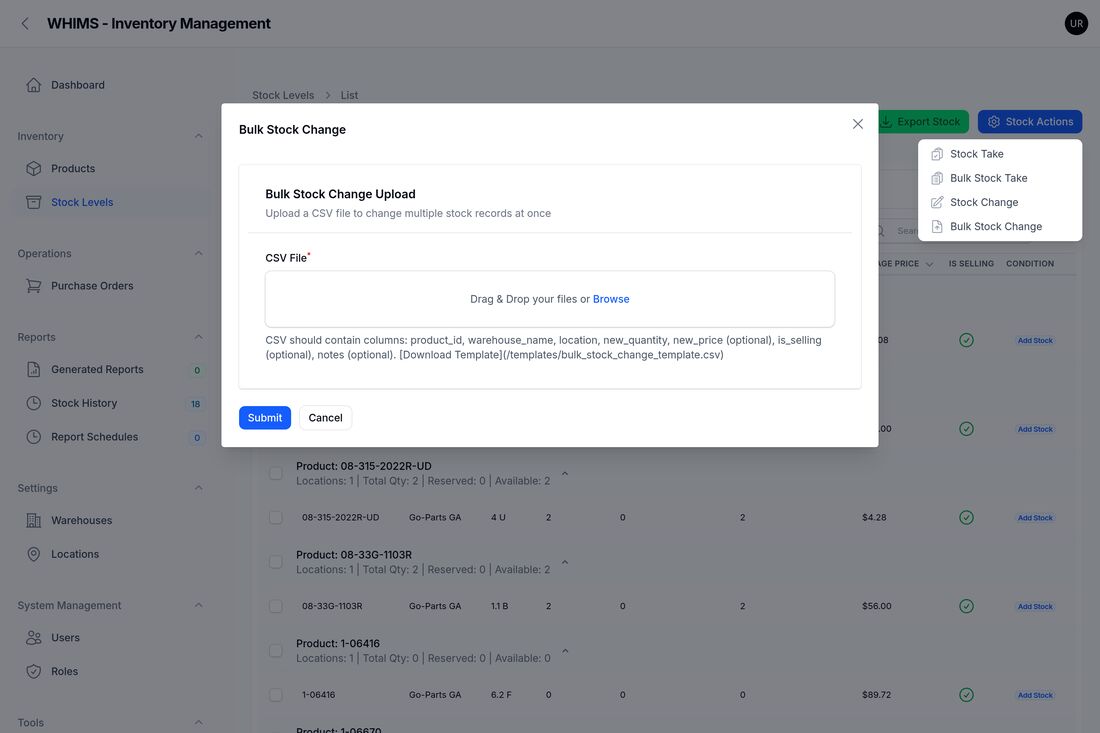
Check your spreadsheet before uploading, especially for blank quantity cells and stray rows at the bottom. A single mistyped row silently overwrites a good stock figure, and the only way back is a second correction.
Never assume. Check every change.
Quantity is everything physically on the shelf. Reserved Quantity is the part of it already promised to orders. Available Quantity is what is left to sell — quantity minus reserved. Your stock movements change Quantity; reserved is managed by the order process and cannot be edited here.
Every movement WHIMS has ever recorded is kept. There are two ways in.
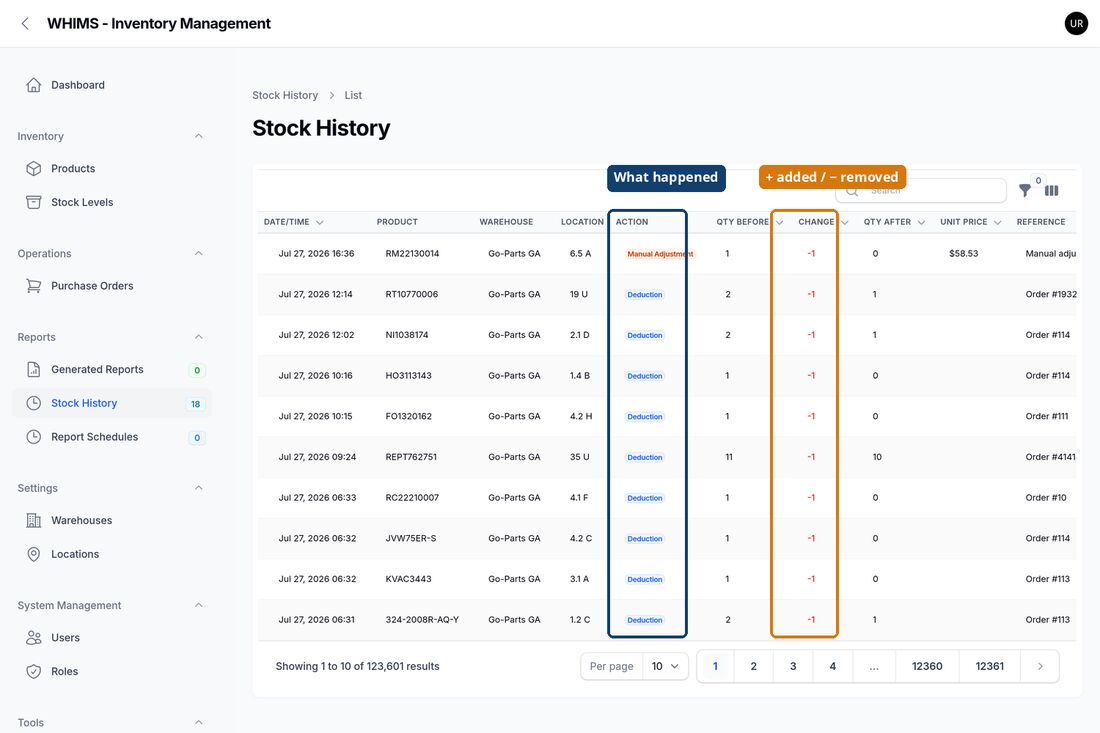
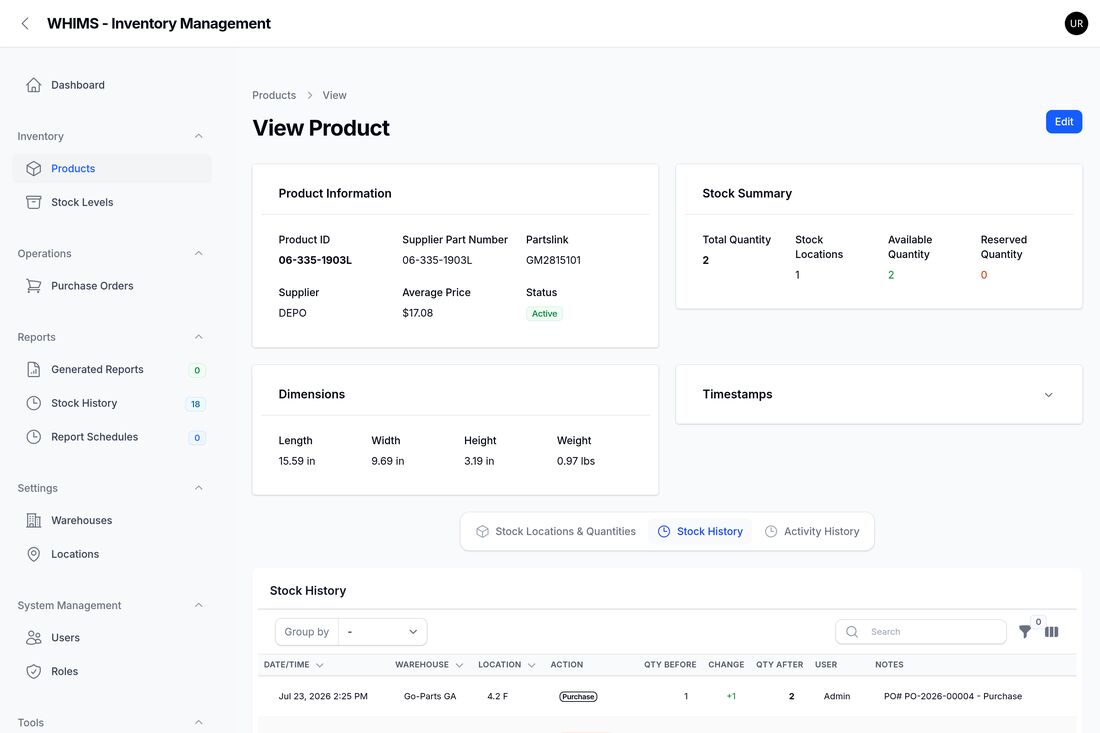
Stock History is permanent and read-only. There are no edit or delete buttons anywhere on these screens, for anyone. That is deliberate — it is what makes the log trustworthy.
Every figure in this guide, where it came from, and what to re-capture if the screens change in a future release.
All screenshots were taken from a live WHIMS system. If a screen is redesigned, use the table below to reproduce the figure: open the screen listed, put it in the state described, and highlight the elements named.
| Fig. | Screen | Address | State to capture / what to highlight |
|---|---|---|---|
| 1 | Sign-in | /admin/login | Empty form. |
| 2 | Dashboard | /admin | Left menu open, Inventory group expanded. |
| 3 | Stock Levels | /admin/stocks | Default view. Mark: Export Stock, Stock Actions, funnel, search box, group heading, Condition column. |
| 4 | Stock Actions menu | /admin/stocks | Dropdown open, all four options visible. |
| 5 | Filter panel | /admin/stocks | Filters expanded via the funnel icon. |
| 6 | Stock Take, empty | /admin/stocks | Form just opened, nothing filled in. |
| 7 | Location dropdown | /admin/stocks | Location list open, showing "(Current Qty: n)". |
| 8 | Stock Take, completed | /admin/stocks | All fields filled. Number the six fields and the Submit button. |
| 9 | Validation messages | /admin/stocks | Submit an empty form. Circle the red messages. |
| 10 | Bulk Stock Take | /admin/stocks | Upload form with the template link visible. |
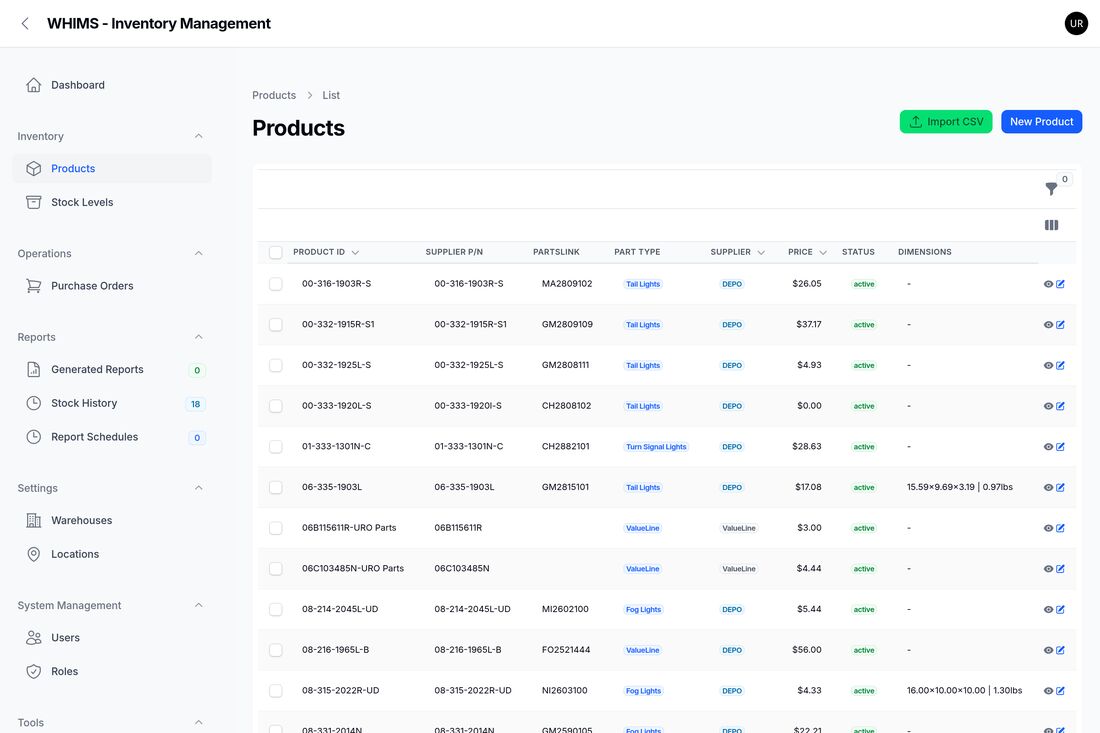
| 11 | Products list | /admin/products | Default view. |
| 12 | Product stock tab | /admin/products/{id} | Stock Locations & Quantities tab. Mark the tab bar and an Adjust button. |
| 13 | Adjust — Add | /admin/products/{id} | Adjust window, Add to Stock selected, all fields filled. |
| 14 | Adjust — Deduct | /admin/products/{id} | Same window, Deduct from Stock selected. |
| 15 | Insufficient Stock | /admin/products/{id} | Submit a deduction larger than the quantity held. Box the red message. |
| 16 | Location page buttons | /admin/locations/{id} | Box Export Stock (green) and Empty Location (red). |
| 17 | Empty Location, step 1 | /admin/locations/{id} | Wizard open on the Disclaimer step. Circle the confirmation tick box. |
| 18 | Empty Location, step 2 | /admin/locations/{id} | Reason step, empty. |
| 19 | Stock Change, empty | /admin/stocks | Form just opened. |
| 20 | Stock Change, completed | /admin/stocks | All fields filled, location showing "(Qty: n, Available: n)". |
| 21 | Bulk Stock Change | /admin/stocks | Upload form. |
| 22 | Stock History | /admin/stock-histories | Default view. Box the Action and Change columns. |
| 23 | Product stock history | /admin/products/{id} | Stock History tab. |
Figures 8, 13, 14, 19 and 20 show completed forms that were never submitted. When re-capturing, fill the form, take the picture, then close the window with Cancel or ✕. Do not click Submit on a live system purely to take a screenshot.
Every box you can type in or choose from, what it does, and what WHIMS will accept.
In the tables below, Yes means the form will not save without it. A red asterisk beside a field name on screen means the same thing.
| Field | Description | Required | Example | Rules |
|---|---|---|---|---|
| Product | The part you are adding stock for. Type to search the catalogue. | Yes | 06-335-1903L | Must be chosen from the list. Searches Product ID, supplier part number, Partslink and description. |
| Warehouse | The site holding the stock. Pre-filled with the first warehouse. | Yes | Go-Parts GA | Changing it clears the Location. |
| Location | The shelf or bin. The list shows what is on each shelf already. | Yes | 4.2 F (Current Qty: 2) | Only appears once a warehouse is chosen. Only shelves in that warehouse are offered. "(No stock)" means a new record is created. |
| Quantity to Add | How many units to add to the shelf — not the new total. | Yes | 25 | Whole number, minimum 1. Default 1. Appears once product and location are set. |
| Unit Price | What this batch cost per unit. Used to recalculate the shelf's weighted average price. | No | 48.50 | Number, 0 or more, two decimal places. Leave empty to keep the current average price. |
| Notes | Why you are adding stock. Written to the permanent history. | No | Received from supplier — delivery note DN-4471 | Free text. Pre-filled with "Stock take" — always replace it with something meaningful. |
| Field | Description | Required | Example | Rules |
|---|---|---|---|---|
| Adjustment Type | Whether the units are going on or off the shelf. | Yes | Add to Stock | One of two choices. Defaults to Add to Stock. |
| Quantity | How many units to add or remove. | Yes | 12 | Whole number, minimum 1. Always positive — the direction comes from Adjustment Type. A deduction that would take the shelf below zero is refused. |
| Reason / Comment | Why the shelf is changing. | Yes | Damaged during handling — written off | Free text, compulsory. Stored in the history against this movement. |
The window heading names the shelf (for example "Adjust Stock — 4.2 F") and the line beneath shows the quantity held right now. Neither can be typed into — they are there to confirm you picked the right row.
| Field | Description | Required | Example | Rules |
|---|---|---|---|---|
| Product | The part being corrected. | Yes | 06-335-1903L | Chosen from the list. |
| Warehouse | The site. | Yes | Go-Parts GA | Changing it clears the Location. |
| Location | The shelf. The list shows "(Qty: n, Available: n)". | Yes | 4.2 F (Qty: 2, Available: 2) | Only shelves in the chosen warehouse. "(No stock — will create new)" means a new record is created. |
| New Quantity | The figure the shelf should hold after saving — what you counted. | Yes | 18 | Whole number, 0 or more. Replaces the existing figure. Negatives are not accepted. |
| New Average Price | Replaces the average price for this shelf. | No | 48.50 | Number, 0 or more. Leave empty to keep the current price. |
| Is Selling? | Whether this stock may be sold. | No | On | Switch, on by default. Turn off to hold stock back from sale. |
| Notes | Why the figure changed. | No | Cycle count 27 Jul — corrected to counted figure | Free text. Strongly recommended even though it is not enforced. |
| Field | Description | Required | Rules |
|---|---|---|---|
| I Confirm I have downloaded the Stock CSV | Your acknowledgement that you have a record of the shelf before it is wiped. | Yes | Must be ticked. "You must confirm that you have downloaded the Stock CSV before proceeding." |
| Reason | Why the whole shelf is being cleared. Recorded against every product on it. | Yes | Free text. Written to both Stock History and the product's Activity History. |
Download the blank template from the upload window rather than building the file yourself — the column headings must match exactly.
| Column | Required | Example | Notes |
|---|---|---|---|
product_id | Yes | TEST-001 | Must match a Product ID already in WHIMS. |
warehouse_name | Yes | Main Warehouse | The warehouse name, spelled exactly as in WHIMS. |
location | Yes | A-01-01 | Must exist inside that warehouse. |
quantity_to_add | Yes | 10 | Whole number to add to the shelf. |
unit_price | No | 99.99 | Recalculates the weighted average price when supplied. |
notes | No | Stock replenishment | Falls back to the Default Notes box if left empty. |
| Column | Required | Example | Notes |
|---|---|---|---|
product_id | Yes | TEST-001 | Must match a Product ID already in WHIMS. |
warehouse_name | Yes | Main Warehouse | Exact warehouse name. |
location | Yes | A-01-01 | Must exist inside that warehouse. |
new_quantity | Yes | 100 | The final figure for the shelf. Overwrites whatever was there. |
new_price | No | 99.99 | Replaces the average price when supplied. |
is_selling | No | true | true or false. |
notes | No | Stock adjustment | Reason for the change. |
| Column | What it shows |
|---|---|
| Product | The Product ID. Click it to open the product page. |
| Warehouse | The site holding this stock. |
| Location | The shelf or bin. |
| Quantity | Units physically on that shelf. |
| Reserved Quantity | Units already promised to orders. Not editable here. |
| Available Quantity | Quantity minus reserved — what can still be sold. |
| Average Price | Average cost per unit on this shelf. |
| Is Selling | Green tick if this stock may be sold, red cross if held back. |
| Condition | Intended to show New / Used / Refurbished / Damaged. Currently displays "Add Stock" on every row — see the warning in section 3.3. Use the Condition filter instead. |
| Created at / Updated at | Hidden by default. Switch them on with the columns icon beside the funnel. |
| Column | What it shows |
|---|---|
| Date/Time | When the movement was recorded. Set by the system. |
| Product | The part. Click to open it. |
| Warehouse / Location | Where the movement happened. |
| Action | The kind of movement — Manual Adjustment, Stock Received, Sold, Physical Count, Transfer In/Out and so on. |
| Qty Before | What the shelf held immediately before. |
| Change | The size and direction. Green + for in, red − for out. |
| Qty After | What the shelf held immediately after. |
| Unit Price | Price per unit applied to this movement. |
| Reference | The paperwork behind it — an order number, or "Manual adjustment" when a person typed it. |
| User | Who did it. Shows "System" for automatic movements. |
| Notes | The reason typed at the time. |
Some things people expect to type are recorded automatically. You will not find a box for these, and that is deliberate — it stops them being back-dated or mis-attributed.
| Field | How it is set |
|---|---|
| Transaction date and time | Stamped from the server clock the moment you click Submit. It cannot be changed or back-dated. |
| User | Taken from whoever is signed in. Another reason never to share a login. |
| Quantity before / after | Calculated by WHIMS from the shelf's figure at that instant. |
| Available Quantity | Always quantity minus reserved. Never typed. |
| Product average price | Recalculated across all shelves whenever any stock record changes. |
| Reference | Set to "Manual adjustment" for the Adjust window, or to the order that caused an automatic movement. |
WHIMS does not use the word "SKU". The equivalent is Product ID. Parts also carry a supplier part number and a Partslink number, and you can search on any of them.
The rules WHIMS enforces, and the rules your team is expected to follow.
| Rule | What it means in practice |
|---|---|
| Stock can never go below zero | A deduction larger than the quantity on the shelf is refused outright with the message "Insufficient Stock", and nothing is saved. Stock Change will not accept a negative figure either. |
| Quantities must be whole numbers | WHIMS counts units, not fractions. 2.5 is not accepted. |
| Added quantities must be at least 1 | Stock Take and the Adjust window both require a minimum of 1. Stock Change accepts 0, because "the shelf is empty" is a legitimate count. |
| One stock record per product, per location | The same part cannot have two separate records on the same shelf. WHIMS finds the existing record and updates it, or creates the first one. |
| Locations belong to warehouses | You can only pick a shelf that exists in the warehouse you selected. Change the warehouse and the location resets. |
| Available = Quantity − Reserved | Calculated by the system and never typed. Reserved units belong to orders and cannot be edited from these screens. |
| Every movement is logged | Product, warehouse, location, before, change, after, unit price, your user account, the timestamp and your reason. |
| History cannot be edited or deleted | There are no edit or delete buttons on Stock History for any user. |
| Nothing saves halfway | Each movement is written as a single unit of work. If anything fails partway, the whole movement is rolled back rather than left half-applied. |
| Emptying a location skips empty shelves | Only products with a quantity above zero are touched. If the whole shelf is already empty you are told "No Stock to Empty". |
| Average price is recalculated automatically | Adding stock with a unit price produces a new weighted average for the shelf; the product's overall average price is then recalculated across all its shelves. |
| All stock screens are open to every signed-in user | The current release does not restrict these buttons by role. See section 2.1. |
These are not enforced by the software. They are what separates a stock system people trust from one they work around.
WHIMS does not detect duplicates. Submitting the same Stock Take twice adds the quantity twice. Uploading the same spreadsheet twice applies every row twice. There is no "you have already done this" prompt.
If you are not sure whether something went through — the page seemed slow, the browser was refreshed, you clicked twice — check Stock History before repeating it. That check takes ten seconds; unpicking a double entry takes considerably longer.
Note that duplicate Stock Change submissions are harmless: setting a shelf to 18 twice still leaves 18. It is Stock Take, Bulk Stock Take and the Adjust window that accumulate.
Every action described in this guide writes a permanent Stock History entry containing:
Empty Location writes twice — once to Stock History and once to the product's Activity History, which additionally records the network address the request came from.
What WHIMS checks before it saves, the exact message you will see, and how to clear it.
Validation happens before anything is written. If you see a red message, your stock has not changed — you have lost nothing but a moment.
| Message on screen | Why | How to fix it |
|---|---|---|
| "The product field is required." | No product was chosen. | Click the Product box, type part of the ID, and pick from the list. |
| "The warehouse field is required." | No warehouse chosen. | Pick the site. It is usually pre-filled — check it was not cleared. |
| "The location field is required." | No shelf chosen. Often happens after changing the product or warehouse, which clears the location. | Pick the shelf again, then re-check the rest of the form. |
| "The quantity field is required." | The quantity box is empty. | Type a whole number. |
| "The reason field is required." | The Adjust window and the Empty Location wizard both insist on a reason. | Type what happened and how you know. |
| "You must confirm that you have downloaded the Stock CSV before proceeding." | The confirmation box in the Empty Location wizard was not ticked. | Click Export Stock first, then tick the box. |
| Situation | What happens | How to fix it |
|---|---|---|
| Zero or a negative number in Stock Take or Adjust | Refused — the minimum is 1. | To reduce stock, use Deduct from Stock rather than a negative number. |
| A negative number in Stock Change | Refused — the minimum is 0. | Type the counted figure. If the shelf is empty, type 0. |
| A decimal such as 2.5 | Refused or rounded by the browser. | Enter whole units only. |
| Letters or symbols in a number box | The box will not accept them. | Digits only — no commas, no "pcs", no spaces. |
The single most common refusal. It appears as a red message in the top-right corner:
| Title | Message |
|---|---|
| Insufficient Stock | "Cannot deduct 999999 units. Only 2 available." |
The number after "Only" is what is actually on that shelf. Either reduce your quantity to that figure or below, or — if you are certain more units left the shelf than WHIMS ever knew about — the shelf figure itself was wrong. Count it and use Stock Change to set the true figure, with a reason explaining the discrepancy.
Each row is checked on its own. Good rows are saved; bad rows are reported. The summary message lists up to five problems.
| Message | Cause and fix |
|---|---|
| "Product TEST-001 not found" | The product_id does not match any part in WHIMS. Check spelling, leading and trailing spaces, and that Excel has not converted the ID into a number or date. |
| "Warehouse Main Warehouse not found" | The warehouse_name does not match. Copy the name exactly as it appears in Settings → Warehouses. |
| "Location A-01-01 not found in warehouse Main Warehouse" | The shelf does not exist in that warehouse. Either you named the wrong warehouse or the location needs creating first. |
| "Row error for product …" | Something else on that row is unusable — most often a blank or non-numeric quantity. |
| "Failed to process CSV: …" | The whole file could not be read. Usually the wrong file type, missing heading row, or headings that have been renamed. Start again from the downloaded template. |
After a partial upload, delete the rows that succeeded before uploading the corrected file. Otherwise a Bulk Stock Take will add those quantities a second time.
| Message | Meaning |
|---|---|
| No Stock — "There are no stock records in this location to export." | You clicked Export Stock on an empty shelf. Nothing to download. |
| No Stock to Empty — "There are no products with stock greater than 0 in this location." | The shelf is already clear. Nothing was changed. |
| Error — "Failed to complete stock take: …" | An unexpected system fault. Nothing was saved. Note the wording and contact support. |
| Error — "Failed to change stock: …" | As above, for Stock Change. |
| Error — "Failed to empty location: …" | As above, for Empty Location. The shelf is left exactly as it was. |
What you see, why it happens, and what to do about it.
| What you see | Likely cause | What to do |
|---|---|---|
| Nothing found when searching for a product | The part is not in WHIMS, or you are searching on a number WHIMS does not hold. | Try the supplier part number or Partslink number, and try a shorter fragment. If it is still missing, the product has not been created — ask whoever maintains the catalogue. Do not substitute a similar part. |
| "The location field is required." after you had already chosen one | You changed the product or warehouse afterwards, which clears the location. | Choose the location again. Always work top to bottom. |
| The Location list is empty | No warehouse chosen yet, or that warehouse has no locations set up. | Pick a warehouse first. If it is still empty, locations need creating under Settings → Locations. |
| Insufficient Stock — "Cannot deduct n units. Only m available." | You tried to remove more than the shelf holds. | Reduce the quantity to m or less. If you believe the shelf figure is wrong, count it and use Stock Change instead. |
| Quantity went up when you expected it to go down | Add to Stock was left selected in the Adjust window. | Make a matching deduction for twice the quantity, with a reason noting the correction. Both entries remain in the history. |
| The new total is higher than expected | Stock Take adds — you typed the intended final figure instead of the amount to add. | Deduct the difference from the product page, or use Stock Change to set the correct final figure. |
| Red messages under several fields | Required fields are empty. | Fill in every field marked in red, then Submit again. Nothing was saved. |
| Permission denied / the page will not open | Your session has expired, or your account is not active. | Sign in again. If that fails, contact your administrator — do not use a colleague's login. |
| The screen hangs or times out after Submit | Connection dropped, or the server was busy. | Do not click Submit again. Refresh the Stock Levels screen and check the quantity, or look at Stock History. Only repeat the action if it definitely did not go through. |
| Save failed — "Failed to complete stock take: …" | A system fault. The movement was rolled back. | Note the exact wording and the time, then try once. If it fails again, contact support with those details. |
| You clicked Submit twice | Slow response, impatient second click. | Check Stock History for two identical entries. If there are two, deduct the extra quantity with a reason such as "Reversing duplicate entry". |
| The bulk upload reports errors | One or more rows name something WHIMS cannot find. | Read the listed rows, fix them, delete the rows that already succeeded, and upload again. |
| The quantity has not changed after saving | The page is showing a cached view, or a filter is hiding the row. | Refresh with F5 and clear any filters. If it is genuinely unchanged, check Stock History to see whether the movement was recorded at all. |
| The Condition column says "Add Stock" on every row | A known display fault on the Stock Levels screen. | Ignore the column and use the Condition filter instead. Already reported to the systems team. |
| Available is lower than Quantity | Some units are reserved against orders. This is normal. | Nothing to fix. Reserved units cannot be edited from these screens. |
| You emptied the wrong location | Empty Location was run on the wrong shelf. | Open the CSV you exported beforehand and restore each product with Bulk Stock Change. Tell your supervisor immediately — this is why the export step is compulsory. |
Include: the exact message, the Product ID, the warehouse and location, what you typed, the time, and a screenshot if you can. "Stock Take failed" alone cannot be investigated; the details above can be traced in seconds.
The questions people actually ask in their first month.
Whenever units arrive on a shelf outside the normal purchase-order process, or you find units the system does not know about. Goods delivered without paperwork, returns put back on the shelf, or a part being placed on a new shelf for the first time. Use Stock Take, or Adjust → Add to Stock.
Whenever units physically leave a shelf and no order accounts for it — damaged, scrapped, lost, stolen, used internally, or given away as samples. Use Adjust → Deduct from Stock. Do not use it for ordinary sales; those are handled by the order process.
After you have physically counted a shelf and the system disagrees with what you found. Use Stock Change and type the number you counted. You do not need to work out the difference — WHIMS does that for you and records it as the change.
Stock Take adds to what is there. Stock Change replaces it. If a shelf holds 2 and you want 18: Stock Take needs 16, Stock Change needs 18. When you have counted a shelf, Stock Change is almost always the right tool.
No. Stock History is permanent and has no edit or delete buttons for anyone. You correct a mistake by making a second, opposite entry with a reason that explains it. Both entries stay visible — which is exactly what an auditor expects to see.
Nothing dramatic, as long as you fix it promptly. Work out the difference and correct it: add the shortfall with Adjust → Add to Stock, remove the excess with Deduct from Stock, or set the shelf to the right figure with Stock Change. Always say in the reason that you are correcting an earlier entry.
Three ways, in increasing detail. Read the green confirmation message — it states the new total. Go to Inventory → Stock Levels, search for the product and read the Quantity column. Or open Reports → Stock History and check the newest entry shows your name, your reason and the expected before/after figures.
Count the shelf first — do not adjust from memory. Then open the product's Stock History tab and read the recent movements; the cause is often obvious. If the difference is small and clearly explained, correct it with Stock Change and a full reason. If it is large, unexplained, or looks like it might be theft or a system fault, report it before changing anything.
You never need one. Quantities are always positive; the direction comes from the choice you make — Add to Stock or Deduct from Stock.
No. It simply means this part has never been held on that shelf. Continuing creates the first stock record for it, which is exactly right when you are putting a part somewhere new. Just make sure you meant that shelf.
No. If you leave it empty the shelf keeps its existing average price. Enter one when you know what this batch actually cost — WHIMS then blends it with the existing stock to produce a new weighted average, which keeps your inventory valuation honest.
Reserved units are already promised to orders. Available is quantity minus reserved. You cannot change reserved figures from these screens — they are managed by the order process.
Technically yes, but avoid it. Each save is applied to the figure as it stands at that moment, so two people adjusting the same shelf within minutes will produce a result neither expects. Agree who is handling which aisle before you start.
Check Stock History for two identical entries a few seconds apart. If there are two, deduct the extra quantity with the reason "Reversing duplicate entry". Note that duplicate Stock Change entries are harmless — setting a shelf to 18 twice still leaves 18.
No. That is why the wizard makes you confirm you have downloaded the CSV first. If you run it by mistake, use that spreadsheet with Bulk Stock Change to restore each product, and tell your supervisor.
A known display fault on the Stock Levels screen. It is not a button and it is not the real condition. Use the Condition filter in the filter panel instead. It has been reported.
Habits that keep stock figures trustworthy.
One page. Print it and keep it by the terminal.
Stock Take ADDS to what is there.
Stock Change REPLACES it.
Shelf has 2, you want 18 → Stock Take: 16 · Stock Change: 18.
Green = saved. Read the new total.
Red = refused, nothing saved.
"Insufficient Stock" → you tried to remove more than the shelf holds.
"The … field is required." → fill in the red boxes.
• Share a login.
• Delete a stock record to remove units.
• Re-submit when unsure — check Stock History first.
• Run Empty Location without exporting first.
• Count before adjusting.
• Write a reason a stranger could follow.
• Read the confirmation message.
• Report large differences the same day.
| Where to go | Address |
|---|---|
| Stock Levels | /admin/stocks — Inventory → Stock Levels |
| Products | /admin/products — Inventory → Products |
| Stock History | /admin/stock-histories — Reports → Stock History |
| Locations | /admin/locations — Settings → Locations |
Inventory Systems / IT Helpdesk — telephone [insert number] · email
[insert address] · hours [insert].
Have ready: the exact message, Product ID, warehouse and location, what you typed, and the time.
Where everything fits together, and the checks to run before every save.
| Notice a difference delivery, damage, count |
› | Count the shelf confirm what is really there |
› | Choose the tool add · remove · adjust |
| Fill the form product, shelf, quantity, reason |
› | Submit and read the confirmation message |
› | Verify Stock Levels · Stock History |
Three tools cover almost everything you will meet:
Two more handle volume and clear-outs: Bulk Stock Take and Bulk Stock Change apply a spreadsheet in one go, and Empty Location zeroes an entire shelf after you have exported it.
Behind all of them sits the same principle: every change is attributed, dated, explained, and permanent. Nothing in WHIMS quietly rewrites the past — which is what makes the numbers worth trusting in the first place.
If you are ever unsure which tool to use, stop and ask. A thirty-second question costs far less than a correction that has to be explained at the next stock audit.
Words used in WHIMS and in this guide.
| Term | Meaning |
|---|---|
| Available Quantity | Quantity minus Reserved Quantity — what can still be sold. |
| Average Price | The average cost of one unit on a shelf. Recalculated when you add stock with a unit price. |
| Bulk | Doing something for many products at once by uploading a spreadsheet. |
| Condition | New, Used, Refurbished or Damaged. Filterable, though the Stock Levels column does not currently display it correctly. |
| CSV | A plain spreadsheet file. Excel can save one with File → Save As → CSV. |
| Location | A shelf, bin or rack position inside a warehouse. Stock is counted per location. |
| Partslink | An industry part-numbering scheme. Searchable in WHIMS. |
| Product ID | The code identifying a part in WHIMS. The equivalent of a SKU. |
| Reserved Quantity | Units already promised to orders. Not editable from the stock screens. |
| Stock Change | The tool that replaces a shelf's quantity with a figure you type. |
| Stock History | The permanent, read-only log of every movement. |
| Stock record | One product on one shelf, with its quantity, price and status. |
| Stock Take | In WHIMS, the tool that adds units to a shelf. |
| Sub-location | An optional finer position within a location. |
| Warehouse | A physical site. Contains locations. |
| Weighted average | A price averaged across quantities, so a large batch influences it more than a small one. |